
2001 – Everyone knows how to type, and many typists use Microsoft Word, since it is a standard for word processing. Word has plenty of unused and unknown features that facilitate the writer’s work. Whether they help to improve your writing, make word processing easy on the eye, or provide powerful editing techniques, those features make writing easier.
- Description: Tips for writing and editing
Difficulty level: Intermediate
System version: Mac OS 8 to Mac OS 9.1
Required: Microsoft Word (98 or 2001 recommended)
Blue Background
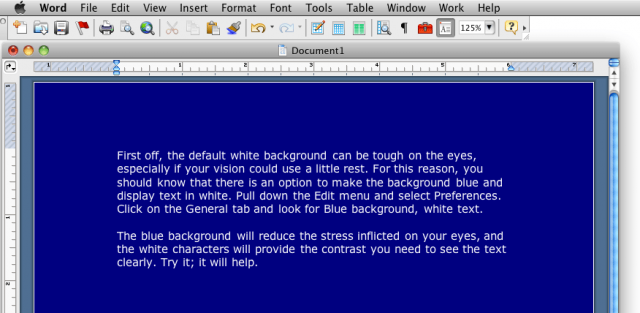
First off, the default white background can be tough on the eyes, especially if your vision could use a little rest. For this reason, you should know that there is an option to make the background blue and display text in white. Pull down the Edit menu and select Preferences. Click on the General tab and look for Blue background, white text.
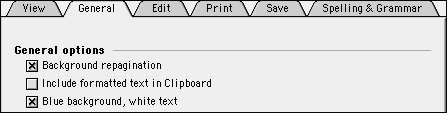
The blue background will reduce the stress inflicted on your eyes, and the white characters will provide the contrast you need to see the text clearly. Try it; it will help.
Blue text, white background in Word 2004.
Language Tools
As Word is a program with a large number of features, language tools are abundant. There is the AutoCorrect feature, spell checking and grammar checking while you type, the level of language, etc.
Before you start writing, your first step should be to customize the language preferences. Go to the Edit menu and select Preferences. Click on the Spelling & Grammar tab. Once there, make sure to customize the spelling and grammar options for the writing you plan to do.
I strongly suggest that you have Check spelling as you type and Check grammar as you type turned on. When you write, Word will check your spelling and grammar as you write and underline potential mistakes. It will underline spelling errors in red and grammar errors in green. Control-clicking on underlined words will allow you to see spelling suggestions and grammar explanations as Word tries to catch your mistakes. You can always choose Ignore to pay no attention to a particular wording or spelling, and you can always select Add from the contextual menu (remember, control-click) to add words to your dictionary.
In the Spelling & Grammar preferences, you should also see the Writing style option. This is a great tool for modifying Word to match your writing style. You can choose between casual, standard, formal, technical, and custom. Standard is what most people will use, but if you want your writing to be tighter for a letter or a report, you should choose Formal. Technical is your choice if you write documents that contain terminology related to a specific work field.
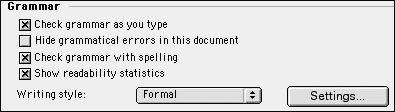
Click on Settings for more options to adjust a writing style.
Still in the language tools, you should consider using and customizing the AutoCorrect features. To put it simply, AutoCorrect scans your writing as you type it; it detects typos and corrects them. It will also format some characters automatically for you.
Go to the Tools menu, and select AutoCorrect.
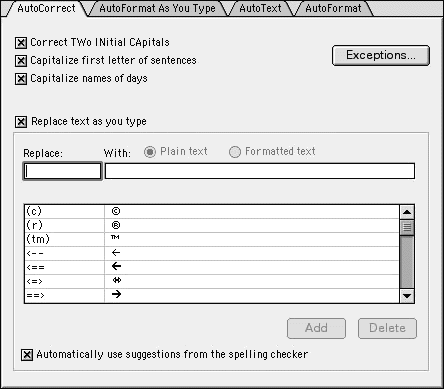
This windows has four tabs. The AutoCorrect tab will offer to replace words as you type them. Common mistakes such as typing two initials and capitalization can be corrected for you. Then there are words and symbols that Word wants to detect for you. For example, if you type corection (with one r instead of two), Word will automatically replace it with correction. You can easily scroll through the list of words and add your own.
You can also – and this is the best part – delete those you do not want Word to change. For example, Word detects smiley faces such as :-) and formats them into graphical smileys. I deleted all the corrections for smiley faces, since the graphical smileys from Word are not compatible with HTML when I write for the Web.
The AutoFormat As You Type tab is great for turning off the annoying formatting that Words tries to insert for quotes, bulleted lists, and other things. If you want to do all this stuff manually, or you simply want none of it, uncheck all the formats that Word detects as you write. The AutoFormat tab offers similar options.
Finally, the AutoText tab conceals a great tool. AutoText detects commonly used names, words, and expressions, and it offers to insert them automatically for you if you hit the Return key. AutoText includes all the names and groups from your address book if you use Outlook Express or Entourage for email and personal information management. Again, you can add and delete the names and words that you want or do not want to include automatically.
If you write a document that has limits or minimum requirements in terms of words, characters, lines, or pages, then you definitely have to look at the Word Count. Go to the Tools menu and select Word Count.
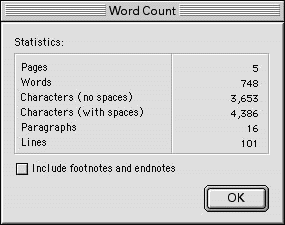
It will give you a few statistics. In addition, you should note that Word 2001 gives you a word count in the status bar.
The word count is the last number on the right.
Before we move on to another feature, remember that you can set the language of a document. If you are bilingual and write in different languages, it is great to know that changing the language of a document will prevent Word from getting in your way with English when you write. It will even make suggestions for spelling and grammar mistakes.
With all the components installed properly, Word will handle languages just fine. Imagine the expression I made when I saw the English version of Word provide grammar tips in French once I switched to French Canadian!
Track Changes
A great editing tool, Track Changes allows you to highlight changes as you write. This is great if several people are working with the same file. Think of a group report at work or a project at school. Track Changes lets you keep track of changes in the document as it progresses and insert comments. It also lets you know who made the changes and when. It colors the modified and deleted text to make it stand out. To turn the feature on, go to the Tools menu and go to the Track Changes item. In its sub-menu, select Highlight Changes.
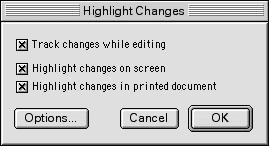
Once there, click on Track changes while editing. Click on OK. If you wish, you can modify the feature’s editing colors by clicking on the Options button before clicking on OK.
Once Track Changes is active, you can simply accept and reject changes by control-clicking on the colored text, or you can go back to the Tools menu, go to Track Changes and select Accept or Reject Changes. From there, you can peruse the document for changes or accept and reject everything at once.
All right, folks, we are done for this week.
Further Reading
- Personalize and Customize Microsoft Word. A guide to making Microsoft Word work your way.
Keywords: #microsoftword #word98 #word2001 #wordformac #classicmacos
Short link: http://goo.gl/pndx6D
