
The Mac IIci took the popular Mac IIcx design and replaced its 16 MHz logic board with a 25 MHz 68030-based design. New features included built-in video and a Level 2 (L2) cache socket. The IIci was the first Mac with “32-bit clean” ROMs.
 As with the Mac IIcx, you need only to remove the cover to access the SIMM sockets.
When upgrading, be careful not to damage the SIMM sockets, especially if you are removing memory. Although the IIci shipped with 1 MB of memory, odds are pretty good it’s already been upgraded beyond that point.
Looking at the motherboard with the connectors to the rear and power supply in the right rear, you will see eight SIMM sockets. The four on the right are Bank A. The four on the left are Bank B. Memory must be installed in sets of four matching 30-pin SIMMs per bank rated at 80ns or faster. (If you are upgrading a IIcx to a IIci, be sure to check RAM speed, since the IIcx works only requires 120ns or faster SIMMs.)
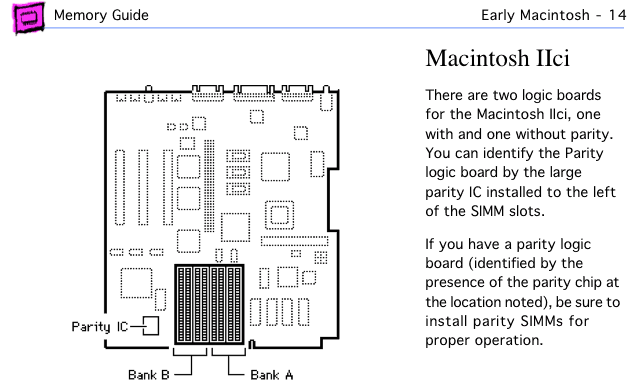
There is a less common version of the Mac IIci that uses parity memory, which has an extra data line. If you have a Mac IIci with a parity logic board, you must install parity memory.
Mac IIci page from Apple Memory Guide.
The Mac IIci accepts more SIMM capacities than any previous model – 256 KB, 512 KB, 1 MB, 2 MB, 4 MB, 8 MB, and 16 MB – leaving a multitude of upgrade options. Contrary to earlier Mac II models, which do not have onboard video, higher capacity SIMMs should always be in Bank B, because Bank A is used for internal video. (Apple states this in the Apple Memory Guide but does not follow this advice when listing memory configurations.) Bank A must always be populated.
A 1 MB configuration has four 256 KB SIMMs in Bank A. This was standard from the factory.
A 2 MB configuration has 256 KB SIMMs in all eight sockets or four 512 KB SIMMs in Bank A.
A 3 MB setup has four 512 KB SIMMs in Bank B and four 256 KB SIMMs in Bank A.
A 4 MB configuration can have four 1 MB SIMMs in Bank A or 512 KB SIMMs in all eight sockets.
For 5 MB, install 256 KB SIMMs in Bank A, 1 MB SIMMs in Bank B.
For 6 MB, install 512 KB SIMMs in Bank A, 1 MB SIMMs in Bank B.
To reach 8 MB, you should have 1 MB SIMMs in each of the eight sockets. You can also use four 2 MB SIMMs in Bank A to achieve 8 MB.
For configurations of 9MB, 10 MB, or 12 MB, install 2 MB SIMMs in Bank B and 256 KB, 512 KB, or 1 MB SIMMs in Bank A, respectively.
You can reach 16 MB with four 4 MB SIMMs in Bank A or 2 MB SIMMs in all eight sockets.
- The list could go on, but I’m sure you see the picture already. If there is only a single bank of memory, it must be in Bank A. If there are two banks, the higher capacity SIMMs should be in Bank B. You can install up to 128 MB of RAM in the IIci.
After installing memory and reconnecting your drives, boot your Mac with extensions off (hold down the shift key) and check “About This Macintosh” under the Apple menu. If it doesn’t give the expected number, you should reseat your memory.
Once you know the upgrade is a success, pop on the lid and enjoy the extra memory. I suggest you increase the size of the disk cache for better performance.
Keywords: #maciici #macntoshiici
Short link: http://goo.gl/KWn6az
searchword: maciicimemoryupgrade
