
Occasionally a teacher discovers that they ask the same students to answer questions over and over because some students are more enthusiastic, while others are content to melt into the background. In order to bring more students into the discussion, I ask students at random – selected by a dice roll or by computer – to respond, just to make sure I’m getting to everyone.
Today’s Agenda
Creating a Random Number Database in AppleWorks
This tutorial will have you create a little AppleWorks database that picks a random number from 1 to 100 and displays it on the screen. Along the way you will also learn about how you can create macros – a memorized series of commands – in AppleWorks. (Did you even know AppleWorks had macros?)
This tutorial is based on AppleWorks 5 and ClarisWorks 4, but from what I’ve seen it should work pretty well for other versions, including 6.
1. Open AppleWorks and choose Create New Document, and select Database from the list.
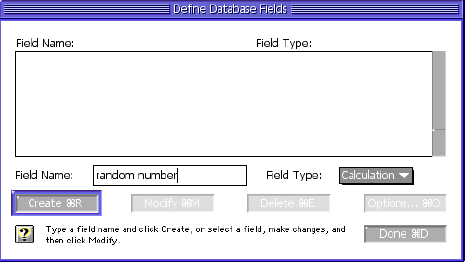
2. When you do this, a dialog automatically appears that assumes you are ready to enter the fields for the database. A database field is like a blank on an index card that always requires the same kind of information. The title of a book on an old-fashioned library card catalog is an excellent example.
In this dialog, enter Random number and set the Field Type to Calculation. Then click Create.
This tells the computer to select a random number from 1 to 100, integers only.
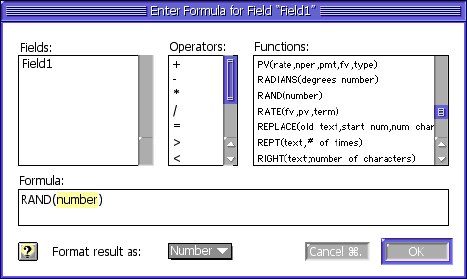
Using FileMaker Pro, you could set up a related database with student names in it and have the name of the student come up as a result of this random selection, but that’s a topic for another day.
4. Now you have a database that will generate a new random number every time you create a new record. The rest of our steps are merely cosmetic, to make the random number appear easy to read when the database is displayed on a monitor, television scan converter, or projector (see last week’s column).
Under the Layout menu, choose Layout. This switches from the Browse mode (where you can flip through the index cards) to the Layout mode (where you can design the cards).
Once in Layout mode, select and drag the line underneath the random number field to make the body of the layout larger. You can select the line when the cursor changes from an arrow to a short horizontal line with arrows on top and bottom.

5. Change the size of the Random Number field by selecting a new font size – something 40 points or larger, depending on the resolution you have set your screen for. Pick a nice font if you like.
6. Add a background border or title using the drawing tools.
7. Next, switch back to Browse mode to see what your finished product will look like in use.
8. To use your database, simply select a new record by entering Cmd-R. This automatically generates a new random number. You can keep track of the number of times you have requested random numbers if you start with an empty database by choosing Select All and then Delete Record.
Writing a Function Key Macro
In my random number picker, I have a function key (F5) assigned to run a macro (a series of prerecorded steps). My macro does the following thing each time I press F5:
- Selects all records
- Deletes all records
- Creates 5 new records
The creation of five new records adds a touch of dramatic flair to the random picker. It is sort of like seeing the balls pop around in the Lotto machine – it adds to the anticipation. This part of the tutorial will show you how to create this macro.
1. First, go to the File menu and select Macros: Record Macro.
2. In the dialog box that appears, make sure you pick Document Specific. Otherwise your macro will only work on your particular copy of AppleWorks.
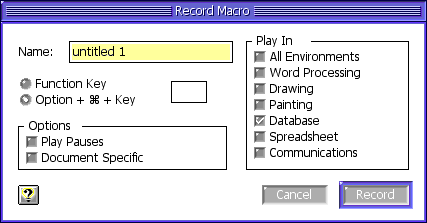
3. Select Record. From this point on, everything you do is recorded.
4. Go to the Edit Menu and select Select All.
5. Go to the Edit Menu and select Delete Record.
6. Go to the Edit Menu and select New Record. Repeat for as many times as you want the screen to display your random number before stopping.
7. Finally, go the the Macros command under the File menu and select Stop Recording.
8. Press F5 to test your new random number picker.
This tutorial is presented not as the ultimate use of a database or a macro, but just to introduce you to the possibilities.
By the way, FileMaker Pro is a much more powerful program than AppleWorks. It can handle related databases, and you can edit your scripts using the powerful programming language embedded within it. It is also fairly impervious to grammatical (programming) errors, because the commands are selected from menus similar to the function list above. An adept user of FileMaker Pro can do almost anything a former user of HyperCard could do. (Ah, don’t get me started on HyperCard. Steve, Steve, we miss HyperCard. We really do.)
Next week we’ll be looking at creating your own library of graphics in AppleWorks and sharing the libraries with others.
Keywords: #randomnumber #appleworks
Short link: http://goo.gl/dzZZwz
