
2001 – Last week, we went through the basics of Outlook Express (OE). Now it is time for slightly more complex operations to take advantage of the power that begs to be used. In this case, more complexity means more power. OE has a variety of tools that make importing, filtering, and sorting easy. They use your mail database’s flexibility to perform surprisingly effective actions.
Importing Mail
As Microsoft wants you to switch to Outlook Express easily – it makes it easier to get more customers, of course – the importing functionality is pretty nifty. In fact, its simplicity makes it worthwhile. Before you do an import, I suggest that you increase the amount of memory allocated to OE and to the application you are importing from. If you have a large message database, a high amount of memory could be necessary.
All you need to do is to click once on the application icon, go to the File menu, down to Get Info, and in the sub-menu, select Memory. One megabyte equals 1024 kilobytes, and convert the number of megs you want to allocate into kilobytes, and type the number in the Preferred Size field (as in the Internet Explorer Get Info window below). Do it for both applications. If you have a lot of data to import, you should not go without this preliminary step since your software may crash during a massive import.

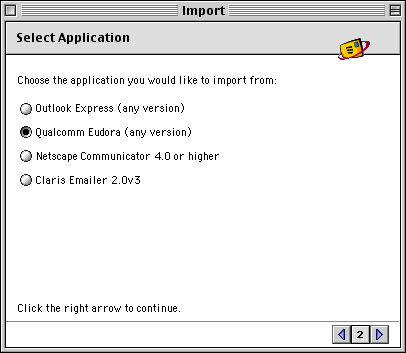
For this example, I chose to do an import from Eudora. To start importing, switch to Outlook Express and to go the File menu. Hit Import item, and you will have to choose to import from an application. Click on the right pointing arrow, and this is what you will see. Choose the application from there. Note that you can export your mail into a text file if you used another client than the four major apps below, and instead of importing from an application, you import from a text file.
 Specify, in the next screen, what you wish to import from, and then OE will take care of the rest for you. The larger your message database and number of contacts, the more time it will take. Once done, you just have to close the import module.
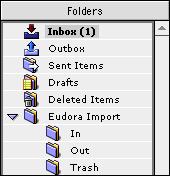
As you can see in this screenshot, you will get a folder that reproduces your mailboxes or folders exactly as they were in your former email application. All you need to do is to move your messages from there. If you wish to have the same structure of mailboxes, just take the messages of the In, Out and Trash folder and drag them in OE’s Inbox, Outbox and Deleted Items folders. Trash those old folders. Then, recreate folders with the same names of your custom folders, to drag and drop your messages from the old ones to the new ones. You are set.
Mail Rules
Outlook Express 5 offers different flavors of filtering power, and the Rules represent a large chunk of it. I can tell you what this function can do, but it will necessitate more work on your side. I’ll throw the ball, and you get to run with it. I will show you the generic pattern of Outlook Express rules, which you will find in all the categories of rules in the software.
Go to the Tools menu and select Rules. You will see five panes: POP, IMAP, HOTMAIL, News, and Outgoing. As the typical mail rule is for POP accounts, and unless it is for a different time of account, select POP. Click on the New button, and you will get this window. We will see the meaning of each item and functions that can be performed through them.
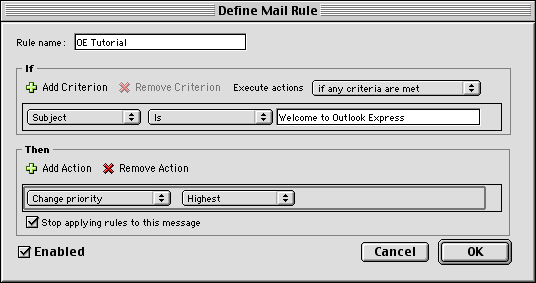
In this case, I set up a simple filter by subject. It will look for messages with the Welcome to Outlook Express subject and mark it with the highest priority in the mailbox.
The result: OE tagged my message with the highest priority. Yipee!
- Rule name: All you need to do here is type the name of the rule. Use something that will sound familiar since you want to remember what the heck it does.
- If: This portion is where you define what Outlook Express has to detect in order to apply an action to a message. You can add multiple criteria if a message has more the one characteristic. The Execute actions popup menu offers to filter if a message meets any or all the criteria, or if doesn’t meet any or all of the criteria. Then, the next popup menu displays All Messages by default. Click on it and select what you want OE to look for. There is a variety of items. OE can look for messages depending on their sender, their location, their subject line, their body text, and many more. Once done, a second popup menu can appear to require you to specify attributes. If you selected Subject for OE to look at subject lines for filtering, you will have to specify if it has to start or end with something, contain or not contain something, or to be exactly the match or opposite of what you typed. Once that’s done, you are likely to see a text field where you need to type what text string OE has to look for in the specified area.
- Then: Once OE has detected which messages to filter, it will apply an action. The first popup menu is there to select what you wish to do. You can move messages in your database, change their priority, category and perform many other actions. You can apply multiple actions, of course. For most actions, you will also get a text field or a second popup menu to specify attributes of the action. In the above example, I had to choose between Highest, High, Normal, Low and Lowest as a priority. The Stop applying rules to this message checkbox should be checked to ensure that your other actions won’t mess up with the already filtered message, and the Enabled box should be checked when you want the rule to be active.
Click on OK, you are done. Reward yourself with a Pepsi if tired. Then come back here, since we’re not done.
Mailing List Manager
The Mailing List Manager will handle all the mail from your mailing lists and filter them for you. It works independently and does it very well. Hit the Tools menu and select Mailing List Manager. Click on New to add a mailing list.
Give it a name in the Name text field. Then, type the List Address. This address is the one used to send messages to the list. You usually find that information in the welcome message after subscribing. You can copy and paste it if you like. This is the key to filtering the mailing list successfully. After that, a popup menu will require that you select where you want its messages to be filtered. If you like clean and organized environments, create a folder for your mailing list (File menu –> New –> Folder; then type a folder name). Select the folder in the popup menu. This will make OE file the list’s messages in the appropriate folder.
Click on the Advanced pane. In the first section, you can store information about the list to retrieve it later. This is totally optional, but useful if you don’t want to bother list members to get basic information. You can specify if you wish to see actions performed on list messages, such as adding a prefix to the subject line. This is especially nice to tell messages apart if you don’t filter your list messages to separate folders.
The When Replying section allows you to decide whether you want to override list behavior and always reply to senders or to the list. This is especially useful if you want to always reply to the list, while the list is set up for you to reply to senders! Click on OK. Set up as many lists as you need to filter.
Junk Mail Filter
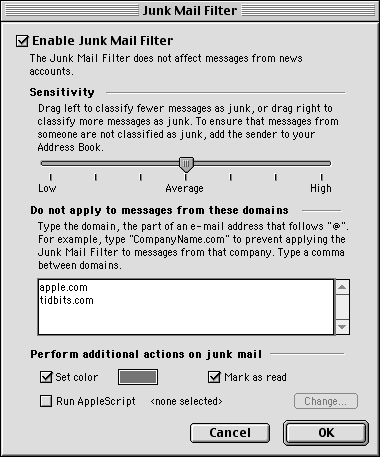
It is simple to use but so darn powerful. It will detect spam better than most spam filters. If you adjust its sensitivity to Average, it should be just fine. If you wish, increase it by a notch to tighten the grip. Make sure to use the big text field to add the domain names of organizations that send you newsletters and other messages that the filter tries to tag as junk. The Junk Mail Filter is strong enough that it will consider newsletters as spam, without knowing if they were solicited. Once you add the domain names of people who are not spammers, you’ll be set. To know what domain name to use, look at the From field of the sender and take the domain name after the @ sign.
Make sure to leave the Set color checkbox checked, so that the gray color will minimize the visibility of messages. The Mark as read checkbox is great to make sure that you do not need to open the message in question to mark it as read before deleting. If you wish, set up a Mail Rule to filter junk messages to the trash, but I recommend that you filter them to a custom folder that you’d name Spam. Click on OK.
Message Status
Finally, sorting messages can be done by applying little actions. You can tag messages with a flag or priority to sort by importance once everything is in the right folder, or mostly, in your Inbox. It can be done from OE’s main window toolbar, the Message menu or a contextual menu. Look for these items: Flag, Clear Flag, Mark as Read, Mark as Unread, and Set priority.
Flag a message if you need to reply to it soon.
We are done for this week. Now you know how to filter your mail and manage your mailboxes for a maximum of order and efficiency. Next week, we will take a look at more features.
Using Outlook Express 5 Index
- Part 1: The Basics
- Part 2: Import and Filter
- Part 3: Conveniences
Keywords: #outlookexpress
Short link: http://goo.gl/uPjYe2
