
2008: In the world of computers, you can never have too many megabytes or megahertz. That sounds dated in this day of gigahertz and gigabytes, but the principle remains the same: More is better, whether you’re looking at CPU speed, system memory, hard drive space, or graphics processor speed and VRAM.
Where it’s not necessarily true is in digital photography, where there’s an unhealthy fixation on megapixels.
Not that megapixels are bad! Far from it: They are a big factor in how large you can make a photo and still have it appear to be sharp. But in the rush to market megapixels, images can actually be worse with a high megapixel camera than from a lower megapixel one. (If you don’t want to learn about pixels and image sensors, feel free to skip to Beyond the Megapixel Myth.)
Pixels and Megapixels
A pixel is a single picture element, and a megapixel is a million pixels. That’s the short of it.
But sometimes things are not as simple as they appear, and this is one place where that’s true. Let’s say you have one of today’s popular 8 MP (megapixel) digital cameras. You know that it creates images with 8 million pixels. Each of those pixels contains the red, green, and blue (RGB) information for one tiny sensor.
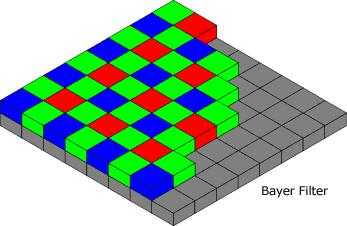 Well, that’s the theory; it’s not the reality. While there are indeed 8 million sensors (give or take a few) in your 8 MP digicam, they are not RGB pixels. Half of them are green, a quarter of them blue, and the remaining ones are red. (The human eye is more sensitive to green than other colors.) Light to the camera’s image sensor goes through a Bayer filter, which has millions of minuscule red, green, and blue filters in a checkerboard pattern.
So how does your digicam make 8 million RGB pixels from 4 million green, 2 million red, and 2 million blue pixels? It makes an educated guess. It makes a very mathematical guess: In the case of a green pixel, it averages the values of the red and blue pixels next to it. For red, it averages the four green and four blue pixels touching the red pixel, and likewise for blue. (The technical term for this is interpolation or demosaicing.)
Except for the Foveon X3 sensor (used only by Polaroid and Sigma to date), that’s the way digicams work. Every pixel is accurate in one of the three color channels and close in the other two. It’s usually close enough that you’ll never see the difference, but it’s there. And it’s especially challenging with high quality black & white work like shooting a newspaper, which is why some digicams have a high-quality b&w setting – no need to average pixels, so these images can be as accurate as possible.
Fujifilm Super CCD
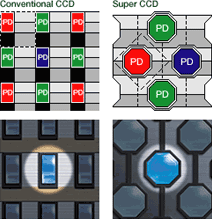
Fujifilm took a different spin with the Bayer filter in its Super CCD sensor, which is used in some of the company’s better digicams. Rather than a standard grid of RGB elements, Fujifilm turned everything at a 45° angle. This has two benefits: it lets Fujifilm makes the sensor elements larger (octagons rather than rectangles) and thus more sensitive, and the pixels are nearer to each other than with a standard image sensor.
Because of this, Super CCD sensors with 3 MP can produce 6 MP images with quality comparable to a 4.5 MP sensor.
Foveon, which we’ve already mentioned, takes a different approach. Instead of separate sensors next to each other for the primary colors of light, the X3 sensor has three sensor layers: a thin blue-sensitive layer, a green-sensitive layer, and a thicker red-sensitive layer – the whole stack being less than 5µ thick. This completely eliminates the need to interpolate and provides the best possible sharpness at a given resolution.
JPEG
That’s how sensors work, and it’s a logical next step from interpolating pixels to compressing images. After all, an 8 MP image with 10-16 bits of data per color channel has to deal with 48 MB of information. Imagine how quickly those raw image files would fill up a memory card!
The key when saving JPEG images is to do as little compression as possible if there is any chance that you will be editing or resizing the image in Photoshop or a similar app. If you use a lower quality setting to save the original image and then edit and re-save, quality goes down. Always save in an intermediary lossless format such as PSD, TIFF, or PNG-24 while working on an image and then export to JPEG when you are done editing.
The solution is image compression, and the standard for compressing photographic images is JPEG (Joint Photographic Experts Group), which was designed by geeks and photographers as a means of making smaller files with good enough quality. This is a multi-step process that happens invisibly to the end user.
- The first step is to convert the RGB data into YCbCr format: Y for brightness (luminance) and Cb and Cr for color (chroma). Some cameras skip this step when set to “highest quality”.
- The second step is to downsample the color (chroma) information while retaining the brightness (luma) information, which retains sharpness but sacrifices some color accuracy. Again, this may not be done at the highest quality settings.
- The third step is to break down the image into 8×8 pixel blocks, which then undergo a discrete cosine transform (DCT), just the kind of thing CPUs do so well.
- The fourth step is where the compression finally comes into play. This is where you tell the camera or Photoshop to use high, medium, or low quality.
- The final step is to encode and store the compressed image.
JPEG is a lossy compression scheme, and the more you compress an image- and the more times you save in JPEG format – the more you’ll notice the artifacts, particularly at edges. Also, JPEG works with 24-bit color (8 bits per color channel), so the 10, 12, or more bits per channel most modern sensors can measure is truncated – yet another reason why RAW images are superior to JPEGs.
Beyond the Megapixel Myth
The Megapixel Myth states that more pixels always means better pictures, so the number of megapixels in an image is the most important predictor of output quality.
There’s some truth to this: When comparing an 8 x 10 from a 1.3 MP camera to an 8 x 10 from a 3 MP camera, you’ll really see the difference. The lower resolution image will be a bit fuzzy everywhere, while the 3 MP image should appear as sharp as you’d expect. And you’d expect an 8 MP image would be even better – but that just might not be the case.
First of all, you’d be hard pressed to see any difference in an 8 x 10 print from a 3 MP digital camera and one with higher resolution. You’ll certainly never see it in a 4 x 6 snapshot, a size where 1.3 MP images create sharp prints. Where you will see a difference between 3 MP cameras and those with more resolution is when you go past the 8 x 10 size. At 11 x 14, 3 MP won’t be quite as crisp as a 4-5 MP image, and at 12 x 18, you’ll definitely see some fuzziness from a 3 MP or lower image.
I’ve seen 12 x 18 prints made from 6 MP digital SLRs, and they are incredibly sharp and detailed. I’ve even seen 20 x 30 poster prints made from 6 MP images, and they look great at normal viewing distances. Sure, they’re a bit fuzzy if you look closely, but you usually view a poster-sized print from several feet away, and even prints from 35mm film are less than crisp at this size.
Enough Megapixels
To make a sharp photo, you only need so many megapixels. That varies with the size of the print.
All else being equal, a standard 4″ x 6″ snapshot will look just as good from a high quality 1 MP image file as from a higher resolution camera. A 5″ x 7″ print from a 1.5 MP camera will look sharp, and an 8″ x 10″ photo made from a 3 MP camera will be virtually indistinguishable from a higher resolution image short of using a magnifying glass.
There are only three reasons to shoot with more megapixels than you need for an 8 x 10:
- There’s a chance you might want to print larger.
- You may want to do some cropping.
- You’re shooting for a client who demands higher resolution (magazines, for instance).
If you want to leave yourself some flexibility to crop, double your pixel count to 6 MP. Unless you crop out a lot of the photo, you’ll still have a great 8 x 10.
A Real World Test
David Pogue recently demonstrated this reality by shooting a 13 MP image, reducing it to 5 MP and 8 MP in Photoshop, and having all three images printed at 16″ x 24″. He put the three photos on display in New York’s Union Square and asked passersby if they could tell them apart. Out of several dozen volunteers who were free to examine the photos as closely as they wanted, only one correctly identified them. “Everybody else either guessed wrong or gave up, conceding that there was absolutely no difference.”
Too Many Megapixels Wastes Time and Space
I normally shoot my 5 MP and 8 MP cameras at the 3 MP setting, as I have yet to make anything larger than an 8 x 10. Not only am I using enough pixels to get a nice sharp enlargement, but I’m saving storage space on my memory card and hard drive, not to mention saving the time it takes to write those images to the flash card or transfer them to my computer.
Shooting high-quality JPEGs at 3 MP, my typical file is about 1 MB in size. If I were shooting at 6 MP, that would be 2 MB. So I save about 40% on file size with my 5 MP camera and over 60% with the 8 MP camera.
Tiny Pixels May Mean Worse Images
The sad truth is that the Megapixel Myth gets the manufacturers to build cameras that offer way more pixels than you really need because megapixels are easy to market. More is better – but not always. As the individual sensors in your digital camera’s image sensor become smaller and smaller, they receive less light, which means that the microprocessor inside your camera needs to turn up the gain. And when it does that, it increases image noise in your photos.
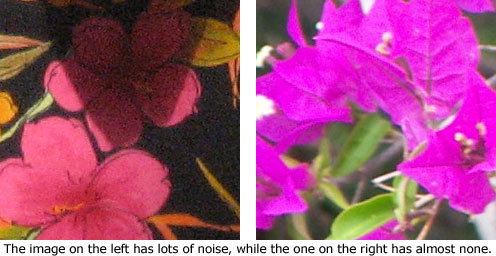
This isn’t a problem with digital SLRs, because they use large image sensors (typically around 22 x 15 mm), but the smaller digicams tend to use much smaller sensors (around 9 x 6.5 mm), and we’re already seeing the results of that. [You don’t even want to know how tiny the sensors are in today’s smartphones!] Too many tiny pixels means more noise, which looks like grain in your photos. I’ve seen 4 x 6 snapshots shot on small, high MP cameras that have absolutely unacceptable levels of noise – and this only gets worse in low light situations, where the gain gets turned up even higher.
There’s nothing to be gained from having twice as many low-quality pixels. As Joe Marney says, “My contention on this issue is that the average photographer does not need more megapixels, they need better megapixels.”
Getting Great Quality Photos
There are many factors in taking a technically good photo: sufficient light, a sharp lens, no camera shake, enough pixels, negligible image noise. My mobile phone takes 1.3 MP images, but they all look horrid on anything but a phone’s small display because the lens is terrible. My 8 MP digicam takes grainy images in low lights, and often with camera shake despite the camera’s shake reduction technology.
When possible, shoot in good light. When not, use flash if you can – and be aware of the distance limitations of your flash. Only shoot in dim light without flash if you have no choice in the matter, as you are likely to see camera shake, have lots of noise, and have to deal with to odd color spectrum of most indoor (and many outdoor at night) light sources. (With a digital SLR, get a high-speed prime lens for low light photography. Something in the f/1.2-1.8 range is usually great for concert photos and the like.)
Almost any camera will get a decent shot on a bright, sunny day – even single-use cameras. It’s low light that’s the bane of cheap cameras because they tend to use less costly lenses that transmit less light along with less costly image sensors that tend to have more noise. Add a slow lens, a cheap sensor, and excessive megapixels, and you have the recipe for photographic disaster.
The best digital photos will almost always come from a DSLR because these cameras have large image sensors, which means less noise, and are invariably coupled with much better lenses than the garden variety digicam, both in terms of sharpness and lens speed (how much light they transmit) – and also because photographers who choose SLRs tend to be more involved in the process of creating photographs.
Not that SLRs are for everyone: I shot film SLRs from 1973 until about 2003, and I had a digital Canon Rebel for a year or two. I loved the photos but got tired of the bulk.
My current digicams are a Konica-Minolta Dimage X50, a very compact 5 MP camera with a 3x zoom lens, a 2″ display, and an honest-to-God optical viewfinder. I love how easy it is to carry and use. The other is a Kodak EasyShare P880, an 8 MP camera styled like an SLR but with a built-in 24-140mm equivalent zoom. It’s bigger than the Dimage but a lot smaller than a DSLR, and the zoom range is wonderful.
Both cameras spend most of their time set at 3 MP, and they both have pretty pedestrian built-in flashes. I’d love to pick up the Kodak P20 Zoom Flash for the EasyShare someday, as that would provide a 25-30′ flash range, over twice that of the built-in flash, but it adds bulk and costs about $120. Still, for all those times when the built-in flash didn’t have the oomph, it would be a nice addition.
It would be nice to someday add a DSLR to my stable, as those big sensors with low noise and high sensitivity coupled with fast lenses make for great low light shooting, but between the Dimage for snapshots and the EasyShare when I want more zoom range (I love that 24mm wide-angle setting!), I’m good for now.
The key to great digital photography isn’t more megapixels, although that number is a factor. The key is knowing your needs, knowing your equipment (how far the flash reaches, how close it can focus, how well it performs in low light), knowing how to use the most important features, and having the camera handy.
Further Reading
- The Megapixel Myth, Ken Rockwell, 2007. “There is little visible difference between cameras with seemingly different ratings. For instance, a 3 MP camera pretty much looks the same as a 6 MP camera, even when blown up to 12 x 18!”
- Breaking the Myth of Megapixels, David Pogue, New York Times, 2007.02.08. “‘The more megapixels a camera has, the better the pictures.’ It’s a big fat lie.”
- The Megapixel Myth, Joe Marney, The Tech Lounge, 2004.04.24. “The problem lies not in the number of pixels recorded, but in the quality of those pixels.”
