
The reason this column is called Mac Lab Report is that these articles will chronicle the steps I took to go from a classroom with one computer to a classroom with 10 fully networked Power Macs in less than three years – at virtually no expense to our science department budget.
Today’s Agenda
- About the Mac Lab Reports
- Microcomputers in the Science Classroom: Six Ideas for Using One Computer
- Follow up to Mac Lab Report #1
- Next time: Mac vs. PC in the Science Lab
About the Mac Lab Reports
The reason this column is called Mac Lab Report is that these articles will chronicle the steps I took to go from a classroom with one computer to a classroom with 10 fully networked Power Macs in less than three years – at virtually no expense to our science department budget. Along the way I will share my thoughts and experiences gained in over 15 years of educational computing.
Although many of the reports will center on the use of the computer in a science classroom, there will be information of general interest to computer users and to other kinds of educators as well. It’ll be an interesting ride, I hope, and I certainly appreciate Dan Knight giving me the opportunity.
With that said, let’s begin.
Microcomputers in the Science Classroom: Six Ideas for Using One Computer
Who says microcomputer any more? Sort of dates me a bit. Nevertheless, it sounds more formal, so I’ll leave it in.
Many teachers already have a computer in the classroom, although there are probably a good many who don’t have a computer in the classroom at all. Regardless, I hear story after story from my students and other teachers about the computer that sat in the corner, unused and gathering dust – and sometimes more than one computer. The main reason for that is that the teacher does not know how to effectively use the machine in the classroom given the fact the classroom has 30-35 students and only 45-50 minutes of instruction. That means that for each student to have a personal assignment on the computer, the teacher must either allocate many days or use a ridiculously short and meaningless assignment.
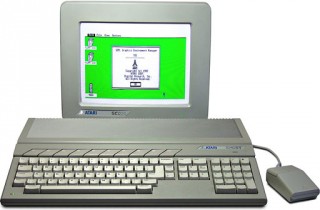 I started with a single computer in my classroom, an Atari 1040ST, which I nearly wore out because I used it so much. I added more computers along the way, but until that happened I had to make do with one machine like nearly everyone else.
To get some ideas of what use the regular classroom teacher can make of a computer, I recommend Great Teaching in the One Computer Classroom by David A. Dockterman. This book is published by Tom Snyder and is available from Amazon.com. Now in it’s fifth edition, this is an excellent book for beginning teachers or for technology newbies. It contains suggestions, such as using the computer with software that accumulates results from many students, such as a database or reading comprehension program, using the internet on a large TV or projector, and the usual suggestions for classroom management, such as a gradebook program.
For the science teacher in particular, the single computer can be a useful tool, especially if the teacher occasionally uses demonstrations or videos already. The computer can fulfill some of those same functions with different capabilities. Here, then, are several suggestions unique to science classrooms with only a single computer available to the teacher.
1. Simulations
Computers can simulate experiments and events too dangerous, or too expensive, to simulate in real life. Aside from spreadsheet calculations of projectile motion and the like, there are a number of physics demonstration products useful for showing all the main concepts of mechanics.
The oldest is probably Interactive Physics, which allows the user to set up a virtual situation by drawing objects on the screen and then applies the laws of nature to them. For example, draw a circle above a box and press Start. The circle becomes a bouncing ball, and the box a table. So if you can’t build a monkey-and-the-hunter demonstration, you can at least simulate it. (Far better to do both, IMHO.)
Any number of companies provide simulations for everything from dissections to relativity. Of particular note on the Mac platform are the YP series of software from Physics Educational Software for Macintosh Computers by Yves Pelletier, a set of shareware programs that can be used to simulate a variety of physical science situations such as ray optics or projectile motion. Of course, if you’re going to do a simulation on the computer for the class, you had better make it visible to them.
A later column will explore options for projecting or connecting your computer screen output to a television, but rest assured, with a standard desktop screen, your students are not going to be able to see what you can see from just two feet away.
2. Lab Data Collection for Demos
A significant difference between the science classroom and other classrooms is that we can use the computer as a means to an end, rather than an end unto itself. Thus, getting the job done – measuring and analyzing data – becomes more important than learning the ins and outs of the software or even the operating system. We can use the computer to actually collect the data used in the experiment.
The equipment used generally consists of a sensor probe (such as a temperature probe) and an interface box that acts as a go-between from the probe to the computer. The probes all output small voltages, which the interface box converts into data your computer’s serial port or USB port can interpret.
Two companies that make software and hardware solutions are Vernier Software and Pasco. Vernier has just come out with new versions of its software and hardware that are iMac compatible and can be adapted to be used with legacy sensors such as motion detectors, force probes, accelerometers, radiation detectors, blood pressure cuffs, and so on. There are lots of probes centered on biological science topics, especially physiology.
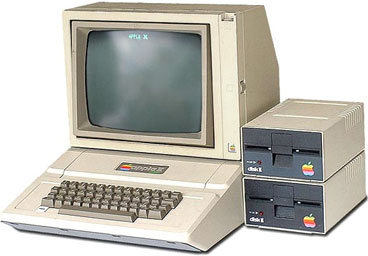 Vernier also has the nice feature of being long-time Apple supporters – before there were Macs, Vernier made sensor equipment for the Apple II series (which is where I learned how to use it) and, remarkably, continues to sell the hardware and software needed for these fine old machines. Many versions of their software, still available for purchase, will run on older Macs such as a Mac Plus, SE, II, or others. The later versions, however, require a Power Mac – and the latest version also requires USB connectivity.
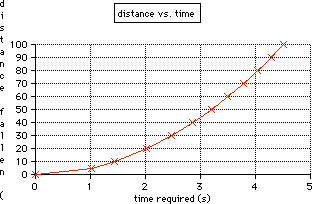
You can perform an experiment with this equipment quickly – so quickly that you can do variants in a short amount of time to establish a trend. My friend Todd, a physics teacher, does an experiment using a Force Probe and an accelerometer attached to a cart. Shaking the force probe causes the computer to collect force and acceleration data. Graphing this data yields a roughly straight-line graph, the slope of which is the mass. (So we have F=ma.) Todd changes the mass quickly by setting a kilogram mass on the cart, and in 60 seconds has another graph, with a different slope. Thus, the effect of mass on the relationship can be shown as a demonstration.
Students are always willing volunteers for these demonstrations. My favorite is to teach basic graphing concepts by having students walk in front of a motion detector, which is an ultrasonic sonar device that can measure their position over time. Students get instant feedback from changes in their motion. These devices are the ultimate tool for teaching about speed, acceleration, and position graphs. I have students attempt to make a graph match a sketch I have drawn on the board. The addition of their own bodies’ physical motion in the demonstration is definitely effective and memorable.
Also worth noting is the ability of the computer to use input from the microphone jack as the signal driving an oscilloscope trace – great for sound demos and experiments. Investigate the program Digital Oscilloscope.
3. Lab Data Collection for Lab Experiments
 Since data collection and logging is so fast, you can actually begin to have students use the computer themselves by having a quick round-robin experiment conducted – such as dropping a picket fence through a photogate – and then print out the associated data table for student groups to take back to their station for hand-graphing. Each group needs to use the computer for about three minutes. If you have a corollary assignment, such as an analysis page or puzzle, everyone can stay busy while waiting for their turn. I believe there must be a way to adapt this technique for math classrooms and other classrooms as well.
4. Logging Observations in a Database
In my astronomy class, I have students occasionally log information into a database. This presents a master file from which a reference can be printed. For example, if students maintain vocabulary words in a database, the entire database can be printed out as a custom glossary before a final exam.
In astronomy class we also do experiments around people’s reactions to their horoscopes. We read the correct horoscope 50% of the time, and the wrong sign from the wrong day on the other 50%. After entering the data from many different observers in a database, we can use summary functions to add up the results from hundreds of participants and look for larger trends. (You could do a similar thing with a spreadsheet, but I like to have students use every major computer function at some point. This one works well for data collection because occasionally you need to add comments about interfering variables.)
Our results, by the way, invariably show that people in general cannot distinguish between correct and incorrect horoscopes.
5. The Screen as an Object of Study
Red, green, and blue pixels on a CRT computer display.
One of the more obscure uses I put my computers to is to use the screen as an object of study – not the computer, but the screen. There are two demos you can do with the screen itself. First, using a paint program, make a patch of solid yellow. Then, using a high-quality magnifying glass, look at the pixels on the screen. You will discover that there are green and red pixels lit up – but no yellow ones. (RGB screens use red, green, and blue with additive color mixing to create all other colors.)
This next demo should not be attempted unless you are sure there is a degauss button on the monitor. On some old Mac monitors, the degauss button looks like a horseshoe with a slash across it.
If you are not sure, don’t try this on a monitor, because it will essentially ruin it for all other purposes.
When you press the button, the screen should blank out, you’ll hear a thud, and the image will wiggle as it comes back. To do the demo, take a reasonably strong magnet (more than a refrigerator magnet) and wave it in front of the screen. The electrons in the CRT will be deflected by the magnet and distort the image in very odd ways, both in shape and color. The degauss button returns the screen to its original state.
I wouldn’t do this on any mission-critical or graphics-intensive monitor – be sure its one you can spare. There is a metallic component to the picture tube that remembers the magnetic field you impress upon it and makes the screen permanently distorted unless you can degauss it. (A video tape demagnetizer might do the trick if you discover that really wasn’t a degauss button, just a power switch.)
6. Screen Capture
With any sort of a digital camera attached to your computer, new options become possible. Demos too small for the class to see can be projected onto the screen. Demos requiring a unique viewpoint – such as looking at the simulated phases of the moon on a basketball you’re holding – can be shown from the “earth’s” perspective on the TV monitor. A short video capture of an accelerating cart can be analyzed right on the screen – literally – by marking on the screen with an overhead projection pen. If your capture card or camera samples at 30 frames per second, use every 6 frames for 0.2 second intervals.
Measuring the marks you make provides data that can be used for hand or spreadsheet graphing. (There are software packages that do this too, but I’m going on the cheap here, okay?) A time exposure sequence of a flower opening, a seed germinating, or a chick hatching can be recorded. This sort of thing can be done as a demonstration or as a lab activity for groups rotating through the system as described above.
Follow up to Mac Lab Report #1
I am a bit overwhelmed by the large number of hits and comments generated by my more-or-less off the cuff suggestions for improving the Mac in my first column. This venue provided me with more hits (4,500) than I’ve gotten for any other thing I’ve ever done on the Web. That says a lot for the Low End Mac readership, and for the fine job Dan Knight does in running and promoting the site.
Touchscreen an Ergonomic Disaster on Desktop Computers
Of the email responses I got, the overwhelming majority said they agreed with all or most of my points in the list. However, one item stood out clearly for these readers. As described by B. Smith-Mannschott, Alex Gibson, Steve Johnson, Mitchell J Laurren-Ring, Dennis Kane, Orjan Larsson (of Sweden! Someone in Sweden read my article!) and others, the touch-screen option is not as cool as it sounds, because your arm will get tired in that vertical position, and it’s an ergonomic disaster if you have to exert any pressure at all. In fact, there’s a term for the effect experienced due to the uncomfortable position of the arm, invented in the early 1980s during some experiments with this technology: gorilla arm, described on this Web page. (Thanks for that one, B. Smith-Mannschott.)
In defense of the idea, let me propose a refinement for the 2000s. I think the same sort of technology that allows PDAs to be touch-sensitive – to a stylus perhaps – could allow a flat LCD screen to be manipulated much as a pad of paper would be.
However, typing is still an efficient form of input compared to writing by hand (that’s what typewriters were for, after all), so the screen should be mobile, able to be placed in front of the keyboard for handwriting and drawing, and behind the keyboard for typing. In the lower position, the ergonomic arguments mostly vanish; in the upper position, the efficiency arguments do as well. And you could still use a drawing pad and a mouse at the same time if you wanted.
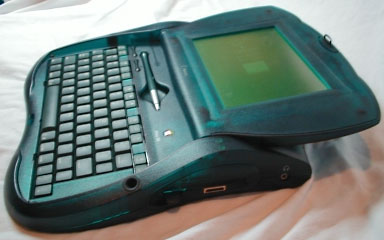
Newton eMate 300 with screen in “flat” position. (image source: Applefritter)
On my computer, I have a trackball and a mouse, and I use them interchangeably as the need arises. This scenario was also described by Orjan Larsson, who told me about the following: “You either have to have a separate loose keyboard to it, as the famous Magnenta ‘PDA’ had, or use it like the eMate. Perhaps the method eMate did it was the best, you could put its screen so it lay down, and when turn the whole unit 180 degrees and type on it, without having the keyboard between you and the LCD.”
Having never used either of these devices, I bow to your superior experience.
Other Suggestions
Finally, in fairness, Andrew McIntosh (a Mac user, natch) points out that Microsoft Office is available at the Apple Store, so my item #3 is essentially unnecessary.
Thanks, everyone, for all those very polite and supportive comments. I hope you find this column useful, and I plan to keep cranking them out as long as I have something useful to say. Needless to say, your comments on this column are welcome.
Next time I will write a comparison of Macs vs. PCs for use in the science classroom. This will contain much ammo for the Mac evangelist.
Keywords: #maclabreport #macsintheclassroom
Short link: http://goo.gl/r9N5an
