2001 – Outlook Express (OE) 5 is the default email application for Macintosh when you install any recent Mac OS. Despite the fact that many folks choose Eudora, Claris Emailer, PowerMail, and other capable clients, many stick with OE since it is free and it satisfies them.
In fact, a large part of the Mac community uses Outlook Express. OE is fairly easy to use, especially for veterans. Novice users can find the zillions of menus and functions confusing. I intend to write a few tutorials to show you how to handle your email with Outlook Express 5. This article will help you set up OE for basic functionality.
Set Up Your Accounts
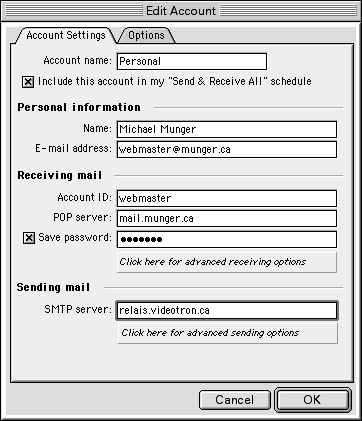
Go to the Tools menu, and at the very end of it, select Accounts. Click on the New button (if you are holding the mouse button, select Mail). From there, you can use the setup assistant – but if you really want to configure it the way you want it to be, click on Configure account manually. This will force you to learn while doing your setup.
In the account type, select POP, which is the default type of email account, unless you have reasons to believe that your mail server is an IMAP server. Click on OK.

In the Name field, type your full name. In the email address field, type your email address. It should be your username, followed by the @ sign, and then the domain name of your provider. If you signed up for EarthLink access, your name would look like johndoe@earthlink.net.
In the Account ID field, you normally have to type your username (see the image for the example), but some providers give you a unique user ID for their service that is different from your email username. With a POP server, use the service provider’s information, which contains the full server name. The SMTP server is the server that will process your outgoing email. Again, your service provider gives you such information.

Click on the Options tab. Select your default signature from the popup menu. Note: the default signature is always assigned to the primary account, not to your other accounts. If you want to know how to set up signatures, the information can be found later in this column. Forget the additional headers for now.
Here are quick definitions for the server options:
Partially retrieve messages over 20K: Once checked, thisallows you to force large messages (think of those with attachments) to remain on the server until you decide what to do with them. When a message is partially downloaded, Outlook Express allows you open it and click on hyperlinks to choose whether you wish to download the message or delete it from the server. This is useful to save downloading time if you don’t wish to get large attachments from folks you may not like.
Leave a copy of each message on the server. This is incredibly useful if you wish to check mail from the road. It leaves your messages on the server, letting you download copies without deleting them from the server. Make sure that you turn this on when it is temporary, otherwise your email account will fill up and take too much server space. Many providers limit your disk space, so do not abuse this option.
A couple of the other options are quite obvious if you take a second to read them, which leaves the last one, which is perhaps the most interesting feature in the Options tab.

Allow online access: When checked, this will create an icon in your folders list (in the main window). Look at the highlighted Personal account in the image to the right. If you click on it once, it will download the message headers and give you an overview of what is in your account without downloading the messages. From there, you can delete messages from the server without ever downloading them and open the messages that you want to read now. When you do that, OE will take care of deleting messages or downloading them for you.
Important for sending: If you have set up several accounts, make sure that the From account (in the form of a pop-up menu) in each and every composing window shows the account you wish to send from. To send new messages, go to the Files menu and select New. In the submenu, select Mail Message. From there, type the recipient’s name and email address in the To field, add a subject, and compose your message.
Schedules
Schedules are so useful! You can retrieve your mail when you want it, whether it is every five minutes or only at startup. Click on the Tools menu and select Schedules. Click on New to create a new schedule. Name it and then define it. In the When section, click on Add occurrence. You have to choose between On Quit, At Startup (ever time that OE launches or quits), Manually, Timed, or Repeating.
Timed is when you want to set up a schedule that executes at precise times. Repeating means that it will happen at a defined interval in minutes, hours, or days.
If you wish to check your mail at startup and every 10 minutes, add two occurrences. One will be At Startup, and the other will be Repeating Every 10 Minutes. You can do whatever you want in that window anyway. As for the action, you have several choices, but most of the time, schedules are used to retrieve mail from an account that you will select. Make sure that the Enabled checkbox is checked for it to be functional.
Signatures
Okay, you want your customized signatures to quote a line or tell more about yourself. Click on Tools and select Signatures. Click on New to create one. Name it and write or design your signature. Keep it short, both in height – the accepted standard is four lines – and width to respectively avoid hate mail and text wrap problems. Hit Save in the File menu. The Random checkbox can be checked if you want this signature used for the accounts where random signatures are assigned. As I mentioned before, you assign signatures from the Accounts window, and Random is available from there.
Multiple Users
All right. You’re the man or woman in the house, and your mate (perhaps your children, too) will access email from the same computer as you. How do you set it up for a personalized Outlook Express environment?

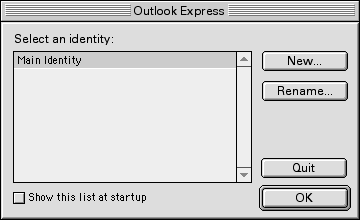
Outlook Express lets you have identities, and each identity can have multiple email accounts. It is simple to set up. Hit the File menu and select Switch Identities, then click on Switch. A window will pop up, and it should look like this screen shot.
The Main Identity is the main identity. You can click on Rename if you are Joe and you want it easy to figure out.
To create a new identity, click on New and name the identity. A pop up menu will offer to base the new identity’s settings on an existing identity or on the default settings. Then click on OK and let the assistant walk you through the setup. After that, you will have to set up the accounts and other stuff, which is the point of the rest of this column. Once you are set, just use the Switch Identity command from the File menu to jump from one to the other.
Hotmail
How do you set up your Hotmail account? Just hit the Tools menu and select Accounts. Instead of choosing POP or IMAP when defining what type of account you have, choose Hotmail and do your setup. Click on the new Hotmail icon in your folders list to get mail.
Use OE your way
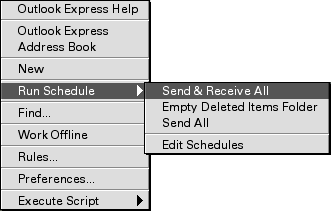
OE allows you to use shortcuts, toolbar buttons, contextual menus, and traditional menus to execute commands. Make sure to control-click everywhere to know what options are available. Look at the menus to see what is where and what keyboard shortcuts could be useful. If you want to check mail manually at times, despite your schedules, you should know that control-clicking on the status bar in the main OE window will allow you to select a schedule that you wish to execute. This is great if you set up a schedule to run manually, or if you feel a little impatient when waiting for that important message from your boss.

Remember to edit your preferences to customize the way OE works for you. From the Edit menu, select Preferences and browse through the tabs to customize your preferences. This will make OE work just the way you want.
Isn’t that great?
That’s it for this week. Next week, we will go through more of Outlook Express’ options and features.
Using Outlook Express 5 Index
- Part 1: The Basics
- Part 2: Import and Filter
- Part 3: Conveniences
Keywords: #outlookexpress
Short link: http://goo.gl/hRlEKF

