
Crack! Dammit.
Another piece of brittle ’90s Apple plastic bites the turns to dust.

Last week, I finally assembled enough parts to build a working Quadra 605. I know, I know.. the 605 is one of Apple’s more boring machines, but there was a hole in my collection that needed filling. The little 605 fits perfectly under an Apple 12-inch monitor on my shelf, which had been feeling rather lonely.
There were just a few problems.
Apple made the Quadra 605 from cheap plastic, which after more than 30 years has transformed into a brittle, nicotine-yellow substance that practically begs you not to touch it. It took parts from two machines to make a mostly good 605.
This is the story of how I did it.
Machine Number One
I bought the first 605 from one of those eBay sellers who specialize in making collectible computers more expensive for those of us who live more than a day’s drive from the nearest Vintage Computer Festival.
The listing said “Logic Board and Case,” although the pictures showed a few more parts. Fine, I thought. Probably worth the risk.
How bad could it be?
Naturally, I ordered it.
When it arrived, I quickly discovered that it was considerably worse than I thought possible. In fact, it was one of the worst machines I’ve ever seen.
Just about every part was missing or bad.
I managed to salvage two low-end VRAM SIMMs and the RF shield from the bottom case. Removing the shield was easy because the plastic had tried its best to not be a bottom case anymore. I don’t blame the packing or the shipping much. The plastic was so yellowed and brittle that the slightest touch turned it into an ever-growing pile of smaller plastic bits.
Oh, and there was no power supply, no floppy, and no hard drive. Not even a bracket.
A power supply was pictured in the listing, but it wasn’t mentioned in the description. A quick look through the seller’s other listings showed it for sale at $85. Judging by the model and the acrid residue it left inside the case, I suspect whoever buys that one is in for a treat.
Salvageable components so far.. The logic board (untested), a couple of cables, the fan, the speaker, some shielding and the Apple logo. Not a great haul.
On to the logic board.. it was, well.. pretty crusty. I removed it – or, more accurately, plucked it from the pile of plastic debris and gave it a quick blast of compressed air. It had rotten capacitors and plenty of corrosion around other components. I decontaminated it, removed the bad caps, cleaned up the pads, and installed fresh ones.
Then I waited.
There wasn’t much else I could do without a power supply.
The Quadra 605 power supply provides +5, +12, and -5 volts. I have plenty of power supplies that can generate +5 and +12, but nothing that produces -5 volts, and I wasn’t about to buy or build the hardware needed to make that rail. Inexpensive as it might have been, I wanted to do it right.
So I waited for another machine to appear with a usable power supply.
And waited some more.
I even waited until the window for leaving feedback for the seller had expired. Oops.
A few months later, there was finally light at the end of the tunnel. A more complete-looking Quadra 605 appeared from a different eBay seller at a reasonable price.
Of course I bought it!
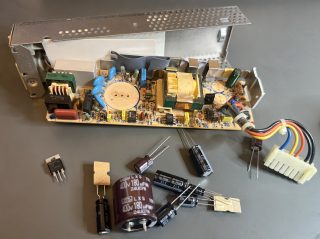
I “borrowed” the power supply (**mwahahaha!!** in my best mad scientist cackle), cleaned and recapped it, and then used it to test the logic board from the first machine.
Chime!
Then… nothing.
I waited, but it never initialized any video.
Okay. I’ve seen this before. I remember the 605 needs a battery to boot fully. Should be a simple fix. I installed a fresh battery and tried again.
Nope.
Time for the oscilloscope.
The first things I check on a dead computer are the power rails, obvious bad or corroded solder joints, and the clock frequencies going to the chips that need them.
Everything looked ok.
More digging.
The Motorola 68040 has four pins that indicate the processor’s status in binary. No voltage is a 0; presence of voltage is a 1. They’re labeled PTS3 through PTS0, and, because apparently things weren’t already confusing enough, you read them in reverse order.
I tacked on a few test leads and connected all four pins (plus ground) to my logic analyzer. I could see it starting at 0000, followed by several other values, and finally stopping at the dreaded 0101.
Double bus fault!
That means the CPU was unable to complete a bus operation – typically because it can’t successfully access something in the RAM or ROM.
But it had chimed, which meant it had gotten far enough to execute code from ROM and access at least some RAM. This was getting strange.
I checked the memory DIMM. I checked the soldering on the onboard RAM. I probed them with my oscilloscope. I checked the CPU pins and started to check everything in between.
Nothing.
This was going to take a while.
So I tried something simple. I swapped in a spare CPU.

Chime!
And then – Video!
Result: The board came with a bad CPU.
I’ll add that to the pile of reasons I should have not bought first machine. If the seller had tried their hardest to assemble a worse Quadra 605 than anyone before them, this one would have been a serious contender.
Machine Number Two
The case was also brittle, but this time I had hope.
Crack! Dammit. Nope, no hope.
When I unboxed the second 605, I made a neat little pile of the pieces of plastic that hadn’t survived the trip. Smaller than the first machine, so there was still room for hope. You see, that’s normal for old plastic computers. Sometimes you can use acetone to melt ABS parts back together. Failing that, there’s super glue, and when all else fails, there’s JB Weld. This machine eventually used a lot of superglue and epoxy.
When I removed the logic board, one of the tabs holding it in place failed immediately.
Crack! Dammit.
The next tab was for the power supply.
Crack! Dammit.
That one came out, too.
The floppy drive contributed two more plastic fragments, and I hadn’t even started cleaning the case.
First things first: I broke out a tube of super glue and reattached every plastic bit that that had decided it wanted to be free. Then both case halves got an ultrasonic spa treatment, followed by a light scrubbing with a Magic Eraser to remove the deeper stains. I gave the case a light peroxide-and-UV treatment to improve the color, dried everything thoroughly, and brought it back inside. The metal shield in the bottom case had rusted, so I removed it and replaced it with the metal shielding from the first machine. It actually looked pretty good when I was finished.
I ordered fresh capacitors and when they arrived, performed the usual remove-old-caps-and-decon routine.

After gluing a few more parts back together, I attempted to reinstall the logic board. Crack! Dammit. That was the other logic-board retaining tab. I removed the board and glued the tab back in place.
On the third attempt, the logic board finally slid into place. Okay…
Next: time to install the rebuilt power supply. Another crack.. and another retaining tab. Copious amounts of glue to the hopeful rescue…
Next came the fan, which required yet another round of tab gluing. Then the speaker and floppy drive. The floppy drive put up a fight, but I eventually got it installed, and after that, re-glued the parts that had broken off again.
Time to power it up… I connected the power supply to the newly recapped and cleaned logic board and flipped the power switch. (Macintosh LC series and Quadra 605’s do not have soft power.)
Chime!
I connected a monitor and a BlueSCSI and success! It booted, so I connected the keyboard and display.
So far, so good, but when connecting the BlueSCSI… Crack! NOT… AGAIN!! One of the logic-board tabs had failed again, right above the spot where I’d just glued it. Fine.. with my patience wearing thin, I still wanted to test the machine.
I grabbed a couple of pencil erasers and wedged them between the logic board and the fan to hold the board in place. The board checked out perfectly. The floppy drive, predictably couldn’t eject a disk (who would have thought with 30+ year old belts and grime inside??)
I serviced the drive, cleaned out all the old grease, applied fresh lubricant, cleaned it some more, paid particular attention to the heads, and put everything back together. I tested it and woohoo – It worked!!
 I attempted to reinstall the drive. Crack again! Nope. Dammit! Both tabs were now free. Defeat? Never.
I mixed some JB Weld and used a generous amount to permanently reattach both logic board tabs and the broken bits that held the floppy in place, all while the logic board was being held steady by the now thoroughly abused pencil erasers.
While I was gluing on those parts, I managed to break a power-supply retaining tab again. No messing around this time, it got the JB Weld treatment too.
Finally!
I left the machine alone overnight for the epoxy to cure. The next day, I installed the surprisingly functional hard drive that came with the second 605. I’d already tested it and given it a fresh OS installation. Old hard drives like that are all living on borrowed time, but I’ll take this one for the win right now.
And finally…

I had a complete Quadra 605. It is shiny, it works and I am happy!
I carefully put it on the shelf, with my lonely Apple 12-inch monitor sitting on top of the really fragile, but working machine.
Brave?
You decide.
But after two machines, two recapped boards, a recapped power supply, one bad CPU, one rusty bottom case, an assortment of salvaged parts, a pile of plastic fragments, two pencil erasers, and what felt like an unlimited supply of glue…
I finally filled that hole in my collection.