StuffIt Deluxe is the most comprehensive compression solution for the Mac. It is not just an application that compresses files; it handles everything that a user needs to do for file exchange or compression. StuffIt Deluxe 6.5 is the best version to have, since some of the features discussed, such as StuffIt Express Personal Edition, only ship with the latest version.
This article covers using Stuffit Deluxe on your Macintosh; the next article will cover Internet related features.
- Description: Using StuffIt compression software
Difficulty level: Intermediate
System version: Depends on what StuffIt version you have
Required: StuffIt Deluxe (6.5 if possible)
The Application
The StuffIt Deluxe application is, in this writer’s opinion, the best tool to use in the whole suite. While the True Finder Integration module, which we will discuss soon, has its perks, the application itself is more flexible in handling files and archives.
Before you start, go to the Edit menu and select Preferences. Customize the settings to your liking and save them. The Preferences window is pretty straightforward. You should not find it difficult to understand.
Create a new archive by clicking on the New Archive button in the toolbar, or go to the File menu and hit New. Name the file, and make sure that the filename ends with .sit. This is very important, because the Finder integration modules, if installed, will automatically decompress files when the .sit extension goes away, and Windows computers require extensions to open the files you send them.
If you set your settings to password-protect your files with encryption – do this if you regularly compress files that need access protection – you will get this window:

- Enter a password if you have security needs
- Click on Generate Random (not recommended if you want to memorize it)
- Click on No Password
Whether you put a password in or not, you are ready to compress. You can click on the Stuff button in the toolbar or select Stuff in the Archive menu and choose the right file from the dialog box. You can also go to the Finder and compress the files by dragging them to the archive window.

Drag files here and they will be compressed.
By going to the toolbar or the Archive menu, you can access lots of features. You can create folders inside the archive. You will find the Edit Comment feature, which allows you to type a little something that you or the file recipient can read. It can be useful to add a note or a reminder to the archive. You can also add a return receipt request, which is useful when you send files and want to know when your archives were opened by recipients. On the other hand, people who use an earlier version of StuffIt Expander (which does not support the feature) will not be able to send the receipt when opening the archive. Note that people can ignore return receipt requests even if their software is compatible with it.
The toolbar in StuffIt Deluxe.
Still in the Archive menu, you can make the archive self-extracting. This is the best compression option if you don’t know what decompression software (or version) your recipient uses. The self-extracting archive will open itself and decompress files by itself without the need to have StuffIt software installed. Use it whenever you are in doubt about archive compatibility.
At the bottom of the Translate menu you will find the necessary features to create the same kind of self-extracting file for Windows computers.
If you need to verify an archive’s file integrity, it can be done by selecting Verify in the File menu and choosing the file to examine. If all is well, you will get this notice:

- Note: If you encode files, it is important to compress them first, except for ZIP formats that represent compression on different computer platforms.
Finder Integration
If you believe that launching the StuffIt Deluxe application for each of your moves is tedious, there are simpler options to execute your operations. To get Finder integration at your fingertips, you have to make sure to install the True Finder Integration module when installing StuffIt Deluxe.
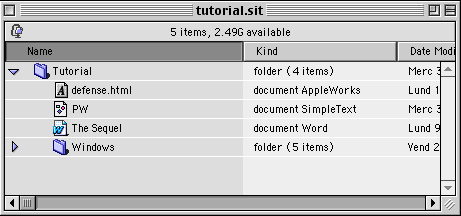
The first feature is the StuffIt Browser. It allows you to open StuffIt archives with nothing but a double-click. When you open an archive this way, it opens just like a folder and allows you, with drag and drop moves, to stuff, unstuff, and remove files.

It opens like a folder.
Another feature of Finder integration allows you to change a file or an archive by changing its name. The Archive Via Rename feature is quite simple: change the name, and StuffIt Deluxe will detect your keystrokes to execute changes. For example, take a normal file named Document and rename it to document.sit. StuffIt Deluxe will automatically compress it into a StuffIt archive. Remove the .sit extension, and StuffIt Deluxe will decompress the file. The same applies to folders. Do this for any compression or encoding format (.zip and many others), and it will work.
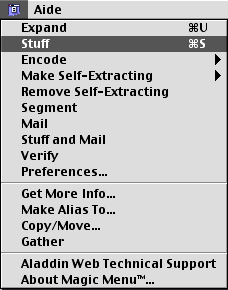
 The other major function offered by the True Finder Integration is the Magic Menu. A veteran feature of StuffIt Deluxe, this menu is present in the Finder (and as a contextual menu when you control-click on a file) for you to access StuffIt Deluxe’s features without launching the application. All you have to do is select the file(s) to handle and pull down the Magic Menu to perform actions.
You can customize the menu’s preferences by pulling it down and selecting Preferences. Pay attention to the StuffIt CM preferences module. It allows you to decide which options are available when you use a contextual menu on a file. If you never do Unix or Windows compression, you may want to uncheck anything but Macintosh-friendly formats.
Drag and Drop Applications
These applications (StuffIt Expander, DropZip, etc.) cover the actions that you want to perform with your files, but they are not as friendly as the application or True Finder Integration. If all you want to do is to drop a file on an icon to get something done, however, the drag and drop apps are just fine.
Next week, we will cover the features that are related to file exchange on the Internet.
Keywords: #stuffit #stuffitdeluxe
Short link: http://goo.gl/4hJn23

