
A mate of mine who has only been using Macs for a few weeks has been using a PowerBook G3. We installed Mac OS X 10.4 Tiger on it, and then he got a larger hard drive. He was about to reinstall OS X when I suggested cloning.
Being a PC user, he was new to the idea, so I emailed him some instructions, and it worked with no problem. So for anyone new to cloning, here is how to do it.
Cloning makes a complete bootable copy of your hard drive onto another drive.
Here is what you will need:
- a Mac with Mac OS X Tiger or Leopard installed
- a new hard drive
- a FireWire or USB enclosure for the drive (not necessary if you have a Power Mac with room for another internal drive)
- a copy of SuperDuper [Editor’s note: You can also use Carbon Copy Cloner.]
Let’s get started.
First, put your new drive hard drive enclosure. Plug it into your Mac, and switch the Mac on. If your enclosure needs to be plugged into a power source, do this and then switch it on.
Once the Mac is booted, you will need to format the new drive into a Mac format in Disk Utility (in the Utilities folder inside the Applications folder). Down the left hand side Disk Utility will show both drives. Select the one in the enclosure.
You will see five tabs across the middle of the screen: select “Erase”. Double check the Volume Format is “Mac OS Extended (Journaled)” and give it a name (or leave it as it is). Then select the “Erase” button. The new drive will erase within a few seconds and your drive is now ready for cloning.
Don’t worry – you cannot erase your existing hard drive with Mac OS X installed on it, as it is the drive you have booted from and is therefore locked.
Download SuperDuper. It is free when used for cloning. Install it and run it.
In the SuperDuper screen, you will see three drop downs.
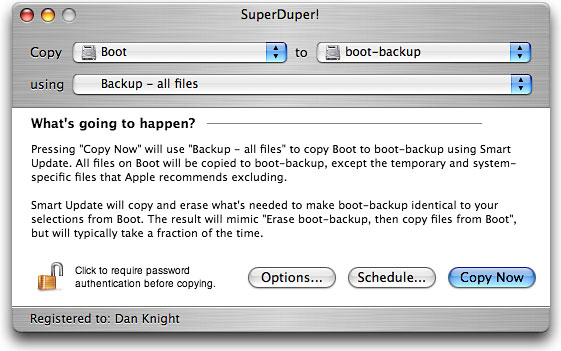
In the first one, labelled “copy”, select the drive in your Mac. In the second drop down labelled “to”, select the new drive that you just formatted.
The third one should be labelled “using” – select “Backup – all files”.
New select the “Copy Now” button.
If you are connected via USB 1.1, it will take quite a while (maybe an hour or two). If you are connected via FireWire or USB 2.0, then it will be quicker (maybe 20 minutes – depending on how much is on your hard drive).
Once completed, shut down the computer and external hard drive. Remove the internal drive and replace it with the new one you just cloned to – and boot the machine.*
If successful, the Mac will work exactly as before. You will not notice anything different, except a larger drive.
If it hasn’t worked, the machine will not boot.
* Editor’s note: You may want to test the clone drive before performing the transplant. To boot from the external drive, hold down the Option key during startup. Your Mac will display icons for any bootable drive. Select the new drive, click on the right arrow icon, and your Mac should boot from it. If not, erase the new drive and try again. Once you know it’s working, transplant it. (Note that some of the oldest G3 Macs can’t boot into OS X via USB.)
You can also use this procedure to clone OS X to another Mac – just install the cloned drive. As long as it’s not too big for that Mac’s drive controller to recognize (see How Big a Hard Drive Can I Put in My iMac, eMac, Power Mac, PowerBook, or iBook?), you should be good to go.
We’ve been doing this at Low End Mac headquarters for years, and it works very well. The registered version of SuperDuper is also a great backup program, which we use regularly.
Carbon Copy Cloner works as well as SuperDuper for cloning, and version 2.3 will also let you clone Mac OS X 10.2 and 10.3. (SuperDuper only supports OS X 10.4 and 10.5.) dk
Follow Simon Royal on Twitter or send him an Email.
Like what you have read? Send Simon a donation via Tip Jar.
keywords: #clone #macosx #osx #harddrive #superduper #carboncopycloner #osxclone #techspectrum #simonroyal
short link: http://goo.gl/gK7uTr
searchword: osxclone
