
In my previous Low End Mac article, I wrote that I was planning a trip for later this spring. I wrote about options for take-along tech gadgets: digital cameras (small is good), mobile phones (get a local SIM at your destination), tablets (bigger than a mobile phone, less capable than a laptop, but good enough for most things), and laptops (can they fit in a hotel safe?)
And I was left with a dilemma. Most – maybe 90% – of what I might want to do with travelling I can do with a tablet. Check email. Go on social networks. Check train schedules and restaurant reviews on the Web.
Now and then, though, it’s been useful to have a ‘real’ laptop handy to do something that I’d rather not postpone until I get back home. But is that enough to make it worth hauling a laptop? Maybe. If I have a laptop that’s small and light enough and (since there are always risks of damage, theft, or other loss) one that isn’t my main work system. Something cheap enough that it wouldn’t be a huge issue if was lost or broken on the trip.
I have a couple of older systems – but while small and (now) inexpensive enough, they just feel too pokey for me to want to use them anymore. And I’ve got a modern Chromebook – an Acer C720. Nice system – small, lightweight, and low-cost. But Google’s ChromeOS seems more like a tablet operating system to me – it’s a nice way to do most of the things I might do on a tablet while not being able to easily do any of the things I might need my laptop for.
Then I had a thought – if I only need my laptop once in a while, I could leave it home and access it remotely from a tablet or Chromebook while I’m on the go.
That requires setting up my travelling systems – iPad and Google Nexus 7 tablets and/or Chromebook to remotely connect to my laptop (a Macbook Air). Since I haven’t decided which of these I’m going to take with me, I might as well set up all three.
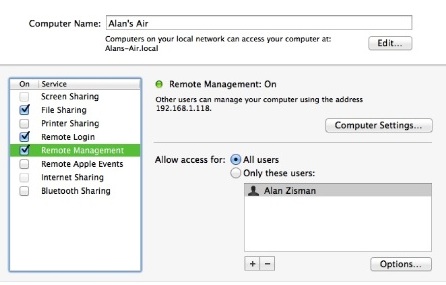
Mac Sharing preference panel
There are a variety of ways to connect remotely – the Mac, for instance, has built in support for the open source VNC standard (though it doesn’t mention it directly; selecting Remote Management in the Sharing preference panel enables VNC. Upside of VNC – there are free VNC clients available for most computer and mobile device platforms. Downside of VNC – if your computer goes online via a router, you will probably have to mess with port forwarding on your router so that the router will pass the remote VNC requests through to your computer.
I used to use LogMeIn, a remote access service that (securely) uses the Web; once you’ve set up a LogMeIn app on your target computer, you can access it using a web browser on any Internet-connected device – no fiddling with your router. Sadly, LogMeIn no longer offers a free service, and I don’t need it enough to want to pay $99/year.
There are lots of other options. Microsoft Remote Desktop (with Windows and Mac options).TeamViewer. Apple Remote Desktop. And more.
I wanted to connect three devices to my Mac – an iPad, an Android tablet, and a Chromebook. I couldn’t find a single (free) option that would allow all three platforms to connect to a Mac. (Even when LogMeIn offered a free service they only had a (relatively expensive) app for Android). I’m open to suggestions.
Connecting a tablet
To allow my iPad and Nexus 7Android tablet to connect to my Mac, I opted for the free PocketCloud Remote Desktop service from Wyse, a company that was well-known a couple of decades ago for pioneering terminals to connect with the mainframes and mini-computers of that era. More recently, they’ve been bought by Dell. Installing their ‘Companion‘ client app on a Windows or Mac computer allows it to be accessed using an iPad or Android app.
(Wyse would be happy to sell added-feature Pro versions along with Premium and Enterprise subscriptions – the basic free version is all that I need).
PocketCloud supports three connection techniques – it can make use of the open-source VNC protocol, requiring the same router port-forwarding that led me to want to avoid it). It supports Microsoft’s Remote Desktop Connection (RDC) protocol. Best for me, though, is its default Auto Discovery. This assumes you have a Google Account and uses it to secure your connection. (If you don’t have or don’t want a Google Account you can still use PocketCloud’s manual setup options).
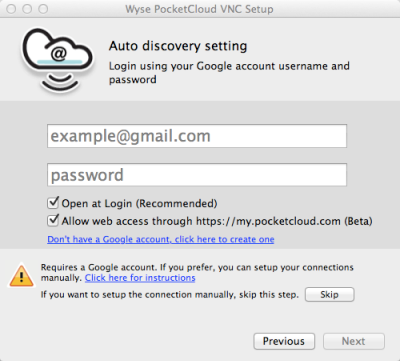
PocketCloud setup
In setting up PocketCloud’s Auto Discovery on your Mac or Windows computer, you’re asked to enter your Google username and password. In many cases, that will be straightforward. If, however, you’ve turned on the more secure (and recommended) 2-Step Verification, you’ll find it doesn’t work… you’ll get a not entirely helpful error message from PocketCloud that identifies the problem but doesn’t clearly tell you where to go to solve it.
With 2-Step Verification enabled you’re most likely bump into it when you try to access your Google account (Gmail or other Google services) from a new device – perhaps from a public-access computer at a web cafe or library or the first time you use a new smartphone, tablet, or laptop. To ensure you’re really you, Google will text a code number to the mobile phone number you’ve identified when you enabled 2-Step Verification. Enter that code (only once) on the new device and you’re good to go.
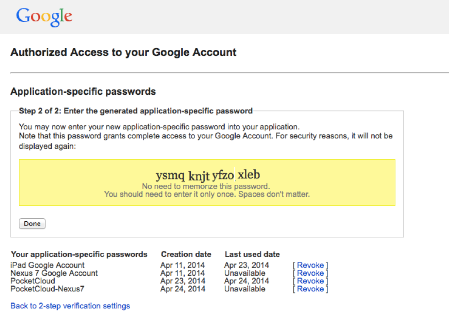
2-Step Verification
That won’t work, however, when a third-party application tries to make use of your Google log-in credentials. Instead, you can to accounts.google.com on a device that you’ve already used to access Gmail or another Google service. Click on Security, then on App Passwords: Settings. You’ll be asked for your Google password even if you entered it previously.
Create a name for the application that needs to connect with your Google account – for instance PocketCloud and click Generate Password. You’ll get a 16-letter randomly-generated password along with the note that you won’t need to memorize this password as you’ll only use it once.
Enter that password (along with your Google account name) in the PocketCloud Setup window, and bingo – it’ll connect. Don’t close the browser window with the Google’s gooblygook temporary password – download the PocketCloud app for your iPad or Android tablet; the same password works when I was setting up the app on my iPad.
If you have closed the browser window, though, it’s no big deal to generate another temporary password when your setting up your tablet – the passwords don’t need to be the same.

PocketCloud Connect
Now, assuming that the PocketCloud companion app is running on your Windows or Mac computer, you can connect to it using the PocketCloud app on your iPad or Android tablet. Both work pretty much identically.
You’ll see a screen listing the remote computers that the app knows about – in this case my Macbook Air. Note that it may be listed as offline or online – if it’s offline, you’ll need to have the PocketCloud Companion program running on your computer and you need to be signed into it. (This could be a problem if you’re far away from your computer, so if you’re going travelling, make sure you’ve left it signed in. There’s also an option to ‘disable computer sleep’ – probably worth enabling).
If your remote computer is online, clicking the Connect button will prompt you to log in with your computer’s user account – not the same as your Google account! Log in, wait a moment or two and you’ll see your computer’s desktop with a row of icons underneath. You may not need the mouse icon – I found tapping on my iPad’s screen worked like clicking the mouse, though finger-tapping on small targets can be a challenge. (If so, the fifth icon magnifies the screen). The keyboard icon works as you might expect, letting you type on your remote computer.
My iPad controls my Mac!
Opening files on your remote computer does just that – opens them on the remote computer. A separate free app, PocketCloud Explore (also available in iOS and Android versions) lets you view the contents of folders on the remote computer – tapping on a file opens it on your tablet, letting you edit it or share it from there.
What about the Chromebook?
PocketCloud doesn’t offer an app for ChromeOS, or an option to run it directly in a web browser (as LogMeIn, for instance, does). There is a web-based my.pocketcloud.com service, described as being in beta. When I logged into that on my Chromebook, I could access my Macs shared folders – but couldn’t view the desktop remotely, making it the equivalent of the limited PocketCloud Explore app for iOS/Android.
Google, however, has a Chrome Remote Desktop browser extension which works with Chrome OS, along with any computer with the Chrome web browser installed. (There’s also a recently-released Android app).
To set up a Mac, Linux, or Windows computer you’ll need to start by adding the Chrome Remote Desktop extension to the Chrome browser on that computer. Once it’s added, you’ll have a Chrome Remote Desktop icon in the Chrome Apps list at the left-end of Chrome bookmarks bar. Use it to enable remote connections to your computer and to enter a 6+ digit PIN.
Once that’s done, you can remotely access your computer from another computer that has the Chrome Remote Desktop extension/app installed – Mac, Windows, Linux, ChromeOS, or Android. You’ll need to be signed into the same Google account on both computers or devices. Opening the Chrome Remote Desktop extension should show the name of your remote computer – clicking it will prompt you for the PIN.
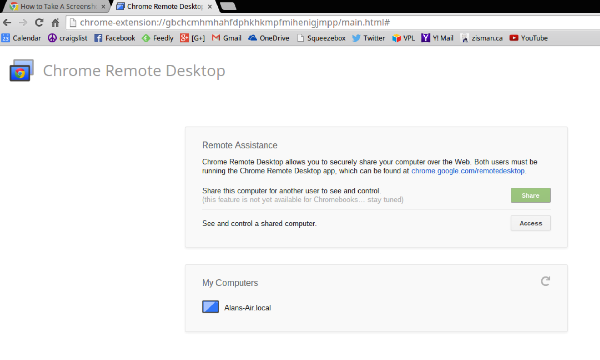
Chrome Remote Desktop
Using it is straightforward. One thing, though – it resized my Mac desktop – both in the remote window and on the Mac, resetting it to 800 x 600. I could remotely open the Display system preference and reset it – clicking on the little blue piece in the centre of the Remote Desktop window dropped down the minimalist set of options – turning off the Resize Desktop to Fit setting kept it from doing it again.
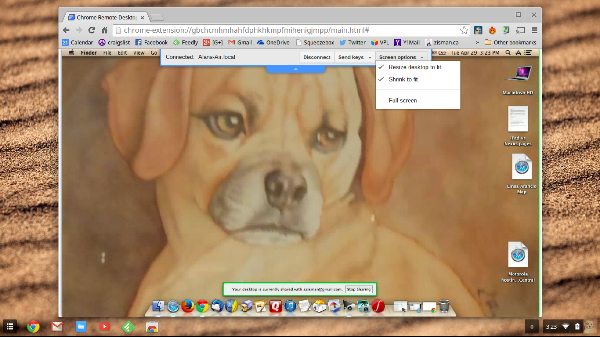
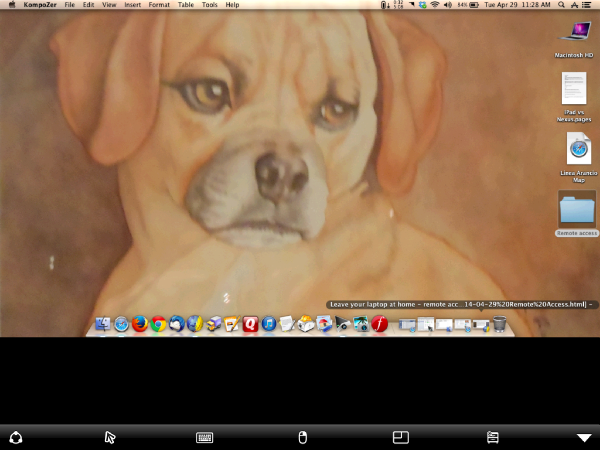
Chrome Remote Desktop – connected!
Chrome Remote Desktop is pretty bare-bones; but it doesn’t need much – at least on the Chromebook. Typing just works, as does Control-Click for ‘right-click’ context menus on the remote Mac.
So, I can now leave my Macbook Air safe at home, turned on and set to stay awake waiting for me to contact it from my iPad or (Android) Nexus 7 tablet using PocketCloud or using the Nexus 7 or (Acer C720) Chromebook using Google Remote Desktop.
By Alan Zisman © 29 April 2014
Keywords: #remoteaccess #vnc
Short link: http://goo.gl/XYsY4f
searchword: remoteaccess
