
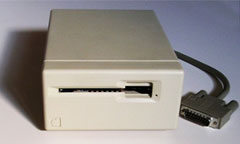
2001 – Packaged in a plain beige case with a single DA-15 connector, this single-sided 400K floppy drive (model #M130) works with early Macintosh computers. The “Click of Death” likely occurs on drives that have not been adequately dusted or as a secondary result of restoration by the liberal application of lubricant.
What Is This ‘Click of Death’?
 Once plugged in and power applied, the drive immediately starts a loud, repeating clicking noise that persists while the power is on. The careful observer will note that the jackscrew controlling drive head position is fully forward and banging against the limit of its range. It will neither read nor write to diskettes, though the computer will likely recognize when a floppy is inserted.
How Do I Fix It?
 The problem has to do with an optical limit switch near the back of the drive – not the front as one might expect – just in front of the motor responsible for moving the drive head back and forth. The procedure below describes how to locate, clean, and test this switch.
I assume common sense: disconnected power, a static strip armband (if desired), a can of spray air, several flathead screwdrivers of varying sizes, about an hour of your time, and some locking tweezers or forceps would also be nice.
I claim no responsibility for any problems arising from this process, technical, personal, or otherwise.
- I’ll assume that you’ve already got the case off, but that the internal cables are all still connected.
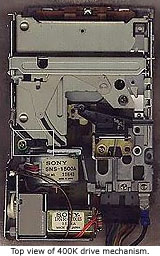
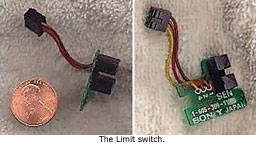 Illustration 1, Top view of 400K drive mechanism, shows the general location of the faulty limit switch (indicated by the white box). Since it is partially hidden, I’ve included Illustration 2, The Limit Switch, for reference. There are three wires: brown, red, and yellow. Unless you are just extremely curious, there is no need to remove the mini-board and switch yourself.
- This optical switch operates with an LED light and a light sensor, each in one of the “towers” and directed inward toward the other. This is an extremely accurate switch – the light and sensor peek out at the world through very narrow slits. This is similar to how handgun video-games work – the barrel [the slit] limits the spread of incoming light. Anything interrupting the light will cause the switch to turn off. During an ideal power-on, the drive head moves all the way to the back of its range. This moves a plastic tab/wedge into the beam of light, cutting off the switch. The process then reverses pushing the wedge forward.
The logic is waiting for the optical switch to turn back on to stop the motor. This is one method of achieving drive head alignment. Ideally, the wedge should stop right in front of the light beam. In the case of the clicking drives, the switch is blocked from the start, so the motor attempts to go forward. The light never comes back on, so the motor never stops pushing forward! - Given what we’ve learned in item #3, we have a choice to make: Do we just want to clean the optical switch and give it a try, or do we want to test the switch to see if this is actually the issue? Those who wish to skip to the cleaning portion need not engage in further disassembly and can skip to item #7.
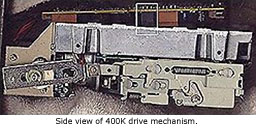 To test the limit switch, we first need to unscrew the primary logic board. There were three screws on my board. Try to leave the wires connected (less work later on). You need enough space to get to the plug in Illustration 3, Side view of 400K drive mechanism. My plug has the designation, CN106.
- Do this step with the power off. Then unplug CN106 and reapply power. The drive should not start clicking. If you then reconnect the plug, the clicking should come back. This operates in a reverse logic sense, as the blocked switch turns the motor on! If your drive continues to click when CN106 is unplugged, then there is some other problem – such as a faulty logic board. This issue will not be addressed in this document. Once satisfied, you should reattach the logic board.
- Now, to the cleaning. Do not use gasoline/petrol, kerosene, or nail-polish remover. These could melt the plastic, and wouldn’t you be in a mess then!
I would, however, start with a can of spray air applied liberally between the two towers of the optical switch. You should be able to do this from the top of the drive. Do only this first cleaning step and test again, because this may be all you need!
This failing, try some GooGone on a lint-free cloth. Then try a cloth damp with water, or even a dry cloth to remove any remnants of the GooGone. CD-ROM cleaning cloths work well – as well as the cloth lining of old floppy disks. The typical Q-Tip is too large for this task.
Allow adequate time to dry (or use the spray air again if you’re in a hurry). - Plug it in and turn it on. If this solved your clicking problem but you still cannot read diskettes, try cleaning the two optical switches at the front of the drive as well.
For those of you with multiple drives, it becomes a simple process of elimination – switching out a known good mini-board for a questionable board. Remember to remove the mini-board from the bottom of the drive if you choose to do this!
For those of you with soldering skills, the switch is still a fairly common piece. You should be able to get it at Radio-Shack or most other parts suppliers. In addition, there are more than one of these optical switches on the drive. If you have a drive you are willing to cannibalize totally, you could retrieve several switches from one drive!
Good Luck! And let me know how it goes….
A. Daniel King, active member of the Compact Macs List.
Keywords: #clickofdeath #400kfloppydrive #floppyclickofdeath
Short link: https://goo.gl/SWhJLG
searchword: floppyclickofdeath
