
Bong! . . . 🙂 . . . Welcome to Macintosh!
Chi chi chi, ha ha ha, chi chi chi, ha ha ha….
What’s that sound off in the distance?
Chi chi chi, ha ha ha, chi chi chi, ha ha ha . . . Ahhhhhhhhhh!!!
Friday the 13th fans will no doubt remember that sound as Jason was about to take out another victim, but in this case it’s the sound of Halloween creeping up on us.
There’s more to Halloween than just the trick-or-treating, the candy, and the costumes. There are also our classic Macs to think about. Maybe they wanna be in on the frightful festivities too!
In the spirit of Halloween, I’ve come up with five programs that will no doubt get your Mac in the Halloween mood – but first we have to get the Appearance and Desktop ready to freak out the neighbors.
Here’s what I do to dress up my iMac – and I’ve even got some pictures. MU HU HA HA HA! Okay, maybe that wasn’t so funny, but I thought it was!
Change Your Mac’s Appearance
First, we have to get a scary background picture or a folder of scary pictures. All of these instructions apply to Mac OS 9.2.2 and earlier, the Classic Mac OS, although the procedures may differ somewhat with earlier versions. Let’s get started:
- Find a ultra spooky background picture, or if you have a whole folder’s worth, that’ll work!
- Go to the Apple menu, find Control Panels, then click on Appearance.
- Go to the Desktop tab (see image below). Here, you’ll find the place to drag either one of your dreadful pictures or an entire folder of dastardly pictures over to the miniature screen.
- Drag the picture or folder of pictures over to this screen, be sure to click on Set Desktop, and that’s it!
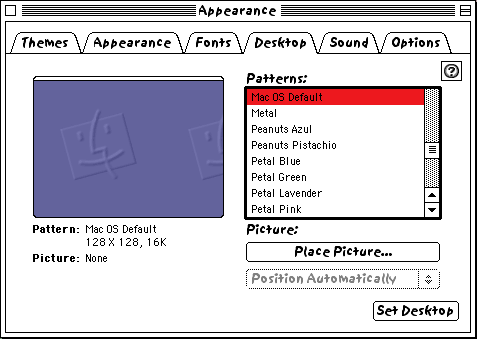
Desktop tab in the Appearance control panel.
Next, let’s get some horrifying sounds ready for prime time! Here’s how to install a sound set (Sound Sets only work in OS 8.5 and later):
- Once you’ve found that creepy sound set you want to use, find it and drag it to your System Folder.
- You’ll get a truly horrifying dialog box letting you know that the Sound Set has to be put in the Sound Sets folder to be available for the Mac . . . blah, blah, blah! It’ll ask if you want the Sound Set put in the Sound Set folder. Click on OK.
- Now head back over to the Appearance control panel and click on the Sound tab.
- With any luck a haunting sound set will await you when you select it from the drop down list!
We’re gettin’ there. Next up, frightening fonts! I use a nice, bloody blend of the Sand font mixed in with a little Capitals, and it always makes for a nice, terrifying touch. Here’s how to do it:
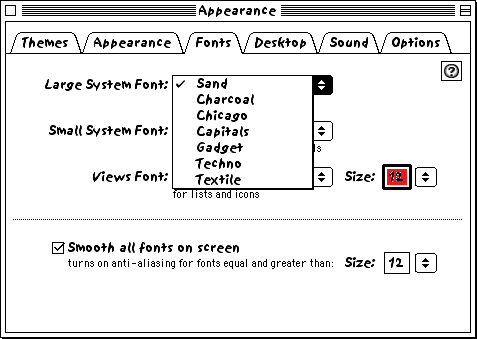
Fonts tab in the Appearance control panel.
- Roll on over to the Appearance control panel and click on the Fonts tab. You’ll see 3 dropdown lists: Large System Font, Small System Font, and Views Font.
- Click on the Large System Font dropdown list (see image above) and select Sand.
- Click on the Views Font dropdown list and select Capitals. I have my font size set at 12 point, but your mileage may vary.
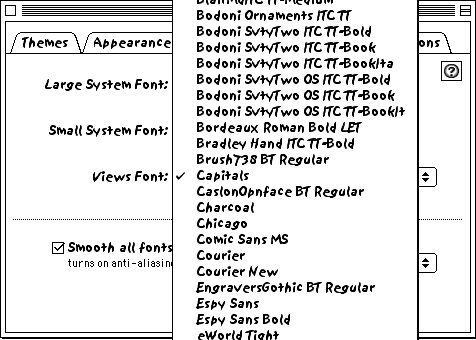
View Fonts in the Appearance control panel.
That’s it for the fonts.
If you want your clock to look just as freakish by displaying the Sand font, follow these steps:
- Like before, go to the Apple menu, stroll down to Control Panels, then click on Date & Time.
- Click on the Clock Options button.
- Find Font Settings (see image below). Click on the dropdown list and select Sand and the font size you like then click on OK.
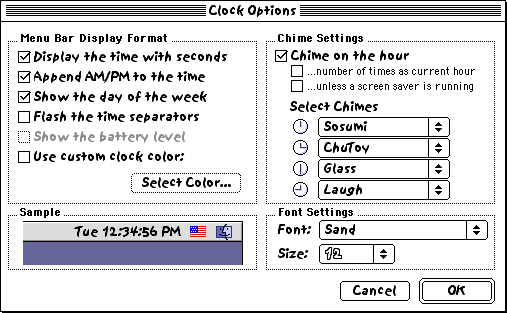
Clock Options in the Date & Time control panel.
Next, it’s time to set the menu bar to a ghostly white that’s ghastly ghoulish! Here’s how:
- By now, you know the drill, go back to the Appearance control panel and click on the Appearance tab.
- You’ll see 3 dropdown lists: Appearance, Highlight Color, and Variation. Although there are Halloween specific themes, we’ll ignore Appearance.
- Click on the Highlight Color dropdown list and click on Other.
- From this point, click on Crayon Picker. You’ll have different colors to choose from. I choose Red for my Halloween setup, but some people may not like the blood red highlight color, so choose what you like! Once you’ve made your choice, click on OK.
- Finally, go to the Variation dropdown list and click on Black & White.
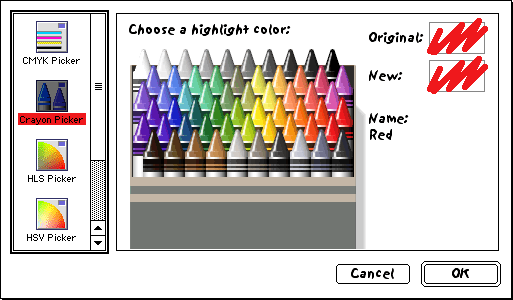
The crayon color picker.
Woooooooooooooo! Freaky, ain’t it!
Change the Startup Sound
Now let’s whip up a deadly concoction, a Startup Sound sure to wake the dead!
- Time to go searching to find the sound you want.
- Head on over to your System Folder and find your Startup Items folder.
- Once you’ve done that, drop the sound into the folder.
Voilà, you have a spooktacular startup sound! The one I use has a dark, scary voice saying, “Welcome to the Dark Side of the Macintosh.”
Change the Cursor
Even the mouse cursor outta be able to join in the spookfest. Changing the mouse cursor is as simple as bobbing for apples – heck, even simpler! The one I use is called Halloween Cursor. It’s the original Halloween Cursor that Bryan Bortz put out. Google in Halloween Cursor and Bryan Bortz to find more of his cursors. You can download the original Halloween Cursor. It’s an extension you put in your System Folder. Here’s how to bring the cursor in on the fun:
- Once you’d downloaded the Halloween Cursor, find it.
- Drop it in your System Folder’s Extension Folder and restart. You’ll see it the next time you boot up your Mac.
Let’s see: Desktop picture, check! Sound Sets, check! Fonts, check! Appearance, check! Startup Sound, check!
Well, I guess that’s it….
Change Icons
Oh yeah, one more thing. Even icons need a shot of the scary stuff. There’s an icon set I use that I consider the best Halloween icon set there is, It’s the Great Pumpkin, Charlie Brown! You can get it from The Icon Factory, which has great instructions to help you in getting the Great Pumpkin icons on your desktop.
![]()
If you don’t want the witches flyin’ away with your old icons (for example, the Macintosh HD icon), be sure to do this first:
- Create a new folder anywhere.
- Click once on the Macintosh HD icon, go to the File menu and click on Get Info -> General Information.
- You’ll see the icon, click on it, then go to the Edit menu and click on Copy.
- Head back and click once on the New Folder icon, go to the File menu and click on Get Info -> General Information.
- Click on the icon, then go to the Edit menu and click on Paste.
The Macintosh HD icon will be saved. You can do this on any other icons you want to save, ’cause you know how that blasted boogeyman loves to steal icons!
Once you’ve got the icons you want to use, here’s how you set ’em up:
- Click once on the icon you want to use, go to the File menu, and click on Get Info.
- Go to the Edit menu and click on Copy.
- Head back and click on whichever icon you want replaced, go to the File menu, and click on Get Info.
- Click on the icon, then go to the Edit menu and click on Paste.
There ya go! Just like with shampoo, repeat the process for all icons you want to use. You can also change the names of each item on the desktop (such as Macintosh HD). You may want to change it to Frankenstein HD or whatever spooks you!
There are other things you can do, such as changing the Startup Screen, but what I’ve shown you are just the things I do. Feel free to experiment until you get that certain scary look that suits you and your Mac.
Five Applications for Halloween
Now that I’ve showed you how to dress up your Mac for Halloween, I spoke about five programs that will get your Mac in the Halloween spirit. Here they are:
Screen saver: The After Dark screen saver is considered the legend in screen savers. Not to mention that After Dark 2.0 had the whole dark atmosphere thing goin’ on. There are a lot of screen savers in After Dark that will make Halloween more festive. The sad news is that Berkeley Systems (which later was bought out by Sierra) no longer produces After Dark. (OS X users may be interested in After Dark X by Infinisys – ed) You may can find the classic version of After Dark on eBayor from older Mac users. Although I’m not entirely sure of the system requirements for After Dark, I’m pretty sure it will run on any Mac running System 6 or later.
For more on After Dark, see The After Dark Interviews.
A good second choice is DarkSide of the Mac. Poubelle Software puts it out. DarkSide is in the same vein as After Dark. DarkSide runs on any Mac with System 7 or later for the latest version. You can also download a version that will run on System 6. DarkSide is freeware.
Decor: The Decor control panel allows older Macs to use desktop pictures along with allowing you to change your Startup Screen. Even though I haven’t used this much, I found it extremely useful for putting desktop pictures on older Macs. It runs on any Mac that runs System 7 or later. Decor is now freeware. Francois Pottier created Decor and has it available for download on his website.
Pumpkin.app: Pumpkin.app is really cool! This puts a jack-o-lantern on your desktop, and it flickers. You can have one pumpkin – or many pumpkins with different “carvings”. Or you can make your own. This is a wonderful app that will definitely add that little touch of Halloween to your Mac. It runs on 68K and PPC Macs, but you’ll need System 7.6.1 or later and at least 4 MB of RAM. Unfortunately, it’s no longer available from Stimpsoft, but you can still get it from jschilling.net.
If you know where we can download the PPC and/or 68k version of pumpkin.app, please let us know via comments. Thanks!
Mac-O-Lantern performs a similar function with Mac OS X 10.3 Panther and later. You might also want to look at Jack-O-Lantern, which requires OS X 10.4 Tiger and later.
Holiday Lights: Holiday Lights is more than just something useful for Halloween. This puts a string of lights around your screen. You can have Halloween lights, Thanksgiving lights, Christmas lights – whatever the holiday, there’s sure to be lights for it! I use this app a lot for the holidays, and I’m sure you’ll love it, too! It’s put out by Tiger Technologies. It runs on any Mac with color and requires System 7 or later. Holiday Lights is now freeware.
Halloween Night II: Halloween Night II is my favorite Halloween app. It’s simplicity is part of it’s charm. Basically, Halloween Night II is where you’re sitting in a living room waiting to greet trick or treaters. Sound boring? Give it a chance! Wait till you see the trick or treaters. I won’t spoil the whole thing – you’ll just have to check it out. Kids will especially enjoy Halloween Night II. This app runs on a Mac Plus and up. I’m not sure exactly how you can get it, but I know at one point you could get it here: http://www.kidsdomain.com
When all is said and done, you should have one of the deadliest desktops of all-time – like mine:
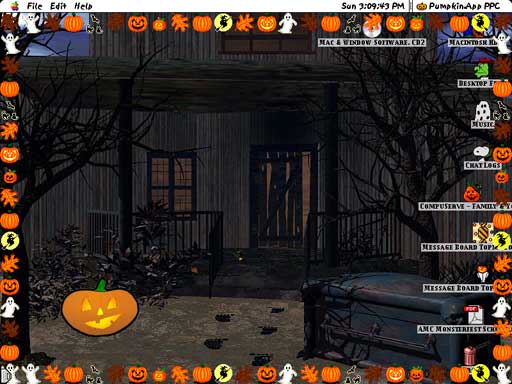
Between decking your Mac out in Halloween duds and these great programs, you’re Mac will be ready to do the Monster Mash – or maybe should I say, the Monster Mac!
Have a happy and safe Halloween!
For more, see A Classic Mac Spookfest.
Keywords: #halloween
Short link: http://goo.gl/dYs8Q2
searchword: classicmachalloween
