
It happens to us all – accidentally deleting a file. Or a folder full of files. Or worse!
This time it was at the end of a Friday afternoon with a new client, transferring data from his old computer to a new one. The process took many hours, the client left for a while, and then returned just as I was finishing up and getting his external drives reconnected to the new machine.
I had cloned the old system to the new, but Time Machine wasn’t recognizing the existing backup on an external drive. Since we now had two identical copies of the system, I decided to just reformat the Time Machine drive (a Western Digital MyBook) and start over.
There was also a 500 GB external LaCie drive containing other data.
Some things require concentration. Using Disk Utility is one of them. I was multitasking and explaining to my client details about his new computer while setting things up. I selected the Time Machine drive, clicked on Partition, named it as before (MyBook), and clicked Apply.
Are You Sure You Wish to Continue? asks Disk Utility. Yeah, yeah, I mutter and hit Continue. A few seconds later, a new drive popped up on the desktop named MyBook. Excellent. Just like the existing, unaltered drive on the desktop named MyBook.
The drive once named LaCie was no more.
Oops.
The moment of recognition that occurs here is similar to the experience of watching the locked door of your car slam shut with the keys jangling in the ignition. In recounting such events later, after the pain has passed, we describe them as learning experiences.
“So,” I asked my client nonchalantly, “what do you use the LaCie drive for?”
Mac OS X Undelete Utilities
The drive had been used primarily to hold music and video files, off-loaded to free up space on his internal hard disk. There was (it turned out) about 350 GB of data on the drive. I apologized, told him I could recover the data, and brought the drive back to my office for a weekend of unplanned excitement.
On Mac OS X, the best known undelete utilities are Prosoft Data Rescue II and SubRosaSoft FileSalvage. I have copies of both these applications. Some Googling presented another option, AppleXsoft File Recovery, so I downloaded the demo.
All undelete utilities require use of a separate destination disk to which recovered files are copied from the damaged drive. A dedicated work drive is ideal when possible, one with adequate free space for the expected amount of data to be recovered.
I started with Data Rescue II, which I’d used successfully before. The scanning and data parsing passes took about 4 hours combined, then another 3 hours to recover files to the work drive – the better part of a Saturday.
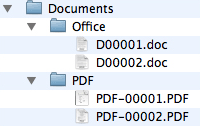 The result was a huge number of recovered files sorted by file type – Documents, Audio, Movies, Pictures, etc. – but no filenames! It’s nice to get a thousand Microsoft Word documents back, but not very helpful when they’re named D3464.doc, D3465.doc, etc.. This was true of every file type – .xls, .pdf, .jpg, .tif, .mov, et.al. I’d had this experience before – very frustrating. Perhaps different software could help.
I tried FileSalvage next. Kudos here to SubRosaSoft – I purchased version 5 a while back, and the current release is v6. I downloaded the newest version and entered my old serial number. The program responded that I needed a v6 serial number, but that it would honor the v5 serial number for two days in order for me to perform emergency work.
This is a developer who knows its market – thank you! I subsequently found out there’s a free upgrade between v5 and v6 available by contacting SubRosaSoft directly.
Scanning the drive with FileSalvage took about the same time as Data Rescue II (3-4 hours), but the tally of found files was displayed in real-time rather than requiring a post-scanning parsing. FileSalvage also breaks down file types more granularly than Data Rescue II; for example, whereas Data Rescue II recovers all QuickTime files as type .mov, FileSalvage breaks things down as .mov, .m4v, .mp4, etc. This is helpful when putting things back together.
The list of files found while scanning was again nameless. Ugh. However, after scanning and recovery, FileSalvage asked if I’d like to attempt to rebuild filenames. “Yes, yes, yes,” I cried, and clicked OK.
This was moderately successful. The resulting filenames are not the originals, but are created from data within files that FileSalvage can read. The attempt worked well on music and movie files, produced mixed results on Word documents, and had no results on images or other file types.
I’d now spent the better part of a weekend running scans and recovering data from the drive with two programs. I started a scan with AppleXsoft to see if it would behave differently but quickly saw it too was coming up with a list of unnamed files. Abort.
This seems to be a file system limitation. More on this below. AppleXsoft may be a very capable program, but I did not get a chance to give it a real test.
Creating Order from (Sorted) Chaos
Now to make sense of what I had recovered – 700 GB of serially named files (350 GB recovered twice), a form of “sorted chaos”. I decided to keep the FileSalvage data, since its naming and organization was better – and I was running out of space on my 1 TB work drive!
Video and Music Files
While filenames are not preserved, metadata within files is preserved. This is a big help for movies, videos, and music files. iTunes to the rescue!
I created a new, empty iTunes library on my work drive (Option-Click on iTunes when launching to get this option). This creates a new iTunes Library file and iTunes Music folder. Verify in iTunes Preferences –> Advanced that you have selected the option to “Keep iTunes Music Folder Organized.”
Next in the Finder, inside the new iTunes Music Folder, I created subfolders named Movies and TV Shows. I then moved all .mov and .mp4 files into the Movies folder, all .m4v files into the TV Shows folder, and the rest of the music files (.mp3, .m4a, and .m4p) into the iTunes Music folder directly. This prevents duplication of data during the next step.
Back in iTunes, go to File –> Add To Library… and select the iTunes Music Folder. iTunes will scan all files and reorganize (in place) everything into named and sorted artist and album folders. Each file gets added to the library – music, videos, TV shows, and movies.
From chaos comes order – one fully functioning iTunes library!
Images
Pictures were next. To make sense of unnamed images, I created a new iPhoto library (Option-Click when launching iPhoto), then went to File –> Import to Library and selected the recovered pictures. The import process can take some time (an hour in this case), but when finished you can see everything in a scalable grid view and get rid of unwanted cruft.
You’d be amazed at how many tiny images from web cache files and help documents exist on a standard hard drive!
Other Documents
The remaining document types? The auto-renaming from FileSalvage wasn’t too useful here. For documents containing text (Word, Excel, PDF, etc.), Spotlight will eventually reindex the content, so you can try finding things via a text search (requires Mac OS X 10.4 or higher). That’s okay, but far from ideal.
Remaining options: Open, Preview, or Quick Look each file, then delete or rename manually. This is the way I had to return the data to my client.
The Moment of Truth
The moment of truth. I explained the situation. Fortunately, my client was most concerned with recovering the videos, TV shows, and movies. Since that was all accessible via iTunes, the renaming issues were unimportant, and he was satisfied. A looooong weekend for me, but everything worked out.
Observation: You haven’t earned your stripes as a computer consultant until you’ve accidentally erased a client’s data. To continue working as a consultant, you are then expected to pass the next test: Recovering the client’s data. I’m glad to say I passed, but the journey was not a straightforward one.
If you deliberately delete a client’s data, you probably should not work as a computer consultant….
Why is it so hard to recover filenames in Mac OS X? I found myself missing Norton Utilities UnErase from the Classic Mac days – and I don’t say that very often!
Deleting, Erasing & Partitioning
Deleting a file or folder removes the entry for that item from the disk directory. Immediately after deletion, a file’s data still remains on the disk where it was, but the directory now says, “That address is vacant.” As long as you don’t write anything new to the disk, recovery is usually straightforward. On the Mac, moving a file to the Trash and then emptying the Trash deletes the file. (You can also use the rm command from a Terminal Window.)
A Quick Erase of a disk or volume means deleting the disk directory and replacing it with a new empty copy. The underlying file structure on the volume is not changed, and existing data remains in place until it is overwritten. A Secure Erase (typically a multi-pass process) deliberately writes data to the disk and is thus much more destructive.
By default Disk Utility does a Quick Erase.
Partitioning a disk removes all existing volumes on a device, then creates new ones with a new disk directories. However like Quick Erase, partitioning doesn’t actually remove underlying data, it just marks the space as available.
Losing Filenames
So why couldn’t I recover filenames?
I posed this question to ProSoft and SubRosaSoft tech support. Here are the responses I (quickly) received from both companies:
- ProSoft: It’s most likely a problem resulting from the reformat which wiped out the old file catalog. A lot depends upon the type of file and the program which created it. Some programs embed metadata (in the case of MP3s, they are called ID3 tags; in the case of camera images, it’s called EXIF data) which may contain the name of the file, but that does not hold true for each and every file type.
- SubRosaSoft: The file names will not be included as they are not actually stored in the file but rather in the system’s catalog/b-trees. As soon as the file is deleted, the information will be removed and the space recycled and overwritten. FileSalvage will recover your files to the folder of your choice but the specific folders they were in and placement will not be the same.
Wow. No chance of filename recovery in OS X – not even with a simple delete and empty Trash. Could this be true?
With the hours spent to date and my curiosity piqued, I decided to perform some more tests.
I erased a smaller (500 MB) drive using 7 Pass Secure Erase – to ensure it was truly empty before starting – then partitioned the disk as a Mac OS Extended volume. I created a data folder of mixed files within organized subfolders: Documents (.doc, .pdf, .rtf), Music (.mp3, .m4a, .m4p), Movies (.mov, .m4v, .mp4), and Pictures .(jpg, .psd, .png). I then copied this data folder to the test drive.
Time to Begin Destruction
I deleted the Documents folder (with six files inside) and emptied the Trash. A typical operation performed many times daily, and one in which you’re likely to blow away a needed file.
I fired up Data Rescue II and FileSalvage, scanned the drive with each (much faster this time), and lo and behold, neither program could recover filenames! Even after just this simple deletion. More surprisingly, Data Rescue II only recovered the Word (.doc) and PDF documents, missing the RTF files entirely. FileSalvage found all six files.
I decided to continue and see if there was any effective recovery difference between erasing a drive versus partitioning a drive. I used Disk Utility to Quick Erase the test drive, ran both programs again, and got the expected assortment of sequentially renamed files sorted by type. This time there were a couple of differences between the two programs’ results – about a 95% match, but not identical. It’s definitely worth running more than one recovery utility if possible when trying to rescue data.
Finally, I used Disk Utility to partition the drive, created a new volume, then ran each recovery program one final time. There was no difference in results from the scans of the erased volume vs. the partitioned drive. The exact same files were recovered. This probably wouldn’t be the case if more than one new partition had been made on the test drive, but at least I hadn’t made things any worse by choosing “partition” rather than “erase” with my client’s drive.
For the moment, a dead end. As they say in the ‘hood: “Bummer, dude. Made a backup lately?”
This article was originally published on Adam’s Oakbog website. It has been adapted and reprinted here with his permission.
Keywords:#undelete #macundelete
Short link: http://goo.gl/rrUpAJ
searchword: macundelete
