
Swap space. Swap files. Page files. Virtual memory. It’s all pretty much the same thing: Extending your computer’s physical system memory (RAM) by swapping data to and from your hard drive or SSD.
For those of you with slow hard drives (or, more importantly, SSDs, which can have their lives shortened by overuse), swap space can be a real drag. (This applies to running your PC from a USB flash drive or a Compact Flash or SD memory card as well.)
Here’s how to “drop the swap” and gain a little performance on a hard drive and a lot of life on an SSD.
Hold It!
Before proceeding, answer this quick question: Does your PC have at least 1 GB of RAM? If so, you can skip the rest of this. If not, well, I hate to tell you this, but unless you’ve got a really lightweight version of Ubuntu, you may encounter issues that could result in data loss.
Don’t say I didn’t warn you! As always, it’s smart to back up your data.
Windows Users
Sorry to say it, but Windows is too dependent on virtual memory for this to work. However, I hear the “lovely” Windows 8 will use RAM more efficiently, so please put down the tomatoes!
 Mac Users
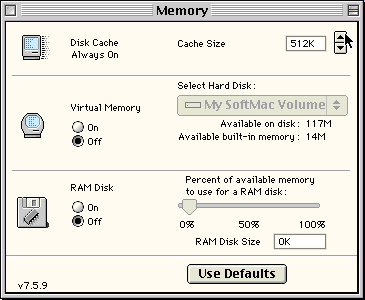
The same goes for Mac OS X, but if you’re using the Classic Mac OS, you can disable Virtual Memory from the Memory control panel.
Testing
This was tested on my IBM ThinkPad T42 and my girlfriend’s ThinkPad X41 Tablet, both running 32-bit Ubuntu 12.04 Precise Pangolin.
If you want to see how your system will run without swap before making system changes, pick up GParted Partition Manager from the Ubuntu Software Center. In GParted, right click the partition that represents your swap, then click swapoff. If you want a Frankenstein-esque feeling, you can have System Monitor open during this whole process, so you can watch the available swap dropping until “not available” appears. Go ahead, do the mad scientist laugh – I judge not.
Reduce Swappiness
If you have any problems with the swap being totally off (like I did with my 1 GB-equipped T42, but not the 2 GB-equipped X41), don’t sweat it. You can reduce the “swappiness” (the tendency of the kernel to move processes to swap space).
- Open the Terminal by pressing Ctrl-Alt-T
- Type gksudo gedit /etc/sysctl.conf
- Add the line vm.swappiness=10 to the bottom of the file
- Save and restart
Turning Off the Swap
If you check your memory usage and find you’re not using any swap, even when you’re at the height of your work (or gaming) time, you can probably follow the steps below if you’re using a stock install of Ubuntu (i.e., one big boot partition and a smaller swap partition)
- Grab an Ubuntu LiveCD or Live USB and boot from it.
- Use GParted in the LiveCD/USB to delete the swap partition (I did this on the X41 with no problems).
- If you’re really confident you won’t need the swap, you can extend your main partition out to cover the old swap partition. Since my drive had an extra 1 MB of free space at the end, I only extended it to meet the free space rather than filling it up totally – not sure why, but hey, it can’t hurt.
- Execute the partition changes.
- Shut down and boot from the hard drive or SSD.
When Things Go Wrong
The beauty of Ubuntu is that it’s very forgiving. If the lack of swap ever gives you trouble, just boot from a LiveCD/USB and create a new swap partition. If the swappiness values give you trouble, just repeat the process, putting the value at its default 60 rather than 10.
For SSDs, this process should help extend their lives considerably, so it’s well worth the risk.
Keywords: #swaplessubuntu
Short link:
searchword: swaplessubuntu
