
Introduction and Background
A little over 5 years ago I wrote about the mid-2010 Mac Mini being an outstanding Low End Mac for using as a media server in my article titled “Mid 2010 Mac Mini: The Perfect Low-End 1080p Media Center“. It checks many of the key boxes given the fact that it can use a retail install of Snow Leopard and thus is easy to get it running iTunes 10 (last version with Cover Flow) and also works quite well with Apple’s Front Row. The 2010 Mac Mini also gets a big leg up on the 2009 model with built-in HDMI connection and integrated power supply (no brick to haul around). All you need to take your entertainment on the go with the 2010 Mac Mini is a HDMI cable, power cable, wireless keyboard (preferably with integrated trackpad for ease of use – such as my Logitech K400), and finally with the Apple Remote you’re set!
What about the 2011 Model?
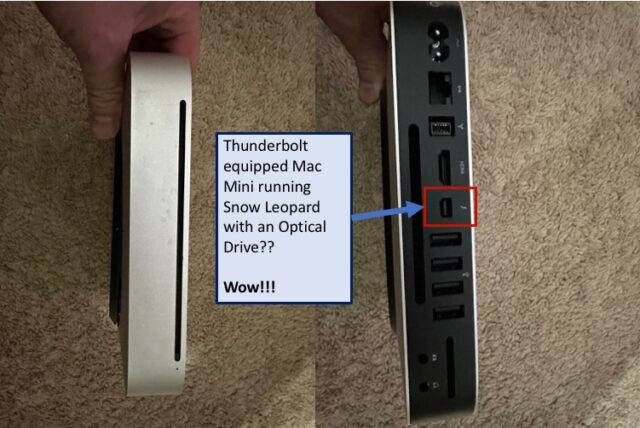
The 2011 Mac Mini ushered in some great new features such as “Core i” series Sandy Bridge CPUs with AVX v1 compatibility, Thunderbolt (also version 1), SATA III (versus SATA II on the 2010) AirPlay support and more, but unfortunately officially left Snow Leopard behind (the 2011 Mac Minis all shipped with Lion pre-installed and unlike the 2011 MacBook Pro, no machine specific version of Mac OS X Snow Leopard ever shipped for these machines). In addition, optical drives were completely dropped from the 2011 models. So, while the 2011 model gained some great features, it also lost some. Thankfully, some brilliant folks on the MacRumors and Apple forums did some poking around and found that you indeed could install Snow Leopard on the 2011 Mac Mini and this yarn was unraveling in early 2012 as people yearned for grafting Snow Leopard onto more powerful machines. While this was quite some time ago, credit is due where credit is due (thanks to MacRumors/Apple Forums user newfoundglory and others for solving this puzzle all those years ago).
MacRumors Post:
https://forums.macrumors.com/threads/snow-leopard-on-the-2011-mac-mini-now-possible-and-working-100.1202095/
Apple Forums Post:
https://discussions.apple.com/thread/3209335?answerId=16916075022#16916075022
Summary of How You Get Snow Leopard on a 2011 Mac Mini
In the Apple forums post, if you start reading from page 19 where newfoundglory explains how this is possible and then continue along (given a few other key contributions) you’ll see how this all unfolded, but the key elements are as follows to get Snow Leopard installed (unofficially) on a 2011 Mac Mini:
IMPORTANT: “Pre-Flight Prep”
Make sure the 2011 Mac Mini you want to use for Snow Leopard has a clean install of Lion prepared on a separate partition to grab a couple kernel extension files from later on. Why? These kernel extensions are then known to be working on that machine and with Lion just being one revision later and the first OS officially supported by these 2011 Mac Minis, it’s the best known route to go…
- I created a small partition (250 GB) on a 2 TB SATA SSD that I carved out for other purposes later down the road and allocated 1.75 TB for Snow Leopard as my “Media Server”.
- I then booted into Internet Recovery Mode by holding down the [COMMAND] and [R] keys simultaneously to invoke Internet Recovery Mode, which allowed Lion Server to be installed on this partition (for the 2011 i7 2.0 GHz Mac Mini Server I’m using – model known as MacMini 5,3) .
- You can retain this partition if desired for preservation of all the installed kernel extensions, upgrade it later to a newer OS or simply delete it and recapture the space for Snow Leopard later on once you extract the necessary kernel extensions, trusting on good backups.
- For installing Snow Leopard, you’ll want a machine that can boot into a Snow Leopard retail installer equipped with FireWire or a 2011 MacBook Pro using a machine specific 10.6.6 or 10.6.7 disc (you can then use FireWire or a Thunderbolt 1/Thunderbolt 2 cable to connect both machines).
- A fully matured Snow Leopard install on a 2011 MacBook Pro will prove to be the best asset since it should contain two of the three critical kernel extensions to get a 2011 Mini running Snow Leopard. Otherwise, you’ll be at the mercy of what’s out there on the web. You will not be able to find these other 2 kernel extensions on the Lion partition you create (just the first of the three) as they were designed for Lion, not Snow Leopard.
- A copy of Geekbench 3 will help to verify performance for the first of the three kexts you need to apply.
- The other two kernel extensions will easily be validated by checking the displays preference pane, testing displays with a mini DisplayPort dongle and playing around with iTunes.
Note on “pre-flight” prep:
- I have not tested Internet Recovery Mode on the dual core i5 (MacMini 5,1) or dual core i7 (MacMini 5,2) models from this family to verify if it still pulls down Lion, as I do not own one of these machines, but to ensure the smoothest process that’s been verified to work, I’d recommend making sure you go with Lion on the temporary partition regardless, so if Internet Recovery Mode on the MacMini 5,1 and 5,2 does not attempt to pull down Lion, simply get it from Apple via their legacy OS downloads.
Getting Started:
- Via TARGET DISK MODE (easiest and most straightforward method): You must have your other Mac handy that can run a retail copy of Snow Leopard that’s equipped with FireWire
OR..
You must have a 2011 MacBook Pro and the Machine Specific 10.6.6 or 10.6.7 disc that shipped with the first batches of Early 2011 models. If you use a 2011 MacBook Pro you can choose to connect to the 2011 Mini via Thunderbolt (Thunderbolt 2 cables work fine) or FireWire 800. - IMPORTANT: Connect the 2011 Mini to a display via HDMI only (DisplayPort, Dual Link DVI, and VGA displays connected using a dongle via the Thunderbolt 1 port are going to be dodgy/limited or not functional at all until you run through all the necessary steps to enable proper graphics support).
Note: If you use a modern 4K TV to connect the 2011 Mini, you may also need to manually enable compatibility mode on the HDMI port you are using due to older HDCP protocols. - Be sure to start off using a wired keyboard/mouse at first until everything is up and running (official Apple Keyboards tend to be the best option at first until things are running smoothly). I used a wired low profile aluminum Apple Keyboard and Mighty Mouse and all worked well.
- On the wired keyboard, put the 2011 Mini in Target Disk Mode by holding down the [COMMAND] and [T] keys simultaneously immediately after hearing the startup chime. Once you see a Thunderbolt/FireWire icon on the screen, release these keys. Connect either a FireWire Cable or Thunderbolt Cable (if desired with a 2011 MacBook Pro) to the Mac you are using to install Mac OS X Snow Leopard.
- Run the appropriate installer (either the machine specific 10.6.6/10.6.7 disc or Snow Leopard Retail depending on the machine you’re using) and install Snow Leopard on the partition you allocated for it. This should take around 25-40 minutes.
Note: You cannot use Retail Snow Leopard 10.6.3 in conjunction with the 2011 MacBook Pro. Only the machine specific 10.6.6/10.6.7 discs will work with the 2011 MacBook Pro as far as a Snow Leopard installer goes. - Do not disconnect from Target Disk Mode just yet! After the install completes of Snow Leopard 10.6.3 (retail) or the machine specific 10.6.6/10.6.7 install, pull down the 10.6.8 update and save to the machine you used to install Snow Leopard on the 2011 Mini. You can then apply that update to the drive dedicated for Snow Leopard for the 2011 Mini that’s still attached via Target Disk Mode.
- Eject both partitions of the 2011 Mac Mini on the machine you completed the 10.6.8 install on and then you can pull the FireWire or Thunderbolt cable from the 2011 Mini and other machine safely.
- Shut down the 2011 Mini by holding the power button down. Press the power button again on the 2011 Mac Mini and immediately hold down the [Option] key on the wired keyboard to bring up the boot picker. Select the Snow Leopard partition! YES!!! INTRO VIDEO COMMENCING!! I really miss those..
- After enjoying the intro video, configure your machine and you’ll get what appears to be a normally functioning 2011 Mac Mini running Snow Leopard. Unfortunately, that not quite the case yet.. There’s several things to sort out involving 3 critical kernel extension files that will make your 2011 Mac Mini fully functional in Snow Leopard. One of them resides on the Lion Partition that was created as part of the “Pre-Flight” prep and the other two I found easiest to track down using a 2011 MacBook Pro as mentioned above.
Note (for validating testing with Geekbench 3):
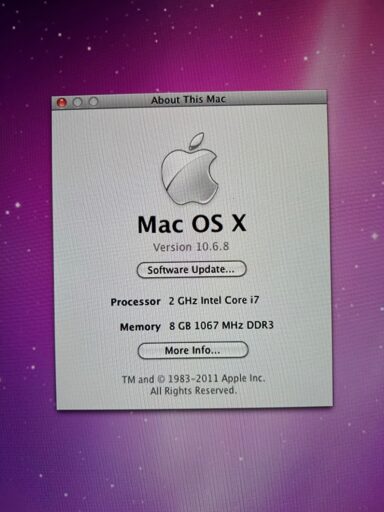
Right now, performance will be somewhat crippled as Turbo Boost and Hyper Threading are not enabled. If you use a copy of Geekbench 3 (still works for testing) you’ll get far below the maximum expected performance. On the i7 2.0 GHz quad core, it should be around 8500 to 9000 in overall multicore Geekbench 3 (it will likely be 1/2 or perhaps even far less), so run a test and then push along.. - In the Finder Preferences, make sure you select to show all connected Disks.
- IMPORTANT: You’ll then want to open a finder window for each partition. Hopefully you named each partition in such a way to easily keep track of each such as simply 2011 Mini SL and 2011 Mini Lion. I ran side by side windows and made sure to navigate to the following paths for each from the root drive:
System -> Library -> Extensions - From there on each partition, you’ll need to find the following file on each partition’s drive in the folder from step 11 above:
IOPlatformPluginFamily.kext - Right-click on this kernel extension package on each partition and click “Show Contents” to reveal further pathway to the necessary files.
- Expand the Plugins folder revealed from the prior step on each partition and you’ll find a file named “ACPI_SMC_PlatformPlugin.kext” and again right-click and choose “Show Contents” to see everything in the folder.
- Finally, you’ll see a folder named “Resources” for each partition. This is essentially the supported machines list. Here is where on the Lion Install you’ll find the inclusion of MacMini 5,1 (i5 2011 Mac Mini); MacMini 5,2 (i7 dual core 2011 Mac Mini); MacMini 5,3 (i7 quad core 2011 Mac Mini Server) – these will all be missing on the Snow Leopard side. You can add one for the machine you are using or simply add all three machines to the list by copying them from the Lion partition to the Snow Leopard Partition.
- IMPORTANT: After you have copied the files, open a terminal window and perform the following (actual syntax in green letters – press [ENTER] after each line of syntax required):
sudo su –
[enter your admin password if prompted – it will always prompt for the first time in a session]
cd /Sy*/Li*/Ex*/IOPla*/Con*/Pl*/AC*/Con*/Res*/
chown root:wheel Macmini5*
chmod 644 Macmini5*
-
Next, update the kernel caches:
kextcache -system-prelinked-kernel
kextcache -system-caches - Reboot your 2011 Mac Mini.
Note:
You can now re-test with Geekbench 3. You will now see numbers close to what should be expected for the 2011 Mac Mini if you followed all the steps to this point (around 8500 to 9000 with the quad core i7 2.0 GHz server model).
ANOTHER IMPORTANT VALIDATION POINT:
We’re not out of the woods just yet though.. if you click on the System Preferences gear and check Displays, there will be two displays showing even though you are only connected to one. The mouse pointer will still be glitchy and so will other things. Continue to the next step… - IMPORTANT: Now – From a fully matured and fully updated Snow Leopard installation on a 2011 MacBook Pro, navigate to:
System -> Library -> Extensions - Look for the following and verify the version of each by right clicking on each and selecting “Get Info”:
AppleIntelHDGraphics.kext
AppleIntelSNBGraphicsFB.kext
Note:
These both should be version 1.6.42 (as noted above this can be validated via the “Get Info” selection after right clicking each). If so, you’re golden!! Copy these to a USB drive or SD card. If not, you will need to hunt for these for Snow Leopard on the web or from a trusted source that has the 1.6.42 versions of these kernel extensions to resolve a lot of glitchy behavior. - Regardless of how you get these 1.6.42 files, they’re really a must to solve the pointer glitches, phantom dual display problems and other stability issues. Armed with your new copies of these files, you must first remove the existing copies installed right now on your 2011 Mini’s Snow Leopard partition in the same directory they were found on your MacBook Pro. The existing Mac Mini copies will likely have been 1.6.36 (if you want, verify this as well by right clicking and Showing Info – version will report accordingly).
- Drag the existing copies of the files noted in steps 20 and 21 above by dragging them to the trash.
- From the USB stick or SD card, copy over the 1.6.42 Snow Leopard versions of these files from the 2011 MacBook Pro or from alternative source to the same location the old ones were in (again: System -> Library -> Extensions).
- Next, with the old files moved to the trash and the new files moved over from the USB drive or SD card, perform the following commands via the terminal:
sudo su –
cd /Sys*/Lib*/Ext*
chown -R root:wheel AppleIntelHDGraphics.kext
chown -R root:wheel AppleIntelSNBGraphicsFB.kextchmod -R 644 AppleIntelHDGraphics.kext
chmod -R 644 AppleIntelSNBGraphicsFB.kext -
Again, update the kernel caches
kextcache -system-prelinked-kernel
kextcache -system-caches - Reboot your Mac!
- Validate by checking the Displays preference pane. The phantom display issue should be gone. The pointer should behave better. In fact, everything now will feel even snappier than ever! Graphics acceleration was definitely crippled without the correct kernel extensions!!
Bonus: What if I want optical media with my 2011 Mac Mini – There’s no Optical Slot!!
Funny thing to mention that.. while there’s no optical slot on the 2011, there is on the 2010. What’s the point though? In the spirit of ways we used to upgrade older Mac hardware, one of the oldest tricks in the book of upgrading a Mac also applies here.. a board swap. That’s right.. you can literally swap the board of the 2011 Mac Mini into the 2010 case! What’s the catch though.. that 2011 board is just barely too big to fit properly with the stock optical drive. Indeed that’s true, but aftermarket 9.5mm ultra slim optical drives such as the UJ-167 (Blu-ray ROM/DVD-RW DL) or the UJ-267 (BDXL-RW/DVD-RW DL) will fit with the 2011 board with no modifications needed at all (otherwise, there’s a plastic clip that needs removed). I talked about some these drives a while back myself in a 2012 piece famously titled “Blu-ray No Longer a ‘Bag of Hurt’ for Macs“, and when you use a UJ-167 or UJ-267 Blu-ray drive in a 2010 case with the quad i7 2.0 GHz board from a 2011 Mac Mini server, you will truly have the ultimate 2011 Mac Mini running Snow Leopard!
Conclusion: Was it Worth It?
Five to six years ago when I got the 2010 Mac Mini running as my primary media hub, and wrote the article previously referenced I would have really questioned myself as to why I would have bothered with all that trouble as I was fairly content with the 1080p video playback at the time. As bit-rate improved in more recent years though with some really high quality content out there, I found even the 2.66 GHz Core 2 Duo with 8 GB RAM and SSD struggling at times and wondered how I really could push it. I knew these whole convoluted processes with getting Snow Leopard onto a 2011 Mini was possible and so were those board swaps years ago into 2010 cases, but those 2011 i7 quad core machines held their value for quite some time and it just didn’t make a lot of financial sense until they got cheap recently (I could have easily spent $350+ on a 2011 i7 2.0 GHz just 5 years ago). I found my quad i7 2.0 GHz 2011 for around $70 shipped recently and to me that was definitely worth it.
I can now use the 2.66 GHz Core 2 Duo elsewhere as a backup and since the server case comes with 2 drive bays, maybe I’ll see how RAID-0 runs on it? Stay tuned as I dig deep into the potential of the ultimate super-charged Hybrid 2010/2011 Mac Mini in further follow-ups.
