In Part 1, I reported that my Clamshell iBook was running Mac OS 9.2.2 on its old 6 GB IBM hard drive. Well, now I have my Addonics CF-IDE adapter (see Silence Is Golden: Running Your Existing Notebook Using Flash Memory), and I just have one thing to say: Meep meep!
The First Wave
Ordering my parts on the Friday before Memorial Day weekend was probably not the best idea in the world, but then again, when have my ideas ever been the best? After ordering an 8 GB 60 MB/s SanDisk CompactFlash (CF) card with UDMA, an Addonics dual-CF to IDE adapter, two AirPort Cards (one for my iBook, one for my iMac), and an aftermarket battery, all that was left to do was sit back and wait.

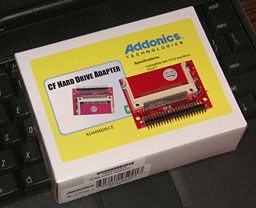
Single-slot Addonics CF-IDE adapter.
The first item to arrive was the Addonics adapter, coming via USPS. Opening the ridiculously large, nondescript box, I found some packing material and another box, this one about one-tenth as large as the first. Opening that box, I found the instructions to the adapter, and then, in a protective bag about a third of the size of that box, was the adapter itself. If you can imagine shipping a third of a deck of cards in a box the size of a Macintosh LC, that’s what it was like.

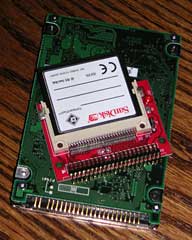
CF & Addonics card on 2.5″ drive.
The adapter itself was smaller than I had expected, about one-third the size of the iBook’s minuscule 2.5″ hard drive. Unlike the sample pics on Addonics’ website, this adapter has handy labels for the two CF slots: master and slave. Also, this adapter was missing the prominent LED bulbs that were shown in the sample pics. Other than that, it was just as advertised.
I didn’t have the 8 GB CompactFlash card yet, but I did have a 512 MB card that would probably work with OS 9.
Oh, what the hey!
The Teardown
 If you’ve never worked on a Clamshell iBook, you’re missing out an one of those defining experiences of an Apple service tech. The Clamshell is one of the most difficult Apple portables to access, for the simple reason that it was designed to be rock solid – nothing can bend, flex, or move inside its seemingly invincible polycarbonate case.
There are at least 20 or so screws that have to be removed in sequence to reach the hard drive, which is one of the last components that can be reached before the logic board, and so, preparing my screwdriver, with its 0, 1, and 2 Phillips bits, my T8 screwdriver, a pair of needle-nose pliers, and my iron will, I slowly proceeded to follow the official teardown instructions from the iBook service manual.
Everything was going great, but then a single slip with the needle-nose pliers threw the whole operation into jeopardy. It was a minor slip, but I had accidentally severed a crucial wire – one of the tiny wires near the connector for the display cable. Replacing the cable would have only cost about $10, but I was on a schedule here – I wanted to test this adapter before vacation, and with that coming up on Friday, there wouldn’t have been enough time for the cable to arrive before we had to leave.
Fortunately, I’m getting more and more experienced with my soldering iron every day, so I whipped it out, fired it up, and prepared for emergency surgery.
The operation was tense. If I was off by millimeters, I would create a short between this wire and the wire next to it, ruining the cable. After what seemed like forever, I got the solder aligned, dipped the wire in it, and pulled the iron back. The solder solidified, closing the connection between the two parts of the wire, and avoiding the other wires completely. Phew!
The First Test
The rest of the teardown went according to plan, and I had soon installed the CF adapter in the hard drive’s place, putting the CF card in the slave slot. Putting the iBook back together, while time-consuming, was an uneventful experience.
Then came the moment of truth: Had my soldering job succeeded? And would my CF card work? There was nothing left to do but plug in the iBook and press the power button.
Click. BONG!
In a few seconds, the backlight fired up, and then, to my great relief, the “system folder not found” icon popped up. The solder had worked, and the iBook was okay.
Popping my OS 9 install CD in the iBook’s CD-ROM drive, I waited as the iBook slowly booted from the disc. Why it took so long this time I’m not sure, but it was a good two minutes or so before I could get to Drive Setup.
Almost immediately after opening Drive Setup, I saw exactly what I wanted to see – the CF card had been recognized, but it needed to be initialized. A click, and a few seconds later, the CF card popped up on the desktop as a non-removable hard drive – oops! You see, according to Addonics, the adapter had some compatibility issues with non-removable type CFs in the slave slot. Nonetheless, I went forward with the install.
After 20 minutes of watching the progress bar slide across its window, the install was complete. I restarted the iBook, anxious to see how the CF performed.
After the bong, there was silence. Total silence. No fans, no hard drive noise – nothing. The backlight blinked to life, then the boot screen appeared – and was quickly gone again. In less than a minute, the desktop was up (blueberry again).
Already impressed, I decided to open SimpleText, just for kicks. It took less than a second for Sherlock 2 to find the app on the unindexed drive. Then I double-clicked SimpleText, which appeared a fraction of a second after I heard the second click.
That’s when I realized what kind of speed demon I was dealing with.
iBook, We Have a Problem
Throughout that day, I was testing the iBook on and off. I tested how fast it was able to surf the Web (using Classilla 9.2.2) via ethernet, and sure enough, having the Virtual Memory off and the browser cache loaded on the speedy CF gave the iBook enough speed to access even fancy sites like Engadget. I was able to index the CF in all of thirty seconds or so, making Sherlock 2 even faster than it already was.
Then, of course, the predicted issues with the CF in the slave slot came to the fore. The iBook would wake up randomly, displaying only a white screen, and would have to be restarted. This happened many times, and I began to worry that it might not go away when I installed the 8 GB card.
Full Power
The next day, the 8 GB card arrived via UPS. Compared to the old 512 MB card, this thing was sexy – dark colors and reflective lettering: SanDisk Extreme. It was one of those cards that gives you a tingly feeling as you hold it in your hands.
Once again, I tore down the iBook, removed the 512 MB card, and inserted the SanDisk Extreme in the master slot. Once again, I put the iBook back together, snapped the case shut, ran downstairs, and plugged it in. Once again, it booted the OS 9 CD perfectly.
Another 20 minutes to install OS 9, and then the iBook was ready for some action. As before, Classilla 9.2.2 provided a great Web experience (God bless you, Classilla devs!), but I didn’t notice any improvement over the 512 MB CF as far as speed went.
Installing OS X
However, I now had some room to play with Mac OS X, so I got out my OS X 10.3 Panther CDs and ran through a light installation of Panther (minus some printer drivers and all the foreign language sets).
The last time I’d run Panther on this iBook, it had turned my somewhat fast system into a snail. This time things were different. Panther booted in 45 seconds, opened System Preferences in 3, opened iTunes in 3, iPhoto in 7, and Safari in 4.
Now that’s what I’m talking about!
Anticipation Is Makin’ Me Wait
I don’t have any more time to test the iBook at present, but, to my relief, the white screen issue is completely gone – it left as soon as I installed the SanDisk Extreme in the master slot. For those of you who decide to buy this adapter, make sure to use a removable-type CF in the slave slot and a UDMA CF in the master slot, and then everything should go fine.
To anyone considering upgrading their IDE-equipped Macintosh to a CF-IDE drive or SSD, I’d say go for it! My iBook is three times the machine it was when I bought it in 2007, and I can’t wait to get it mobile again.
Looking Ahead
For those of you who’ve enjoyed reading this series of articles, I’m sorry to have to say I won’t be able to write the next one until after I get back from vacation next Friday, so it’ll probably be at least Monday before it hits Low End Mac, depending on when my battery arrives. The third one should be a doozy, since I’m going to be testing it in regular use with Microsoft Office 2004, iPhoto 2, some retro games, and a whole score of other applications.
Until next time, viva la iBook!
Continued in Resurrecting a Clamshell iBook, Part 3.
Keywords: #clamshellibook #compactflash
searchword: clamshellresurrection


