
I purchased a Lombard PowerBook G3 in 2005 and started upgrading it, adding everything from more RAM, and a bigger hard drive to a DVD-RW. I parted with it in 2007 and kind of missed it, so I bought another one recently and plan to do the same upgrades to it, maxxing it in every way.
- Original specs: 333 MHz G3, 192 MB RAM, 4.3 GB hard drive, CD-ROM, Mac OS 9.2.2
- Final specs: 400 MHz G3, 512 MB RAM, 20 GB hard drive, DVD-RW, Mac OS X 10.4
This is a nice machine for its age (built in 1999) and still capable of meeting most needs for most users. It is capable and supported by Apple to run Mac OS X 10.3 Panther. With 512 MB, mine coped very well.
With a modified Tiger DVD I managed to install Mac OS X 10.4 Tiger on my Lombard without the need for tweaking, hard drive cloning, or using third party installers like XPostFacto.
There is plenty to be done to boost your aging PowerBook. You can upgrade the RAM, replace the hard drive and the optical drive, and upgrade the processor to a faster G3 or even a G4. This guide shows you how to do everything except the G4 and optical drive upgrades. The optical drive upgrade is covered in Replacing Your Lombard or Pismo Optical Drive with a SuperDrive.
Although this is a Lombard guide, a similar process is required for WallStreet, PDQ, and Pismo models of the PowerBook G3.
These are very easy machines to strip down, so lets get started.
1. Preparation
Before you start ripping out the insides of your lovely PowerBook, you need to power off the machine and remove the mains plug. Leave it for about 10 minutes before you do anything else to it. This will just let it cool off a little.
2. Drive Bay Removal
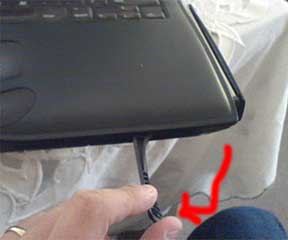
Next, remove the battery. Pull the release tab, and the battery will pop out a little. Now pull the battery further until it is clear of the machine.
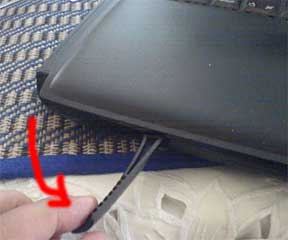
Next, do the same to the optical drive.
For instructions on how to replace the CD-ROM drive with a different drive, please see step 11 at the bottom of the page.
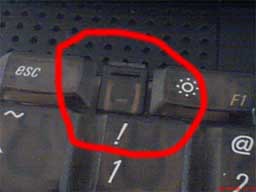
3. Keyboard
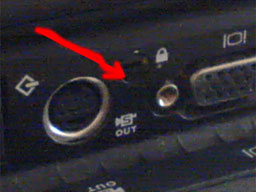
The next step is to remove the keyboard. On the back of the PowerBook, where the ports are, there is a small metal screw/lock. Twist this into the unlock position.

These tuck under the casing, and once slid down they should pop the keyboard up slightly. If the keyboard does not pop up and you are sure the tabs are down properly, gently lift the keyboard.
It is important to note that you do not need to remove or unplug the keyboard, merely lay it flat on the trackpad/palm rest. Be careful not to pull on it too much, as it is still attached.
If you need to replace the keyboard please see step 12.
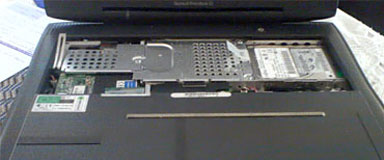
4. Metal Shield
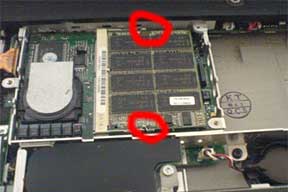
As you can see in the picture to the right, there is a metal shield below the keyboard. It is a heat deflector. This is the next object to be removed.
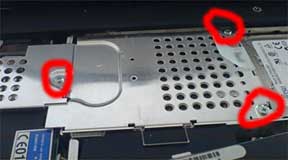
There are only three screws holding this down. Two are at the end near the hard drive, and one is in the center of the plate.
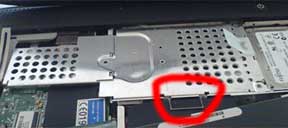
Once you have removed these screws, put them somewhere safe. Now you are ready to remove the shield. There is a small metal “pull tab” located at the bottom in both of the above pictures. Lift this and gently tug on it.
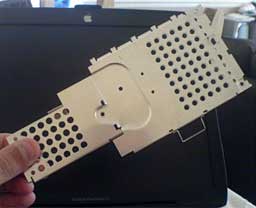
The metal shield is tucked under the casing at the top of the PowerBook and with a gentle tug it should free itself.
Put this aside once removed.
5. Hard Drive Removal
Next, we need to remove the hard drive. The two screws you removed from the metal shield were also holding the hard drive caddy down.
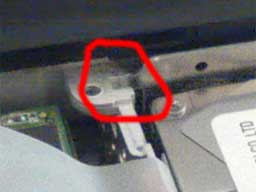
You will notice a little plastic tab, which is attached to the hard drive caddy. Gently lift this so the end of the hard drive is raised enough to be removed.
The other end of the hard drive caddy is tucked underneath the right side of the the case, so it just needs a little manipulation to free itself.
WARNING: The hard drive is still attached, so do not pull too hard.
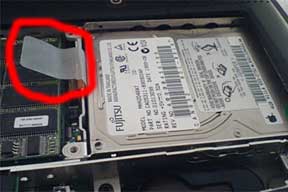
Once raised, you will see a small ribbon cable attaching the hard drive to the processor card. It is attached via a small connector. Gently prise this free and place the hard drive (in its caddy) in a safe place.
For those who want to replace the hard drive, there are four small screws attaching the hard drive to the caddy. These are located in the black stoppers. Unscrew using a T7 screwdriver, then gently remove the IDE connector from the end of the hard drive.
To be sure the replacement drive you are looking to use in the PowerBook will work, check out Accelerate Your Mac. Most drives will work, but I cannot be held accountable for incompatibility. The original 4 GB drive in my Lombard was made by Fujitsu, but the 20 GB I replaced it with is an IBM Travelstar.
NOTE: This guide is a take apart guide. It is your responsibility to ensure that replacement components will work.
Anyway, simply connect the new hard drive to the IDE connector and place it back in the caddy. Then replace the four removed screws, and it is ready to go back in the PowerBook when the time comes.
NOTE: When replacing the hard drive, make a note of the jumper settings on the old drive and copy this on the new one. From my experience, the original 4 GB hard drive had no jumpers on it, and neither did the 20 GB drive I put back in it.
6. Top RAM Slot
If you are only intending to replace the top RAM stick, you can leave the processor card in place. Simply pull back the two metal connectors gripping the RAM, and the RAM should spring up. Then just pull it free and replace it with the new stick of RAM.
INFORMATION: From searching various memory providers, you can put in low-profile or high-profile PC66, PC100, or PC133 RAM in the top RAM slot, but only low-profile modules in the bottom slot. Apple states that the maximum RAM is 384 MB, which is 256 MB in the bottom and 128 MB in the top. It is possible to install 512 MB with 256 MB in each slot – I have. This is probably because of the availability of RAM when the PowerBook was produced.
If you are only intending on replacing the top RAM, this is as far as you need to go. You can now reverse the above steps and put your PowerBook back together.
NOTE: Please refer to Step 10 on reinserting the hard drive caddy.
For those who want to replace the bottom RAM, read on.
7. Processor Card
According to Apple, the following steps are only supposed to be done by an Apple certified tech. It is not a complicated process, but it will require a little nerve, as it removes the brains of your PowerBook.
If you have removed the top RAM stick, great; if not, do so now.
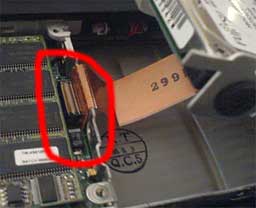
To remove the Processor Card, place a credit card or something that isn’t going to scratch the board (i.e., not a screwdriver) under the far edge of the card. This is the edge in the picture above that is nearest to the KT/QCS stamp.
BE VERY CAREFUL: The card is held in by a small connector on the underside and kept in place by two tabs at the other end.
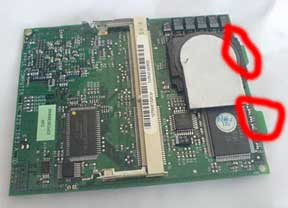
Once you lift the card at one end, it should free of the connector. Now all you need to do is remove the card tabs from the frame. Give it a little wiggle, but be careful.
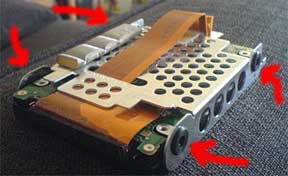
You can see the two tabs in the picture (for this picture the card has been rotated 180°).
If you have the 333 MHz processor, you can simply put in a 400 MHz card from a faster Lombard and upgrade. They are interchangeable. I recently swapped my 333 MHz card for a 400 MHz, and it worked with no problems.
8. Bottom RAM Slot
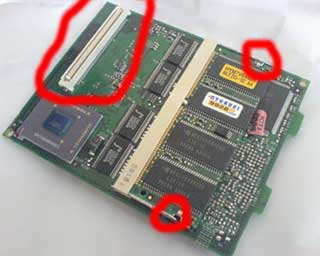
If you flip the processor card over, you will see the other, smaller (low-profile) RAM stick.
You will also see the Motorola PowerPC G3 processor. Please be careful with the processor card; it is the brains of your PowerBook.
Simply prise back the little arms holding in the RAM, and it will pop up slightly. Once again, pull it gently until it is free.
Insert the replacement RAM, and your processor card is ready to be reinstalled.
9. Rebuild
This is it for this take apart guide, unless you need to replace the keyboard (see step 11). Otherwise, simply replace the components in the reverse order that you removed them, noting any tabs, connectors, or specific methods of removal.
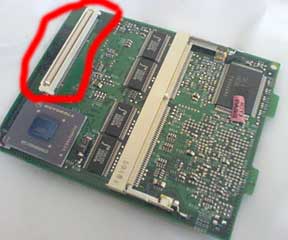
When you put the processor card back in place, notice the white connector just above the processor. This is what you had to prise off when removing the card.
To ensure this is reseated properly, simply make sure the card is in its correct place and push down firmly; you will feel it go home.
10. Hard Drive Caddy Note
Now you are happily putting everything back into place, this is a small note to remember.
When you replace the hard drive caddy, the top end where the screw holes are at the edge nearest the screen fits into a little lug. Ensure this it pushed into the lug – otherwise the metal shield will not go home.
11. Replacing the Keyboard
I recently had to replace the keyboard on my Lombard. It is a pretty easy process, but unfortunately I did not take pictures.
Follow steps 1-4 above. Then to the left of the processor card, towards the bottom left, you will see a small card held in place by two screws. Remove this – careful, it has a small white connector on the right hand side.
Once removed, you will see where the keyboard is connected to the mainboard. It should have a small loop of plastic, like a little handle. Pull on this gently until it is free.
WARNING: Be careful, this small connector has 40 pins on the bottom.
To fit the new keyboard, carefully push the new keyboard’s connector into the 40-pin connection, refit the modem card, and follow steps 4 downwards.
12. About This Mac
To ensure the hardware you installed is working (with the exception of the hard drive), you can check the Apple System Profiler.
You will know if the hard drive works, as when you go to install your Mac OS on it, it will ask you to initialise the disk and tell you how big it is. If it doesn’t initialise or tells you there is no drive, something is wrong.
Under OS 9, boot the machine. Click on the Apple Menu in the top left hand corner and select Apple System Profiler. On the first screen you will see memory, processor, and start up drive. If you click the Devices and Volumes tab, you can see which drives are installed.
Under OS X, boot the machine. Click on the Apple in the top left hand corner and select About This Mac. This will tell you what OS version you are running, what processor you have, and the amount of RAM installed.
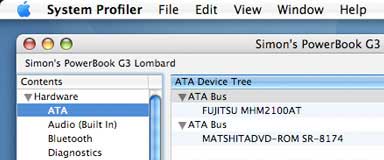
If you have upgraded the optical drive, click the More Info button, and, under ATA, it will show which drives are installed.
Have fun with your newly upgraded PowerBook. If you have any questions or suggestions for this guide, please email me.
Hardware upgrades are performed at your own risk. I and Low End Mac take no responsibility for any damage to any equipment or data when you perform an upgrade using this guide. I have successfully done this myself and offer this information to aid others.
Follow Simon Royal on Twitter or send him an Email.
Like what you have read? Send Simon a donation via Tip Jar.
keywords: #upgrading #lombard #powerbook #powerbookg3 #techspectrum #simonroyal
short link: http://goo.gl/o2L1Qu
searchword: upgradelombard
