
This article is taken from MacFacts 95. Scott Baret wrote and drew the original work in 1995 at the age of eight and began revising it a year ago. For more about this document’s history and Baret’s experiences with Macs through his school years, see About This Article at the end of the page.
Floppy Drives
When the Mac came out in 1984, the floppy disk was the only type of storage medium available. The first disks were single-sided and held roughly 400 KB of data. Two years later, the double-sided drive brought 800 KB disks into light, followed by the 1.4M SuperDrive in 1988.* The 2.8 MB extended density disks were never brought to the Mac (nor were they popular on IBMs). Today [1995], the 1.4 MB floppy has finally taken over after what seemed to be a long transition period.
Most Macs made within the past six years have a SuperDrive, and most new software seems to be shipping on these disks. Floppies look to have several years left as a popular storage medium, as CD-ROM drives are read-only at this point and the technology to produce CD-ROMs is expensive and, at least for consumer models, still slow and awkward.
Disks are also becoming less expensive every year, especially high density disks. Apple has provided a floppy drive with every model of the Mac with the exception of a few PowerBook models. External floppy drives, once a popular add-on, have fallen out of favor due to the popularity of hard drives.
A few Macs have the capability to use two internal floppy drives. These are the SE, SE SuperDrive, Mac II, IIx, IIfx, and LC. All other Macs support only one internal floppy drive.
External floppy drives are supported only by the 128K, 512K, 512Ke, Plus, SE, SE SuperDrive, SE/30, IIcx, IIci, IIsi, Classic, and Classic II. Note that an SE or SE SuperDrive with no hard drive (which takes the place of the second floppy in an SE or LC) can support a total three floppy drives.
All Macs have the capability to boot from a floppy. While System 7 is often difficult to fit on a floppy and some of the newer Macs ship with a bootable CD-ROM instead of the old Disk Tools, System Tools, or System Startup disk that once was shipped as a bootable floppy, some older Macs with no hard drives rely on floppies to boot. A bootable floppy is always good to have in times of trouble (refer to the troubleshooting section for more information on ideal startup floppies).
400K and 800K Floppy Drives
The earliest Macs (128K and 512K) used 400K floppy drives. Using only one side of the disk, these drives are largely obsolete and have been for some time now – Apple sold the last 400K drive in 1986. An external version was available to complement the internal drive. While there are few in service today, the ones that exist appear to be wearing out. Since most 128K and 512K machines still in service today have been upgraded to Pluses (or at least 512Ks), they should be free of these older, slower drives.
The successor to the 400K drive was the 800K drive. It was first seen in the Macintosh Plus in 1986 and became the only type of drive used in Macintoshes later that year. The only four models to use the 800K drive were the Plus, 512Ke, Mac II, and pre-August 1989 SE. Until recently, support for the 800K floppy had still been strong.
- COMMENTARY: I purchased a new copy of Number Munchers in May 1995. The old copy had shipped on two 800 KB disks, one containing the black and white version as well as a copy of System 6.0.7 and the other containing the color data file. The new one contained a single high density disk. As luck would have it, the computer I needed to install this game on was a Macintosh SE without a SuperDrive. I wound up copying the black and white program file, which was less than 400 KB, to an 800 KB disk using a Macintosh LC. Prices of high density disks have dropped dramatically over the past few years and are now affordable for software companies.
There are two different models of internal 800K drives. The older drives with red labels on the spindle tend to be noisier when ejecting disks and develop more ejection problems. The black label drives, which are most drives made in 1987 and later, sound like the early SuperDrives (described in the next section) and are more reliable. The pitch that the drive makes (also described in the next section) is also identical to that of the early SuperDrive.
A confusing subject for many is the external 800K drive. There are three models of this drive, all of which look similar. Most common is the Apple 3.5″ drive, which also works with Apple II computers. It has an eject button with a paper clip hole in the center, comes in platinum, and has a red light to the left of the opening. The drive was introduced with the Apple IIGS in 1986 and became the standard Macintosh floppy drive in 1987.
There were two other floppy drives that looked similar to this that sold in 1986 and 1987. For the Macintosh, there was the Macintosh 3.5″ drive, which was beige and lacked an eject button. For Apple II computers, the UniDisk 3.5″ drive was sold. This drive was the same white color as the Apple IIc and early ImageWriter IIs and did not work on Macintoshes unless a cable inside was disconnected to bypass a board that allowed the drive to function on an Apple II. The Macintosh 3.5″ drive is not believed to work with an Apple II.
High Density Floppy Drives
Also known as the SuperDrive, these are found in just about every Mac made since the IIx. While the drive was introduced with that model, it wasn’t used across the line until the Plus was discontinued. In August 1989, Apple began equipping the SE with a SuperDrive, as designated by the “SuperDrive” or “FDHD” (Floppy Disk High Density) label on the front of those machines.
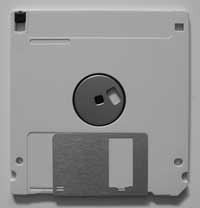 There are four different types of SuperDrive. The earliest one has a thin white rod that appears to check the hole on the disk as to whether or not it has the hole on the left, which is a telltale sign of a high density disk (on the right when looking from the reverse side of the disk, as in the image to the right). This rod is on the right hand side and is visible when looking inside a floppy drive. Note that 800K drives do not have any rod.
Around October 1990, with the introduction of the Classic, LC, and IIsi, these rods became green in color. The white ones seem to have problems with telling if disks are locked or not. While the visible rod does not appear to be the one affecting this, the white rod drives sometimes tend to read disks as locked when they are not. The number of drives affected is low, but this is a somewhat serious problem, as it often takes multiple reinsertions of a disk for the lock status to change to unlocked. If you have older drives that are failing, be sure to replace them.
Another variation appeared sometime around June 1992. These drives still have a green rod, but they seem to eject better. The ejection sound is different on these drives and sounds much more forceful. While older drives were prone to stickiness over time, these drives look as though they will not have this problem.
Manual Inject Drives
The newest type of floppy drive showed up in some of the late 1993 models, such as the LC 475 and LC III+. Unlike previous drives, where the disk would automatically feed in once it was pushed in far enough, these drives require a full push until the disk clicks, similar to the drives in IBM and compatible computers. The drives still eject like the old ones, but the failure to “auto-inject” takes getting used to.
These drives have a black door over the opening to prevent dust from accumulating inside the drive and are made by Mitsubishi (the same company that produced the Dodge Colt) instead of Sony, which had made drives for the first nine years of Macintosh computers. The sounds made by these drives are much different than that of the old ones, and the pitch is tougher to tell.
- HOT TIP: My experience with the newer drives is limited, as I didn’t have one at my building until last September [that’s September 1994], but the pitch made by the old drives is important to me. If you have perfect pitch, you can tell when a disk has an error. Whenever the disk is being copied or accessed, beware of an E flat. Although you hear an E flat when the disk is initially inserted, an E flat during a process often signals an error. Normal pitches to hear are an F and a D (higher than the F). Keep in mind the dreaded E flat is one whole step below the particular F that signals a good drive, while the D is a sixth higher than the F.
The external version of this drive was sold briefly around the turn of the decade. It looks identical to the Apple 3.5″ drive but has “FDHD” written on the front. This drive works only on computers that already have an internal SuperDrive. Third party drives are available for users of Macintosh Pluses who need to use high density floppies – and that would be any Plus user who wants to keep his computer running new software these days. Applied Engineering is the most recognized manufacturer of such drives.
5.25″ Floppy Drives
A common misconception is that a Macintosh can use 5.25″ floppy disks. Some have seen these drives sitting next to Macs and attempted to load a disk into it, only to find it does not read in the standard Macintosh system.
The Apple IIe card is usually responsible for the presence of a 5.25″ floppy drive. With the majority of Apple II software on these disks, most who wish to emulate an Apple IIe on an LC series machine need to keep one of these drives handy. A dual connector attaches to the Apple IIe card allows for the connection of this drive (as well as a joystick). The Apple 5.25″ drive and UniDisk 5.25″ drives both work with the card. Disk II drives and Disk III drives do not plug into this socket, but the Disk IIc, similar to the UniDisk 5.25″ drive, will probably work. The DuoDisk 5.25″ appears to be unsupported.
Another source of 5.25″ drives, although somewhat uncommon, is the PC card. Sold in the late 1980s, this plugged into SEs and IIs and allowed for the use of one 5.25″ disk in PC emulation. Apple sold a drive called the PC Drive, complete with the lever commonplace on IBM drives, specifically for this purpose.[Editor’s note: Although the NuBus AST Mac286 card for the Mac II series is covered on Low End Mac and the Web, you’ll find almost nothing about the relatively rare AST Mac86 card for the Mac SE on the Internet.]
Using PC Disks in the SuperDrive
The SuperDrive’s biggest claim to fame has always been the ability to read MS-DOS disks. Until a few years ago, this was done either through emulation or using a program called Apple File Exchange. PC Exchange, the latest MS-DOS disk reading program, allows these disks to be mounted directly in the Finder.
Using PC Exchange, swapping files with an MS-DOS computer is very easy. Some programs even have translators built in so the files can be read and written using the format of, say, WordPerfect 5.1 for DOS. The DOS disks can also be used as regular diskettes on the Macintosh, but they are noticeably slower.
SuperDrives also can read ProDOS (Apple II) disks. A 3.5″ 800 KB ProDOS disk, however, is not all that common because most Apple II series computers use 5.25″ disks. 3.5″ disks are most frequently used on ProDOS to transfer files from Apple IIgs computers.
Selecting Floppy Diskettes
Floppies are usually sold in boxes of ten, and companies use relatively complicated naming schemes to describe the capacities of the disks. DS/DD stands for double-sided, double-density and refers to an 800 KB disk. These disks can also be used as 400 KB disks with only one side being formatted. DS/HD refers to a double-sided, high-density diskette and refers to the 1.4 MB high density disk.
Avoid a DS/ED (double-sided, extended-density) diskette, as it will not work in a Macintosh. Remember that a 1.4 MB floppy cannot be used in an 800K drive (see next section).
Many companies are now selling diskettes preformatted. Unformatted diskettes must be prepared for use when inserted for the first time. Think of an unformatted diskette as a puzzle that hasn’t been assembled. Formatting solves the puzzle, placing the pieces in the correct places to form something worthwhile. Today, it’s commonplace to find diskettes formatted for both IBM (sometimes referred to as MS-DOS) and Macintosh (referred to as Apple by Verbatim) on store shelves.
For those who may accidentally purchase IBM diskettes, they can be reformatted to work on the Macintosh. Users of PC Exchange will not receive a dialog box to inform them that the diskette is not a Macintosh disk and should select “erase disk” from the Special menu in the Finder to reformat these floppies – unless, of course, the disk will be used on IBM computers as well as Macs.
- IMPORTANT: When formatting 800 KB disks, always choose the “double-sided” button in the dialog box that appears. “Single-sided” formats the disk as a 400 KB disk.
Finally, there are a good wealth of disk companies today, leaving a shopper with a big choice when making their purchase. Good brands include 3M, Verbatim, Maxell, BASF, and Sony.
- COMMENTARY: I have never had a problem with a Verbatim disk. Out of the dozens of 3M disks I have owned, only one has failed. A few Maxells, BASFs, and Sonys have also failed on me, but not in high numbers. The failure rate for generic disks, Memorex, and Fujifilm floppies has been much higher. I will buy any of my five recommended brands, but Verbatim and 3M have been my favorites dating back to the Apple II days.
What to Use in Each Drive
The names of the 400K and 800K drives provide a giveaway to the maximum capacity of diskette to use in each. 400K drives read only 400 KB disks, while 800K drives read both 400 KB and 800 KB disks. The SuperDrive adds 1.4 MB high density disks to the list of supported capacities and retains the backwards compatibility with 400 KB and 800 KB diskettes. It’s also the only type of drive that can read 3.5″ DOS formatted disks (with proper software installed).
A 400 KB disk can be formatted as an 800 KB by choosing “two-sided” in the erase disk dialog box. Since 400 KB disks aren’t carried by most vendors, those requiring the older and smaller capacity can format an 800 KB disk as 400 KB. The only difference in these formats is the number of sides used.
800 KB disks cannot be formatted as high density. Although hole punches exist in an attempt to give the diskette a second hole, the magnetic medium is different from that of a 1.4 MB disk and will cause problems. Likewise, a 1.4 MB disk cannot be used as an 800 KB without problems (this is most often done by accidentally formatting a 1.4 MB disk in an 800K drive).
Labels
Disks are sold with labels so the user can mark the contents of the disk. Disk labels should be marked only in ink, as the graphite from pencils can come loose in drives, potentially causing damage.
If a label is no longer relevant to the contents of the disk, it can be carefully removed. Should it leave sticky residue, cover the offending area with a new label or a label alternative, which can range from an Avery mailing label (which may have to be cut if it is too large) to an American flag sticker from the local Hallmark store. White out is not a good idea, as it could flake off in the drive over time.
Disks with no labels can be marked with a permanent marker such as a Sharpie. Should the information written in marker no longer be accurate, a label is required, as substances or even pencil erasers can leave byproducts that may seep between the crack of a disk, causing damage.
Write Protection
In the days of 5.25″ disks, write protection was done using tabs, which covered a notch on the side of the disk. 3.5″ disks make this much easier, eliminating the small stickers in favor of mechanics. A sliding piece of plastic is located in the hole on the right-hand side of the disk. If the hole is open, the disk is locked. With the piece of plastic (usually black, but sometimes red) closing the hole, the disk can be written to and erased. Always lock master disks of programs to prevent accidental erasure.
- HOT TIP: Some commercial programs ship on disks without the sliding piece of plastic to safeguard against accidental erasure. However, if one of these disks needs to be repaired with Disk First Aid, the hole must be covered. I experienced this problem once and solved it by going into storage to find 5.25″ disk locking tabs. Covering the hole with this tab made the drive assume the disk’s hole was closed – or the exact opposite of the desired effect on a 5.25″ disk. I simply removed the tab when I was done. For those without 5.25″ disk tabs, small stickers usually do the job. Scotch tape is also useable, but make sure it is sticking very well before placing the disk in a drive.
The Best Use for Failed Disks
At some point, every user will come across a floppy disk that for whatever reason ceases to function. While some folks like to throw the dead disks away, I am one to recycle as much as possible. My failed disks become drink coasters, and I have several around my house, including on my desk and near my TV. I make sure to write a memo on the label (although I can usually tell after a while since the condensation tends to warp the shape of the label). Practical, fun, and inexpensive, I have received many compliments on both the visual effects and the recycling aspect of these “high tech” coasters, which amazingly are approximately the same size as commercial coasters.
* Low End Mac’s convention is to refer to the drives as 400K, 800K, and 1.4M while referring to the floppy disks themselves as 400 KB, 800 KB, and 1.4 MB. ed
About This Article
June 2006
This is taken from MacFacts 95, which is heavily adapted from a mostly pictorial work written in 1995.
I wrote and drew the original work in 1995 at the age of eight and began “remastering” it a year ago. This process has resulted in my short descriptions being lengthened and the (sloppily drawn) pictures and symbols becoming words. I also was sure to use better word choice, as my vocabulary has expanded significantly since my days as a second grader.
MacFacts 95 (originally called MacFacts) contains information about the different models of Macs, information about components and peripherals, a troubleshooting section, and a list and (very brief) descriptions of my favorite software programs, many of which were educational games. Given the age of the original document, the information was outdated when I found it last year.
However, due to my interest (and that of others) in vintage Macs, I have left the information in the 1995 time period to provide an authentic “throwback” feel. The book was mostly handwritten and hand-drawn, with some parts of it on diskettes in MacWrite and Kid Pix format. It was adapted from a first grade project called “The Mac Guide”, written in October 1993. “The Mac Guide” survives in excellent condition to this day.
Be aware that a few things were modified or added to ensure accuracy and completeness when I reworked it. I’d say about 92% of the material is based on the original work while the other 8% was added.
Why did I write this at a young age? I was hopelessly obsessed with Macs. Everyone who visited my house as a youngster knew it, as my Macintosh LC was pretty much the only toy I played with (and one of the few I owned, as most of my Christmas and birthday gifts were for the Mac, ranging from software to an external hard drive).
Today I have many Macs, both old and new. My old LC is still with me in its original box!
A search of Low End Mac reveals a My First Mac article I wrote at the age of 13 describing my fascination with them as a young teenager (see A Total Mac Nerd at 13).
One of the sentences mentions that I did tech support work from an early age – five, to be accurate. On my first day of kindergarten, which was September 2, 1992, I was called upon to help with a minor problem on a Macintosh Classic involving the use of Kid Pix. This was not my first call of duty as a technician – I had solved a few problems in late 1991 for my father’s coworker – but it got me on the radar at my school.
When teachers found out I could optimize System Folders, install programs, and help everyone along the way with using software, I was thrust into the role of technician. The computer lady only was in the building once per week (I went to a private school), so I got a lot of hours. I did not get paid, but I didn’t care – it was fun and I always enjoyed it.
I left the school on June 2, 1995 at the conclusion of second grade, and when it was obvious I wasn’t returning (around March), I started making notes of everything with the intent of giving it to students who would return. However, I wound up taking the book home with me, since it was somewhat sloppy. I never did get around to cleaning it up until last year.
As far as writing it, I did it during school during “quiet time” when I couldn’t use my beloved Mac SE SuperDrive that sat in the classroom. (The SE remains one of my favorite Macs).
Some of my knowledge came from books (I read the Macintosh Bible in kindergarten and read four Mac books in second grade, all of which I counted for the school’s reading program, plus I read an occasional Macworld) while a good deal of it came from hands-on experience.
When I switched schools, I was again a student technician and remained in this role until graduation. I worked three summers with the IT department in high school and “retired” from duty last August. I was paid for those summer hours with no cash, but instead a Color Classic and five monochrome Classics. Now I’m in college majoring in elementary education, and I continue to work as a freelance technician on the side.
Keywords: #macfloppydrive #macdiskformat #macfloppydisk #macfloppyformat
Short link:
searchword: floppydriveobservations
