Your computer is a mess. There are icons all over your desktop, and
your files are not well organized. You have been using Mac OS X for
years, and yet you have the impression that you don't know how to
use it to keep your screen's real estate clean.
In the first incarnation of iBasics, I showed you how to
unclutter Mac OS 9 (see Organize Your
Files and Never Lose Track of Them), now let's give this topic
a spin under Mac OS X.
Sure, Spotlight (introduced in Tiger) is great, but having a
well-organized environment is extremely important to save time and
facilitate backups. It also gives you this great feeling when you
know where everything is.
The first step is building a new folder structure to store your
files. As I stated in previous columns, I recommend that you either
use two hard drives or two partitions on a single hard drive (put
your system software and all your applications on one, and save
your work files - text, music, video, etc. - on the other). That
way your data is safe if your startup disk crashes.
The other major advantage of splitting the software from the
data is that you can build a better folder structure than the
default one created by Apple.
Should you choose to organize your files by project, by company
(if you work as a freelancer or consultant), by file type, or
something else? My advice is to organize everything by theme, and
then by project or company, depending on what kind of things you
do.
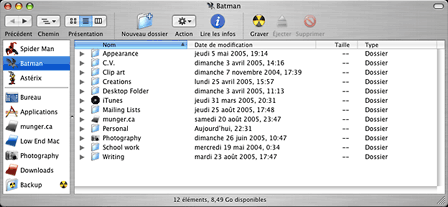
Work files organized by type.
Take a good look at my screen shot for an example. I do a bit of
writing for different print and online publications. I put
everything in my Writing folder, with subfolders for the different
publications. In the Personal folder, I put types of files together
(recipes, budget files, etc.). The same goes for the Creations
(graphics), School work, and other folders.
As you can see, organizing files in a folder structure by themes
gives you a good amount of flexibility once the main themes have
been chosen. Whether projects, files used for different
organizations, or types of files have to be put together in
subfolders, they will be easy to find - most of the time without
ever reaching for Spotlight.
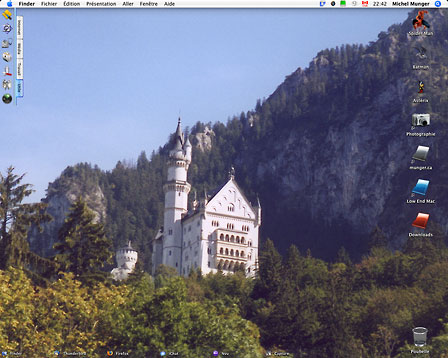
An uncluttered desktop (click for larger view).
How can you keep your desktop clean? Once your folder structure
is right for you, it' is quite easy to keep icons off the desktop,
putting only a few key aliases under your hard disk icons. To
create an alias, just click on a folder and while holding down the
mouse button, press the Option and Apple key. A small arrow will
appear under the bottom left corner of the folder's icon. Just drop
the alias on the Desktop (or anywhere else you want) and release
everything.
What I gave you is the hard but efficient way to do things. If
you need some extra help, Mac OS X and third-party software
can come to the rescue, especially to launch programs and consult
your frequently-used items and folders.
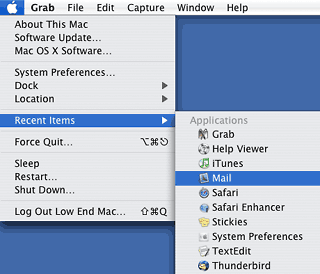 In the Finder
In the Apple menu you have a list of recently-used applications
and documents called Recent Items. This is especially useful as a
launcher if you always seem to use the same programs. Whenever you
select one of the items from the Recent items menu, it will be
opened. If you pull down the Apple menu and select System
Preferences and then click on Appearance, you are given the option
to decide whether you want Recent Items or not, and how many of
them (up to 50) you may want to appear. Don't hesitate to use the
Clear Menu command if you need to clear all the items.
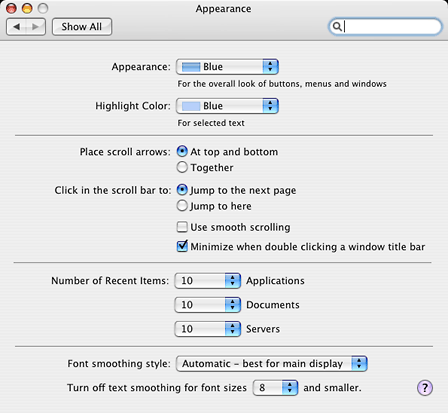
Appearance settings
If you are still new to Mac OS X and want to put a window away
temporarily, click on the yellow button in the top left corner of
any window to send it to the Dock. A multimedia effect will move
the window to the Dock. You can open the window again with a single
click on it in the Dock.
Do you believe that Apple has put too much eye candy around its
windows with the brushed metal interface, the buttons, and the
sidebar filled with folders? Get rid of all of those by clicking on
the lozenge-shaped button in the top right corner of a Finder
window for a bare bones appearance. In most applications, the same
button will have the same behavior to get rid of all toolbars.
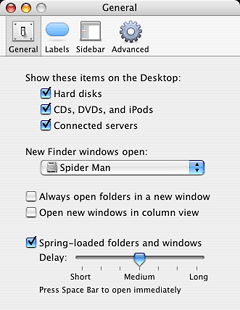 If you somehow found
the way to turn on the "feature" that opens every folder in a new
window, you can turn it off by pulling down the Finder menu,
selecting Preferences, and clicking on the General button. Then you
just need to uncheck the button where it says "Always open folders
in a new window". Whenever you click on a folder after that, the
Finder will use the existing window to display its contents.
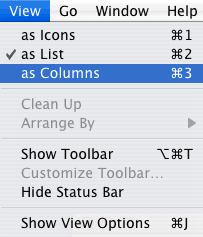 Another way to use your
windows more efficiently is to pull down the View button and choose
Columns. This will give you columns to display the folders and
files in Finder windows. The path works this way: to the left, you
will ultimately find your hard disk drives, and to the right, your
folders and files will be listed.
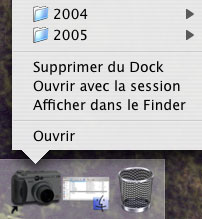
The Dock
I hate the Dock, but most OS X users find it useful. With single
drag and drop moves, the Dock can store icons for frequently-used
applications and folders. Take any application icon and drag it to
the first part of the Dock, to the left of the separator. Now you
will be able to launch it with a single click. This is much better
than putting the icon on the Desktop. Do the same thing with
folders to the right of the separator, and you will be able to view
its content and open items with a control-click (or a right-click
on multibutton mice).
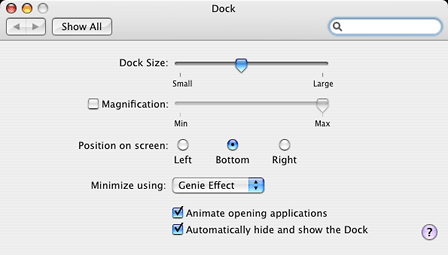
Dock options
To customize the appearance of the Dock, pull down the Apple
menu and select System Preferences. Click on the Dock button. You
can put the Dock to the left of the screen, at the bottom (which is
the default) or on the right. You can choose to have it displayed
at all times or only when you move you mouse around it, and adjust
its size.
DragThing
Do you want a Dock on steroids? For users who need more power
and limitless ways to personalize their own docks, DragThing
(US$29) can be a wise investment. With its added flexibility, you
can create multiple docks, give them any appearance, and put them
anywhere on your screen. You can use them to hold applications,
folders, hard drives, and other things, and make them behave the
way you want.
As a bonus, DragThing allows you to put a Trash icon on the
Desktop - you can even rename it - and it has a neat function to
hide windows when you switch between applications. I may write more
about DragThing in a later column. I've been using it for more than
five years, and I don't want to work with any other launcher.
Most of the above tips are fairly basic, but they can help you
become more organized and more productive on your computer.

Michel Munger is a journalist who lives in Montréal. He discovered the Mac in 1994, and his work on a PC reminds him every day why he embraced Apple's platform. Munger has also authored some MacDaniel columns.


 In the Finder
 If you somehow found
the way to turn on the "feature" that opens every folder in a new
window, you can turn it off by pulling down the Finder menu,
selecting Preferences, and clicking on the General button. Then you
just need to uncheck the button where it says "Always open folders
in a new window". Whenever you click on a folder after that, the
Finder will use the existing window to display its contents.
 Another way to use your
windows more efficiently is to pull down the View button and choose
Columns. This will give you columns to display the folders and
files in Finder windows. The path works this way: to the left, you
will ultimately find your hard disk drives, and to the right, your
folders and files will be listed.


