If you're like a lot of teachers, you create handouts and tests
for your students. Integrating photos and drawings into your
handouts is a way of breaking up the monotony of an all-text
document and emphasizing important points.
Unfortunately, when you print a color photo on a laser printer
or photocopy it, subtle shading and detail in the photo are often
lost, leading to a high-contrast blotchy picture. Sometimes it's
hard to tell what it is.
Some photocopiers have a "photo" mode, but that doesn't help you
when you laser print a document not worth copying in the first
place. This article will show you how to prepare your photos on
your computer so they'll print well, copy well, and retain most of
the original detail.
Let's face it: You're printing a black and white picture on your
laser printer. Even though the original image may be in color on
your computer screen, black and white is still the choice of
mass-produced copies. So how do you prepare the picture?
Most Macs come with a copy of GraphicConverter, a valuable
shareware program that Mac users have used since before OS X
to manipulate images and convert images between file types.
Here's an example of how to do the conversion on the fly using
an image you'd like to use in a document.

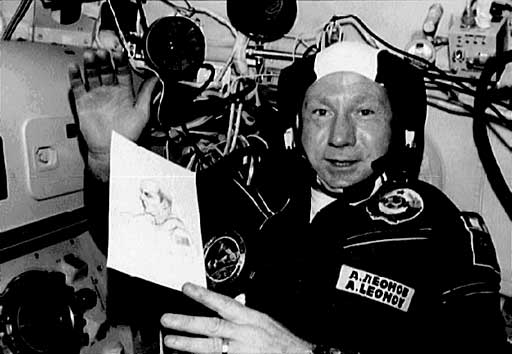
I found a picture on Wikipedia Commons to use as an example.
Here's a photo of Alexei Leonov, a famous Russian cosmonaut,
holding a drawing of an American astronaut. Note the dark flight
suit and low-contrast image in the drawing. If you print this image
on a standard laser printer, the darks will become darker and the
white areas will wash out.
Next, I opened GraphicConverter and hit Command-J, which copies
the clipboard to a new document (that way I don't mess up the
original image). Then I picked Effect > Black&White >
Dither... and used the default setting, Random Matrix with an 8x8
grid (600 dpi).
That generated this image (reduced here):

You'll note that some of the texture in the flight suit is
missing, but lighter colors, such as Leonov's face and, in
particular, the drawing, become more contrasty and easier to see.
If you print this article on a black & white laser printer,
you'll be able to see the difference between the print quality of
the two pictures.
Here's what dithering, which converts the image to black and
white with no grays whatsoever, looks like close up:

The resulting image can be copied from GraphicConverter and
pasted in Word documents, Examview Pro test writing software, or
any other document creator you are using.
Go forth and used more graphics to your documents.
is a longtime Mac user. He was using digital sensors on Apple II computers in the 1980's and has networked computers in his classroom since before the internet existed. In 2006 he was selected at the California Computer Using Educator's teacher of the year. His students have used NASA space probes and regularly participate in piloting new materials for NASA. He is the author of two books and numerous articles and scientific papers. He currently teaches astronomy and physics in California, where he lives with his twin sons, Jony and Ben.< And there's still a Mac G3 in his classroom which finds occasional use.


