Virtualization is a hot topic amongst computer users; it's
getting a lot of interest from IT departments wanting to be able to
run multiple servers on a single piece of hardware. In particular,
this lets them run older software, such as applications designed
for Microsoft's no-longer-supported Windows NT 4.0 Server, without
having to keep an old computer in operation.
Software developers and Web designers are able to test their
creations on multiple platforms without having to actually have
dedicated Windows, Linux, and Mac computers sitting on their
desktops.
Virtualization has been particularly of interest to Mac users;
it allows them to run individual Windows applications (like
Microsoft Access database) that lack Mac equivalents or to connect
to Internet Explorer-only websites if necessary without having to
hunt down a Windows PC. Apple's move to Intel-powered Macs has
resulted in newer and better ways to run Windows, Linux, and other
PC operating systems and software in virtual sessions on Macs.
Virtualization on the Mac
Parallels
Desktop , now in version 3.0, is the best
known and most widely used of this new generation of Mac virtualization
products. VMware, long a leader in virtualization software for
Windows and Linux is nearing the release of Fusion, its first
product for the Mac. Competition has pushed both of these US$79
products to improve performance and increase features and ease of
use.
, now in version 3.0, is the best
known and most widely used of this new generation of Mac virtualization
products. VMware, long a leader in virtualization software for
Windows and Linux is nearing the release of Fusion, its first
product for the Mac. Competition has pushed both of these US$79
products to improve performance and increase features and ease of
use.
But these two commercial products aren't the only options for
creating and running virtual computers on your Intel Mac. In
January 2007, InnoTek released VirtualBox as a professional-level
virtualization program that's available as open source software
under the GNU Public License (GPL). As open source software, any
interested can download, examine, and alter the source code. While
corporate users are expected to buy licenses, it can be freely used
by anyone for evaluation or personal use.
VirtualBox is available
in versions for Windows, Mac OS X (Intel), a growing number of
Linux distributions, and other so-called host operating systems. I
installed it onto a computer running Ubuntu Linux and onto an OS
X-powered iMac. Note that while the current version 1.40 is an
official release version for Windows and Linux, at the time of
writing the Mac version is still in beta. (And, like Parallels and
VMWare Fusion, it's only usable on Intel-powered Macs).
The VirtualBox Mac installer notes the following beta
issues:
"Currently, we are aware of the following issues:
- No support for Host Interface Networking
- No support for Internal Networking
- No support for audio input
- No support for VT-x/AMD-V (rarely required)
- No support for raw disk access
- On OS X 10.4.10, USB memory devices cannot be assigned to a
VM
- The NumLock emulation isn't implemented yet
- The VirtualBox kernel extension is currently accessible from
all user accounts
"Note that we are planning to address all known issues."
Since all these virtualization products end up doing the same
thing - installing a 'Guest' operating system that runs on top of a
'Host' operating system - it's not surprising that they are similar
to one another. Having worked with Parallels Desktop and VMware,
along with older emulation software for PowerPC Macs like Virtual
PC and Guest PC, getting VirtualBox up and running seemed pretty
familiar. Users are walked through the process of creating a new
virtual system with a relatively user-friendly wizard.
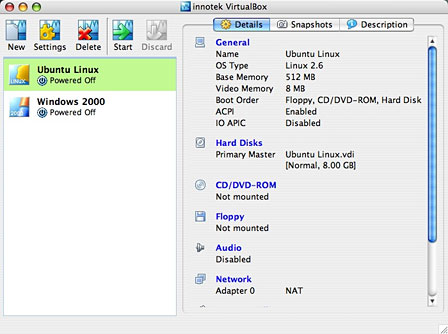
Creating a new virtual machine.
Users are asked to pick their desired Guest operating system
from a list. While relatively straightforward for Windows, this may
confuse wannabe Linux users: Rather than listing supported Linux
distributions (Ubuntu, Fedora, SuSE, etc.), it lists Linux kernel
versions; how many of us know which kernel is used with, say Ubuntu
7.04 vs. Ubuntu 6.10? Since I was installing the latest Ubuntu
release, I picked the latest kernel listed, crossed my fingers, and
hoped for the best. It seemed to work.
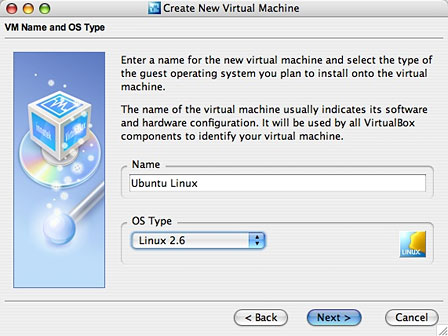
Choose your OS.
Users can accept the default settings for RAM and hard drive
size or easily alter them - I increased the default RAM sizes to
512 MB for both Windows 2000 and Ubuntu 7.04 Linux.
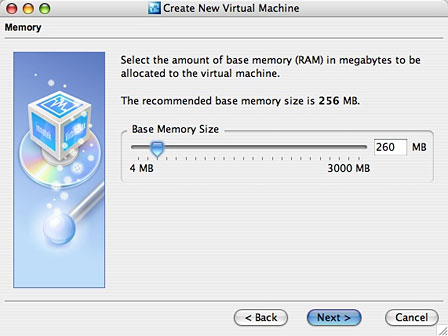
Set memory size.
Creating a virtual hard drive takes several steps, even if
you're accepting the defaults. A nice feature - the default is to
create a so-called dynamically installing drive image. With this,
the virtual 8 GB drive I created for my Ubuntu Linux system
won't automatically require that much space on my Mac's hard drive
- instead, it only takes up as much space as is actually required
by the files on the virtual drive (at the moment, 2.68 GB).
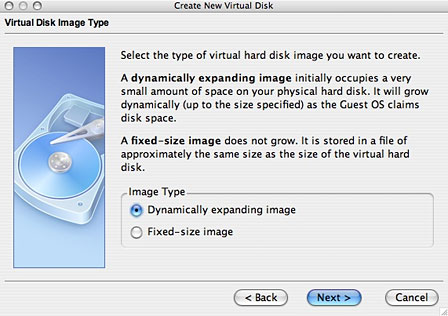
Create a virtual hard drive.
Once these are configured in the wizard, just pop in the install
CD for your desired guest operating system and click Start.
(Advanced users, which I'm not, can create scripts to replace the
Wizard).
Ready to go!
When you start up a virtual session for the first time, another
wizard walks you through a few steps necessary to get the guest
operating system installed. In particular, it checks whether you're
installing from a 'real' CD or DVD in your computer's optical drive
or whether you're using an image file. Most of us would probably be
using a CD.
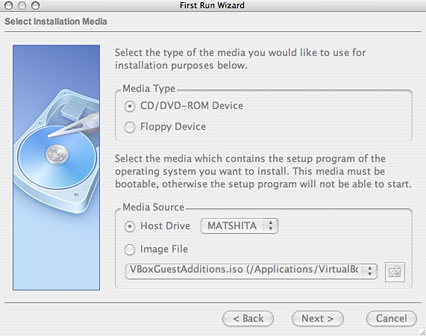
The First Run Wizard.
Once that's done, you're in business. Your guest operating
system installer should load, and everything should run as normal,
just as if you were installing onto a real, physical PC.
Ubuntu Linux booting from a CD.
The virtualized system includes virtual hardware for a network
adapter, sound adapter, video display adapter, etc. A few things to
note: The sound adapter is turned off be default; you can easily
turn it on, but be sure to pick the Core Audio option - the Null
Audio option leaves sound turned off.
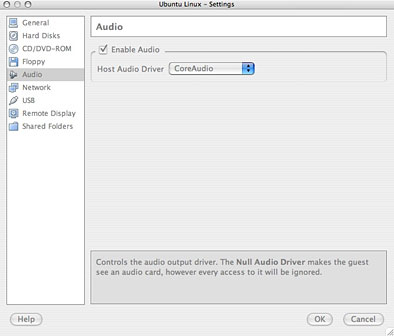
Enable Core Audio.
The display adapter uses 8 MB of RAM for video by default. While
both Parallels and VMware are working on adding DirectX support for
Windows gaming, you won't find VirtualBox a gaming powerhouse -
even if you increase the amount of RAM set for video. The default
8 MB gave me 32-bit graphics in a 1024 x 768 window, which was
fine for me.
I haven't tested Windows Vista, but I suspect that regardless of
the amount of video RAM set, it wouldn't support Vista's Aero
graphics transparency and other eye candy.
As with sound, USB support is disabled by default; it too can be
turned on giving access to USB printers, and more. (Note that 'USB
Memory Devices' such as flash drives are not supported in the
OS X Beta version I tested.)
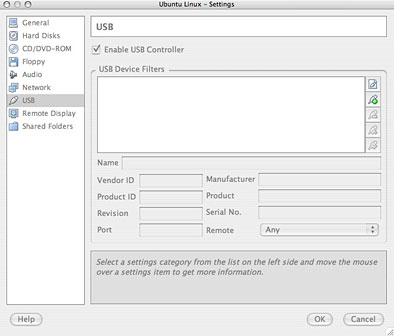
Enable the USB Controller.
Just like Parallels and VMware virtual sessions, you're going to
want to install "Additions" for improved functionality. Additions
are included for Windows and Linux; they offer improved video and
USB performance and smoothly integrate the mouse between the Mac
and the guest desktop. (This can cause problems, and once installed
it can be turned on or off - when this is not installed or turned
off, users need to press the left Command key to get access to the
mouse for the Mac.) The Additions can be installed from the
program's Devices menu; once chosen, a CD image is loaded and
appears as a drive, ready to run.
The Windows additions installed without a hitch in my test
Windows 2000 guest OS. I had to do a bit of fussing to make the
Linux additions install on my Ubuntu session, however.
Double-clicking on the VBoxLinuxAdditions.run file tried to load it
in a text editor rather than running the file. In the end, I copied
the contents of the virtual CD to a new folder on my desktop,
opened a Terminal session, moved to that folder, and from the
command line typed:
Sudo sh ./VBoxLinuxAdditions.run
After prompting for my password, the Additions installer ran.
(Linux gurus probably know more elegant ways to make this
work).

Installing the Additions in Ubuntu Linux.
While the Parallels and VMware additions provide drag-and-drop
between the guest OS desktop and the Mac desktop, VirtualBox lacks
a similar feature. As well, the software promises the ability to
set up Shared Folders - designated folders on the Mac that will
appear as virtual drives on Windows or Linux virtual systems. The
documentation tries to walk users through steps required to mount
these virtual drives in Windows and Linux, but this needs to be
made more automated. In any event, I couldn't get it to work - this
seems to be what the beta warning quoted above meant by 'Internal
Networking'. As a result, it wasn't as easy to move files between
my Mac and my virtual sessions as it is using the commercial
virtualization programs.
Performance seemed fine - as with Parallels and VMware,
virtualized sessions running on an Intel Mac seem to work at nearly
full speed . . . at least if you've got enough RAM to throw at
them. I've got 2 GB of RAM on this iMac; that lets me share 512 MB
of it with my virtualized PC operating systems.
If you already own a copy of Parallels Desktop, VirtualBox
probably offers nothing new. But if you've got an Intel Mac and
want to try out Windows, Linux, or some other PC operating system,
this free and open source virtualization software can be a usable
and attractive way to do it. It lacks some of the cutting-edge
features of Parallels or VMware (such as Parallels' Coherence Mode
or the ability to run a Boot Camp installation as a virtual
session), yet it's an impressive piece of software. And the price
is right! 

