A topic that frequently surfaces in the Mac user orbit, especially
among veteran Mac users, is what image editing application makes the
most sense to use as an affordable replacement for an old copy of
Photoshop.
What about Preview?
You say you didn't know Preview had photo editing tools? The Leopard
and Snow Leopard versions do.
It's not Photoshop - not even close. However, it may well be all the
image-correction software many casual users need. These days, Preview
is a lot more than a graphics viewer, incorporating some handy dandy
image correction tools that are not only user-friendly and intuitive to
use, but also work really well.
Consequently, if the main reason you need an image editor is because
you take digital photos or scan transparencies or prints onto your
computer and want to optimize them, you may not need a traditional
third-party image editor at all. Preview can probably do the job for
you.
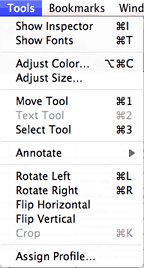
 Check
out Preview's Tools Menu. If the last time you checked was in OS X
10.4 Tiger or older, you'll note that there are some new
selections.
Say you've
downloaded of photo from your camera, and you're not quite happy with
the exposure, color rendering, or other picture attributes. For
example, here's a photo of my truck. It's straight out of the camera
(it's an old 3.2 megapixel unit). To my eyes, both color saturation and
contrast are washed out, it has a greenish color cast, and it isn't as
sharp as it might be.
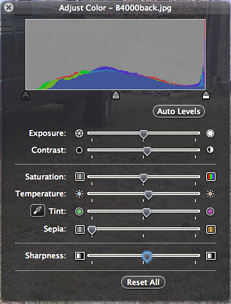
 Open the image in Preview (I'm using Snow Leopard) and choose
Adjust Color from the Tools Menu. A floating translucent black
color and exposure adjustment palette (reminiscent of the appearance
theme in the Pixelmator image editor ) will
appear, with seven sliders that facilitate adjustment of exposure,
contrast, saturation, temperature, tint, sepia (!), and sharpness.
That gives you a lot of adjustment range, but the Snow Leopard
version of Preview is actually dumbed-down somewhat from the Leopard
version, which also included sliders for brightness, black level, and
white level.
These sliders give you have real time feedback, and I find that
they work beautifully. I love to play with all possibilities, and after
my adjustment efforts, my truck photo now looked like this. It
definitely has more contrast pop, and I like the color balance better,
and I was also able to make it significantly sharper. (I like contrasty
pictures.)
However, if you're pressed for time or are not quite sure what
adjustment/correction effects you would like, just click the Auto
Levels button, and the program will make its best guess as to
optimum values, automatically adjusting the sliders. You can still
tweak individual qualities if you wish before saving the image.
What impresses me is how sophisticated this is and how well it works
- and all from one simple palette, showing other image editor
developers how it should be done. In fact, I'm not sure that this isn't
the all-round best tool I've ever used for this sort of image
correction. It's certainly the most convenient and has added a great
deal of value to the Preview application from my perspective.
But there's more. Preview now has an image scaling and resizing
tool as well, allowing you to conveniently and quickly change a photo's
resolution. Just select Adjust Size from the Tools menu and
either manually enter the desired dimensions in the provided fields or
pull down the menu and choose one of the resolution selections
provided. You can also change the resolution of your picture (number of
pixels per inch) by setting it in the resolution box.
As with similar tools in image editor applications, you can also
select Scale Proportionally, and the height value will
automatically change when you enter a new width value (and vice versa),
so your picture will keep its original proportions.
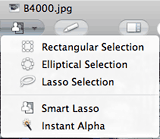
 The
Select menu gives you several options for selecting portions of a
picture, including extraction of part of an image from a simple
one-color background - such as a person standing against a clear blue
sky - or even a busy background.
There is also a Reassemble Image selection. When it's turned
off, Preview will adjust the image's size by making the existing pixels
bigger or smaller, but it will not change the number of pixels.
However, with Reassemble Image turned on, Preview will add or
subtract pixels as necessary to scale your photo up or down, averaging
the colors of neighboring pixels when you are scaling up.
Of course, if you need to do more advanced correction, such as red
eye or spot removal, or retouching, you'll still need an application
like Photoshop Elements or Pixelmator - or maybe the image correction
tools in iPhoto will do - but the above-described features are not the
totality of Preview's initiating capabilities by any means.

 Check
out Preview's Tools Menu. If the last time you checked was in OS X
10.4 Tiger or older, you'll note that there are some new
selections.
 Open the image in Preview (I'm using Snow Leopard) and choose
Adjust Color from the Tools Menu. A floating translucent black
color and exposure adjustment palette (reminiscent of the appearance
theme in the
  The
Select menu gives you several options for selecting portions of a
picture, including extraction of part of an image from a simple
one-color background - such as a person standing against a clear blue
sky - or even a busy background.
