Hamrick Software, developer of my favorite scanning software,
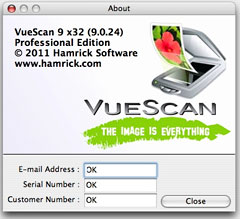
VueScan, last weekend released
its version 9.0.24 of the application, mostly a tweak and bugfix update
typical of VueScan, which gets updated regularly and frequently:
- Improved support for Image Capture scanners on Mac OS X
- Improved support for WIA scanners on Windows
- Fixed problem with some hangs on Mac OS X when starting up
VueScan is claimed to be the most popular scanner software in the
world with a customer base of over 130,000. Once you try it, you'll
understand why.
 I've been using
VueScan for years, starting with Version 7 back in the early '00s. It
was great software then, and it's only gotten better.
An interesting recent addition to VueScan's deep and extensive
feature set is support for importing scans directly into Adobe
Photoshop, allowing for faster, more convenient image importing
directly from the scanner.
"We have tens of thousands of Photoshop users, and we have had
numerous requests asking for the ability to import directly into
Photoshop.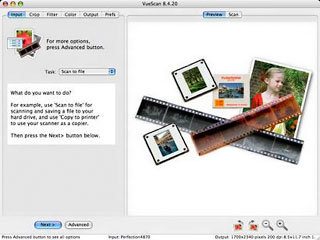 This
feature will provide our customers with both time savings and
convenience," comments Hamrick Software President Ed Hamrick. "This
capability automatically installs when you install VueScan, and makes
it easy to use your scanner from Photoshop. It works with both 32-bit
and 64-bit versions of Photoshop, on Windows XP, Windows Vista, Windows
7 and Mac OS X (Intel and PowerPC) 10.3.9 and later. Basically any
configuration of Photoshop will work with VueScan's Import filter."
 "We also added
support for TWAIN drivers for importing images from your scanner into
other programs," Hamrick continues. This also works with 32-bit and
64-bit systems, on all versions of Windows and Mac OS X. This means
that importing images using other programs is a lot faster and easier,
and also uses less memory when scanning."
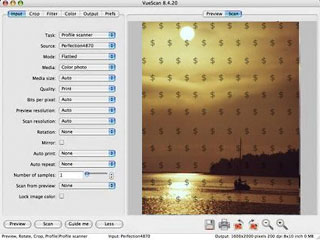
VueScan is marketed as crippled demoware (watermarked scans,
otherwise fully functional.
 Not only
that, but VueScan's frequent version updates keep it abreast of the
latest new hardware innovations and refine its performance. I've heard
some users complain about the frequency of VueScan updates, but you
don't have to update if it doesn't suit you. An old copy of VueScan 7.6
still works just fine on my old Pismo PowerBook. However, Ed
Hamrick does go above and beyond to keep VueScan current with new
scanners on the market and to constantly improve and performance and
enhance features.
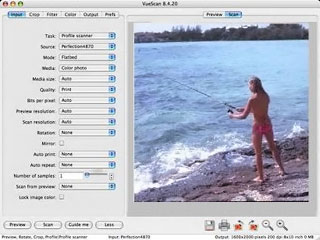 VueScan's "support
everything" philosophy makes it especially useful to owners of older
scanners, helping them get more use out of older hardware, such as my
Epson Perfection 4500 Photo flatbed and Konica-Minolta Dimage Scan
Elite 5400 Film Scanner, since it supports more than 1,500 flatbed and
film scanners. It's easy to use, relatively inexpensive, and includes
advanced features like restoring faded colours, batch scanning, and
other tools used by professional photographers and graphic artists.
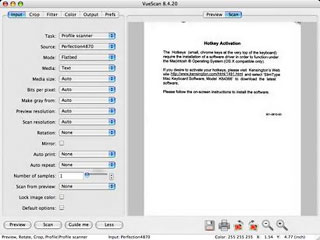 VueScan also incorporates an Optical Character Recognition
(OCR) engine for converting hard copy text to editable text. It works
with prints, transparencies or negative photographs and printed
text.
Start up VueScan, and it will identify and configure itself for your
scanner. Press the "Preview" button, and the scanner will preview your
image, which will appear in the right hand pane of the VueScan
interface window after VueScan processes the scanned data. A text
readout in the bottom field of the interface window keeps you apprised
of scanning and processing progress.
Once the preview image appears, you can use the crop box to specify
the desired crop for your actual scan.
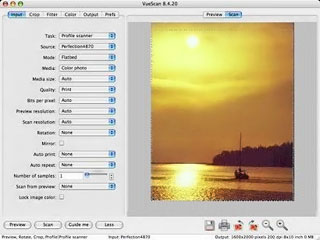
You can just leave VueScan in its automated mode and let it do its
thing, which it does very well, or click the "Advanced" button and
provide yourself with an array of scan configuration options.
For example, if colors don't look quite true in the preview, try
Control-clicking on an area of the image that should be gray. To reset
to the automatic color balance setting, Control double-click on the
image. If the lighting in the scene is unusual (i.e. at sunset or with
stage lighting), try setting "Color/Color balance" to "Neutral".
When everything is to your liking, press the "Scan" button, and the
scanner will do its stuff, and after another processing interval, a
scan of the image will appear in the window. Click "Save" to save it to
your hard drive or open it in an image editing/viewing application.
VueScan can save scanned images as JPEG files (by default) or TIFF
files (optionally). You can also copy and paste scans to image editing
apps via the Clipboard.
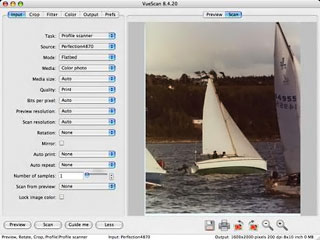 VueScan lets you
change options in the tabbed panels on the left side of the interface
window and displays images and histograms on the right side of the
window. The bottom left corner of the window gives instructions for the
chosen task and the bottom right corner of the window shows the
dimensions of the image that will be written if you press the Scan
button. Other commands are available in the menu bar, and the most
commonly used commands are available as buttons at the bottom of the
window. A vast number of settings and adjustments are supported by the
various menus and entry fields. VueScan keeps you informed as to what
it's doing with text readouts at the bottom of the interface
window.
The preview window is primarily used to show the cropping that the
automatic cropping has selected and to let you change cropping if
necessary. It's also used to give you a rough idea of what the color
and contrast will look like in the final scan. The scan window shows
the cropped image that can be written to a file or printed.
VueScan is a pure scanning application and doesn't have any
post-scan image editing functions, no TWAIN or Plugin interface
support, so you must do your scanning from the VueScan application and
then transfer it to an image editor for any final tweaking, but you can
configure your favorite image editing program to automatically open
each image when a scan completes. Use the "Prefs/External viewer"
option to configure. VueScan supports scanning of negative and positive
(transparencies) film images as well as prints and hard copy.
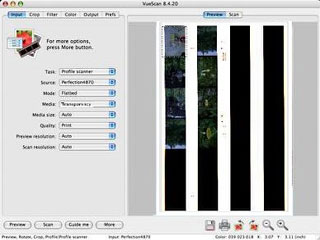 VueScan does color-correct scans from photographic images by
referencing profiles for over 200 different types of color negative
film and four types of slide film, and it can also color-correct raw
data based on profiles for your particular scanner, as well as allowing
for a wide range of manual adjustments, and VueScan is engineered for
crop and white-balance accuracy to minimize the amount of manual
post-scan adjustment necessary, which will be especially appreciated
when scanning batches of images using the "Input|Batch scan"
option.
VueScan supports various processing algorithms such as dust removal,
grain reduction, color restoration, and sharpening. If you're using a
Minolta Dimage Scan Elite 5400 film scanner, you can select the Grain
Dissolver option, which causes a translucent material to be inserted in
the light path to make the light source more diffuse, slightly reducing
the appearance of film grain at the cost of longer scan times. VueScan
supports a scanner's hardware features such as batch scanning,
autofocus, infrared channels for dust and scratch removal, and
multiscan to pull the full bit-depth of data from dark areas of
slides.
Here are some examples of how you can clean up and restore slides
using VueScan's Filter tools (the uncorrected versions of these next
example shots were taken from my "discards" archives), meaning that
they had problems from the get-go, and they haven't improved with age.
Here is a shot of my old 1953 Ford F200, taken c. 1976. As you can see,
the old slide is a bit fuzzy, there are a few dust flecks, and the
color has shifted toward a reddish cast.
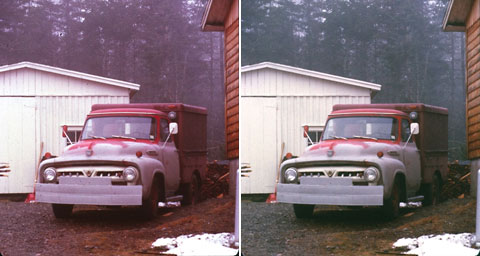
1953 Ford F200: Original fuzzy, dusty, reddish slide and restored
image.
After applying VueScan's Infrared Clean (Heavy), Restore colors,
Grain reduction, and Sharpen options in the Filter tab, the photo
cleaned up quite nicely. The trees in the background now look green
again instead of purple, and the dust flecks are diminished. If you
don't like the result from applying some of these filters, you can
immediately reverse it.
I imported the filtered image into Photoshop Elements to see if it
could be further improved upon, but all I ended up doing after some
experimentation was increasing the color saturation by 18%, and I'm not
sure it's a significant improvement. VueScan pretty much got it right
the first time.
This shot of my son's '79 Chrysler Cordoba didn't need sharpening,
but the color had begun to shift and the slide was very dirty (dust
shows up particularly badly in the background mist and on the car's
engine bonnet.
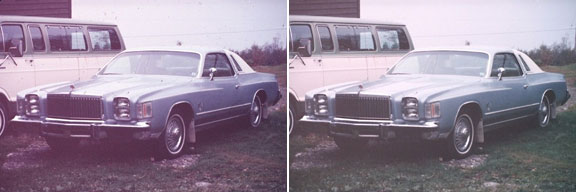
1979 Chrysler Cordoba: Original dirty, color-shifted slide and restored
version.
After the VueScan filters did their thing, here's the result. Upon
checking in Photoshop Elements, I found no further adjustments that
improved on VueScan's work.
You can do some pretty amazing stuff with these tools. For example,
here is a scan of a 30-year-old slide taken with (I think) GAF slide
film, that is badly faded and color-shifted, as well as having dust
spots. It looks pretty grotty, but it's a shot I'd like to save because
it shows what the view from my front yard looked like in the early
'70s, before there were power poles and telephone lines, and a lot of
tree growth that's there now.
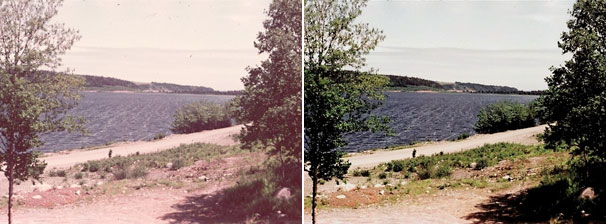
30 years of fading and color shift corrected using VueScan.
Using the digital correction functions in the Minolta Dimage Elite
5400 scanner and a bit of touchup in Photoshop Elements, I was able to
salvage quite an acceptable image from that old slide.
Here's another shot taken out the windscreen of my MGB on a tour
through upstate New York in the mid-'70s, also on the now
long-discontinued GAF transparency film. There was plenty of color, but
with a slightly odd cast, and blocked-up contrast, and there were dust
flecks in the light areas.
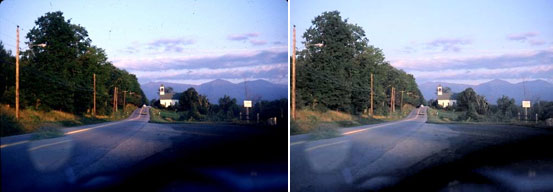
Old slide with an odd color cast and too-high contrast repaired with
VueScan.
Here's what the image looked like after scanner enhancing. I like
the result so much that I'm currently using it for a desktop picture on
my iBook.
You can save raw data to a file so you won't have to rescan the
original to make subsequent copies, and VueScan also has preliminary
support for raw scan files from certain models of digital cameras.
Available as noted for Mac OS X, Windows, and Linux, VueScan offers
a full range of advanced features including options for scanning faded
slides and prints and automatically adjusting images to optimum color
balance that reduces the need to manually do it in Photoshop. It
includes built-in IT8 color calibration of scanners, producing colours
that look true to life, batch scanning and other advanced and powerful
scanning and productivity features, including PDF output.
VueScan is available in two editions, Standard ($39.95) and
Professional ($79.95). The Professional Edition adds unlimited free
upgrades, advanced IT8 color calibration, and support for raw scan
files. Multi-user licenses are available. A fully functional trial copy
(it watermarks scans until the registration fee is paid) of VueScan can
be downloaded from hamrick.com.
I'll give VueScan a four out of four rating. This is a great piece
of software

 I've been using
VueScan for years, starting with Version 7 back in the early '00s. It
was great software then, and it's only gotten better.
 This
feature will provide our customers with both time savings and
convenience," comments Hamrick Software President Ed Hamrick. "This
capability automatically installs when you install VueScan, and makes
it easy to use your scanner from Photoshop. It works with both 32-bit
and 64-bit versions of Photoshop, on Windows XP, Windows Vista, Windows
7 and Mac OS X (Intel and PowerPC) 10.3.9 and later. Basically any
configuration of Photoshop will work with VueScan's Import filter."
 "We also added
support for TWAIN drivers for importing images from your scanner into
other programs," Hamrick continues. This also works with 32-bit and
64-bit systems, on all versions of Windows and Mac OS X. This means
that importing images using other programs is a lot faster and easier,
and also uses less memory when scanning."
 Not only
that, but VueScan's frequent version updates keep it abreast of the
latest new hardware innovations and refine its performance. I've heard
some users complain about the frequency of VueScan updates, but you
don't have to update if it doesn't suit you. An old copy of VueScan 7.6
still works just fine on my old
  VueScan's "support
everything" philosophy makes it especially useful to owners of older
scanners, helping them get more use out of older hardware, such as my
Epson Perfection 4500 Photo flatbed and Konica-Minolta Dimage Scan
Elite 5400 Film Scanner, since it supports more than 1,500 flatbed and
film scanners. It's easy to use, relatively inexpensive, and includes
advanced features like restoring faded colours, batch scanning, and
other tools used by professional photographers and graphic artists.
 VueScan also incorporates an Optical Character Recognition
(OCR) engine for converting hard copy text to editable text. It works
with prints, transparencies or negative photographs and printed
text.
 VueScan lets you
change options in the tabbed panels on the left side of the interface
window and displays images and histograms on the right side of the
window. The bottom left corner of the window gives instructions for the
chosen task and the bottom right corner of the window shows the
dimensions of the image that will be written if you press the Scan
button. Other commands are available in the menu bar, and the most
commonly used commands are available as buttons at the bottom of the
window. A vast number of settings and adjustments are supported by the
various menus and entry fields. VueScan keeps you informed as to what
it's doing with text readouts at the bottom of the interface
window.
 VueScan does color-correct scans from photographic images by
referencing profiles for over 200 different types of color negative
film and four types of slide film, and it can also color-correct raw
data based on profiles for your particular scanner, as well as allowing
for a wide range of manual adjustments, and VueScan is engineered for
crop and white-balance accuracy to minimize the amount of manual
post-scan adjustment necessary, which will be especially appreciated
when scanning batches of images using the "Input|Batch scan"
option.


