The
Finder is probably the most vital - yet the most underused - part
of every Mac on the planet. It does more than just providing a
graphical user interface to your computer. When you use all its
features, you can harness amazing power to your advantage and save
a lot of time.
There shouldn't be anything revolutionary to learn here, because
these features are available all the time, but we'll show you how
to get the most out of features overlooked by most people.
Smart Folders
The key to saving time and being efficient with your Mac, which
is very important when you use it for work, is organization. My
favorite Finder features are special folders. With these you can
regroup different types of files and folders scattered all around
your disk and access them all easily. (Folder actions have been
left out of this tutorial on purpose - we are focusing on the
basics, and folder actions require AppleScript knowledge, which is
for more advanced users.)
Smart Folders, introduced with Tiger (Mac OS X 10.4), are pretty
amazing. They allow you to regroup all kinds of files and folders
in a folder no matter where you actually store them. All they have
to do is share some attributes, such as creation date or file type
or any imaginable attribute.
To create a smart folder, pull down the File menu and select New
Smart Folder. Click on the Computer button to make sure that you
look for files everywhere on the computer, and then tailor the
options to your liking. Don't hesitate to use the plus and minus
signs to add and remove attributes.
Extra tip: you may want to use Spotlight Comments (when using
the Get Info dialog box) to add comments to files. When you use
Spotlight Comments as attributes to filter files in smart folders,
you can easily view files together that otherwise have nothing to
do with each other.
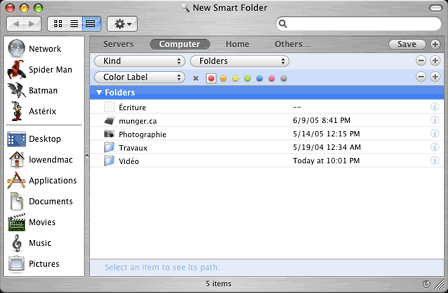
Smart Folder - click image for full-sized view
In my example (see screen shot), I used the most simple
attribute of them all: color labels. When you control-click a file
or folder, you can give it a color label and later use these labels
to create smart folders.
Just take a good look at it - the feature is much more powerful
than Spotlight, which Apple used as an easy marketing strategy for
Tiger.
Burnable Folders
Apple finally got the point: Burning CDs and DVDs with the Disk
Image application was a both. It forced you to create disk images
that replicated your files before allowing you to burn a disc. With
Tiger, the burnable folders feature lets you create folders
especially made to burn data without any need to first create a
disk image on your hard drive.
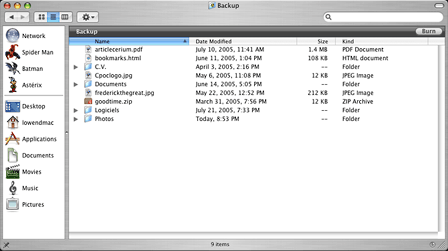
Burnable Folder - click image for full-sized view
After pulling down the File menu in the Finder, select New
Burnable Folder. You will notice some changes in the folder's
window elements, 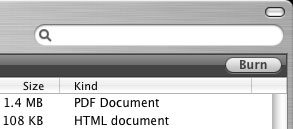 partly because it comes with a Burn button.
All you have to do to burn a disc is dragging files to the folder.
The burnable folder will remember where the files are and read them
from their original location (even on separate hard drives and
other media) when you burn a CD or DVD. When you are ready to burn
the disc, just click on the Burn button.
I find this feature handy for files that I want to put on CD or
DVD on a regular basis - or simply to use one folder that serves as
a bridge between my hard drive and my disc burner.
 Sidebar
Are you familiar with the sidebar? In Mac OS X 10.0 to
10.2, there were some unfriendly Favorites, which were replaced by
the superior sidebar in Panther. This neat feature is present in
every Finder window, and you should use it to your advantage,
because it provides quick access to your favorite folders.
To put a folder in the sidebar, just drag it to the second part
of the left column of any Finder window (below the grey line). You
can reorder (and eliminate) sidebar folders as you wish by dragging
them around. As a bonus, all sidebar folders are available in the
Save As... dialog of any application that fully supports Panther
and Tiger.
To add and remove types of media (such as hard drives and
CDs/DVDs) from the sidebar, pull down the Finder menu and select
Preferences. Click on Sidebar and check or uncheck the boxes.
Automator
Automator, introduced with Tiger, has great potential. It is
barely used right now because Apple hasn't had time to fully
exploit it - and third-party developers still have to add support
for it - but once it is really unleashed, it could allow great
automation for the masses.
Basically, Automator allows users to put together all kinds of
actions from different applications in a single sequence. It works
better than AppleScript.
For example, a workflow can start from file handling in the
Finder to manipulations in a photo editor and PDF conversion in the
Finder. The possibilities will be limitless one day, but very few
applications support Automator at the moment.
To create a sequence, launch the Automator application and
select Create Workflow under the File menu. Click on the
application that should execute a command and drag the action you
want to use to the right column. Add all the actions you want (you
can reorder them). After that, all you need to do is to pull down
the File menu again, choose Save As..., and save the workflow as an
application anywhere you want. Whenever you want to use it,
double-click it.
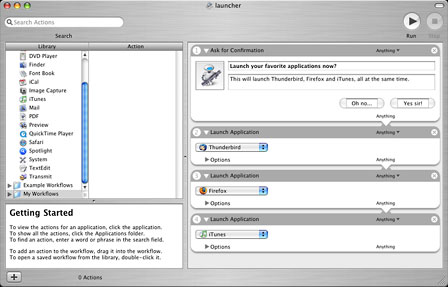
Automator - click image for full-sized view
In my example (see above screen shot), I put together a simple
workflow for the Finder to launch a few favorite applications
together. It just saves time....
Open With
 As far as
clean organization is concerned, there are other things you can do
from the Finder.
You can make sure you associate files with the right application
at all times - and change the settings whenever you want to. You
will find this especially useful if, for example, you want to open
TIFF files with Photoshop and JPEGs with Preview, or if you switch
applications to handle certain types of files. With a few mouse
clicks, you can associate thousands of files with one
application.
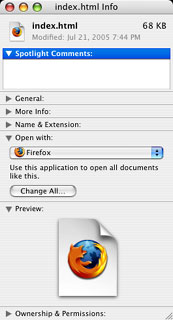
Just take one of those files and control-click on it. Select Get
Info and open the Open With: item. Pull down the small popup menu
and choose the application that should handle the file type. Then,
click on Change All. You are done.
Last but not least, presentation options can be great to keep
your folders uncluttered. Once a folder is opened (this applies to
the Desktop) pull down the View menu in the Finder, and you can
change the icon size, font size, and alignment attributes.
Shortcuts
There are two ways to do things in life: the simple way and the
complicated way. Here are ways to avoid accessing things from the
Finder using the complicated way.
 Switching
Users
When there are several users on the same computer, logging is
and logging out can be tedious. Why don't you activate the fast
user switching?
In the System Preferences (available in the Apple menu), click
on the Accounts button, and then click on Login Options. You may
have to enter an administrative password at this point.
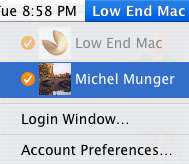
After that, make sure that Enable Fast User Switching is
checked. From now on, a list of users will be available in the
right part of the Finder's menu bar. Switching users will no longer
require a logout, just a simple password. (See Creating a New User to Solve Display
Problems as an example of how you might take advantage of Fast
User Switching.)
Compression
Do you want to compress files without launching an application
such as StuffIt Deluxe? Just select your file or folder and
control-click on it (or right-click if you use a multibutton
mouse). Choose Create Archive Of (insert file name here) and your
file will automatically be compressed in zip format and saved in
the same location as the original.
Desktop Picture
No need to reach for the System Preferences panel in the Apple
menu to change your desktop background - just control-click on any
empty space in the Finder and choose Change Desktop Background. It
takes less time...
Trash
Get rid of the annoying confirmation when you delete files from
the Trash by pulling down the Finder menu and selecting
Preferences. Click on Advanced and uncheck the second box.
Menu Bar Items
 You can easily
change options for Classic, Date and Time, and your keyboard
definition without opening the System Preferences panel by making
them available in the menu bar. In the System Preferences, click on
Classic and make sure that "Show Classic Status in menu bar" is
checked. In the International options, do the same for "Show Input
Menu in Menu bar", and in the Date and Time pane, select a similar
option under Clock.
Special Characters
Do you use Special Characters in the Finder? To access them
easily, go to the Edit menu and select Special Characters.
Voilà!
Keyboard Shortcuts
Here is a bonus to finish the column: Look at the Apple key on
your keyboard. You see the little Command sign on it?
Now look at the Finder's menus . . . you will find it
along with letters and numbers. When you combine the Apple/cmd key
with the letters and numbers found besides the menu items, it
allows you to execute the actions without using the mouse. For
example, cmd-S allows you to save files, and most software supports
it. Learn to use such shortcuts to save time and strain on your
wrists. 
Michel Munger is a journalist who lives in Montréal. He discovered the Mac in 1994, and his work on a PC reminds him every day why he embraced Apple's platform. Munger has also authored some MacDaniel columns.


 partly because it comes with a Burn button.
All you have to do to burn a disc is dragging files to the folder.
The burnable folder will remember where the files are and read them
from their original location (even on separate hard drives and
other media) when you burn a CD or DVD. When you are ready to burn
the disc, just click on the Burn button.
 Sidebar

 Switching
Users
