Putting
audio on a computer probably was one of the coolest inventions
since sliced bread. With a bit of hardware and software, you can
take your favorite songs, arrange them for a CD, shuffle them and
play them on your home stereo, or take them on the road on your
iPod.
But how do you ensure that you get quality sound the whole time?
How do you make sure you don't eat up too much storage space?
Pick the Right Encoding
Everything starts with encoding. Say that you have a CD in your
hand or a choice to make when purchasing music online, and you need
to rip the songs to your hard drive without eating up too much
space on your hard drive and/or iPod.
Let's be blunt: The MP3 format is technologically archaic. The
AAC format (also called MP4) and its more modern compression allow
users to get better sound while using less disk space.
 Using AAC instead of MP3 was mainly Apple's
recommendation at first, but it turned out to be the right one. I
am a bit of an audio nut, and throughout the years I tried pretty
much all the formats. My conclusion is that AAC at the 128 kbps bit
rate is the best possible compromise.
You get great sound quality, even on a home stereo system, using
up about a megabyte of disk space for a minute of music. On my own
setup, I have about 1,500 songs and they take up to 6.8 GB of
space, while a smaller collection of high-quality MP3 files ate up
10 GB.
For equal sound quality, the AAC format means serious megabyte
savings.
Why AAC?
Should you work with uncompressed CD audio files (AIFF)? If you
can afford 600 MB to 700 MB to store the number of songs a
commercially released CD can hold, sure.
Should you rather use the Apple lossless format? It will reduce
the amount of space needed by about 50%. Again, it's a question of
storage. If ripping a CD requires 300 MB, ripping 10 CDs requires
3 GB.
For most users, AAC gives much more bang for your buck at 60-80
MB per CD, and on a good stereo system, only audiophiles will
really notice a difference in sound quality in comparison with a
CD, AIFF file, or lossless track.
You may use lower quality MP3 files (at 96 or 128 kbps bit rate)
if you encode files for a computer with small speakers, but anyone
who wants quality sound from their iPod, uses good computer
speakers, or burns CDs should go with AAC at 128 kbps.
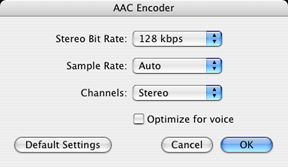
To set up your sound import preferences, pull down the iTunes
menu when iTunes is active, and select Preferences. Click on the
Importing button. Choose AAC Encoder and in the Setting popup menu,
choose High Quality. For the spoken word or podcast, you can use
the Podcast preset.
When you are done encoding your music in AAC, you have a perfect
music library for playback, CD burning and transfers on an
iPod.
Burning to CD
Burning a CD on the Mac is simple with all the integration
offered by iTunes, but there are a couple of hurdles to jump in
order to make sure that everything is kosher for best sound
quality.
Most CD and DVD players available on store shelves support MP3
playback. But for the reasons stated above, you should still avoid
using MP3, even when it means not being able to squeeze 200 songs
onto a CD.
You want quality, right? Then, you should favor audio CD as your
burning format. When you burn a CD from AAC files, iTunes will
convert the music into standard audio CD files, which means that
you can put up to 80 minutes of music on a CD.
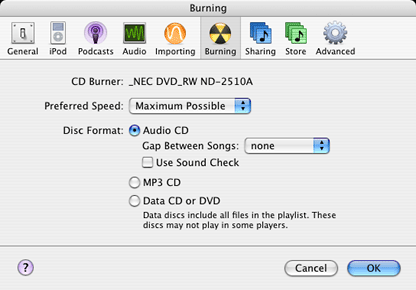
To change your burning preferences, pull down the iTunes menu
and select Preferences. Click on Burning and click on the Audio CD
radio button.

In the same window, you get a popup menu that allows you to
change your CD burning speed. Which to choose? Unless you had bad
experiences with it in the past, pick the fastest speed. Today's
burners are made to burn discs at their fastest speed, and some
manufacturers will even warn you that if you burn CDs at much lower
speeds, they may not work. In addition, slower speeds mean more
time to burn the disc....
Playback
Any self-proclaimed audio nut (that would be me) will tell you
that there is more to playback than just pressing the Play button.
To make sure that your sound comes out right, your software and
hardware have to be fine tuned. The right bass settings or wrong
sound effects can change everything.

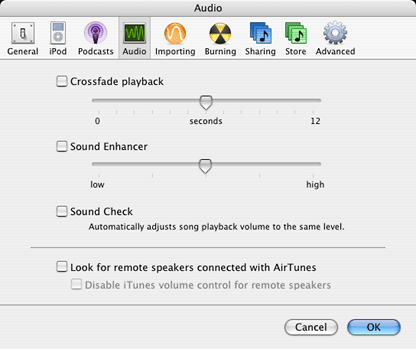
In the iTunes preferences, click on the Audio button. Apple
offers you a few "special effects". My advice? Don't use them.
Crossfade playback may be okay if you like to overlap the ending
of each song with the beginning of the next, but stay away from the
Sound Enhancer. It distorts sound. I wouldn't use Sound Check
either. The best way to adjust the volume is to do it manually so
it will be just right to you.
 The next thing to
do is to use the Equalizer efficiently. When you pull down the
Window menu, you can select the Equalizer, and then a window that's
filled with sliders will appear. If you already know how to use
these, you don't need my help.
If you are not too sure what to make of the equalizer, Apple has
done a good job by providing a bunch of good presets. Just choose
the preset that goes with the style of music that you are listening
to and click on okay. By the way, Rock will do fine with anything
heavier than rock, such as punk and metal. There also is a preset
for small computer speakers.

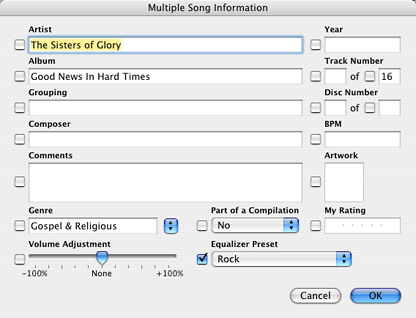
To avoid messing around with the equalizer every time you listen
to a different style of music, you should associate your songs with
the appropriate equalizer setting. Select the single song or a
group of songs, Control-Click (or right-click with a two-button
mouse), and select Get Info. In the bottom right corner (see image
above), there is the Equalizer Preset option. Click on the small
checkbox on the left and choose the preset. Do this for every song
or group of songs and you are done.
Now that you are done fine tuning iTunes, enjoy your music! 
Michel Munger is a journalist who lives in Montréal. He discovered the Mac in 1994, and his work on a PC reminds him every day why he embraced Apple's platform. Munger has also authored some MacDaniel columns.


 Using AAC instead of MP3 was mainly Apple's
recommendation at first, but it turned out to be the right one. I
am a bit of an audio nut, and throughout the years I tried pretty
much all the formats. My conclusion is that AAC at the 128 kbps bit
rate is the best possible compromise.

 The next thing to
do is to use the Equalizer efficiently. When you pull down the
Window menu, you can select the Equalizer, and then a window that's
filled with sliders will appear. If you already know how to use
these, you don't need my help.

