
2001 – Before we get started, let me introduce a new feature to iBasics. I will rate tips in terms of difficulty, from easy to intermediate to expert. As the focus of the column is basics, we will mostly go through easy and intermediate topics, but sometimes an “expert” tip will be useful, especially as you become a more advanced user.
I will also note the System version of the tip, to make sure that you know what System you can use it with. With the release of Mac OS X, I want to reduce the possibilities of confusion. The System rating can be handy, since my main System is Mac OS 9.1, and older versions may not allow you to do everything I tell you about.
- Description: Organizing files
Difficulty level: Easy
System version: Classic Mac OS
To save time and keep your Mac clean, you need to organize your files into a custom structure and hierarchy that fits to your needs. This tutorial will help you to find ways to do that.
The Finder offers many ways to organize files on your hard drive. It is rather flexible, allowing you to customize each folder’s window to your liking. A few of its features are subtle, and some won’t pop up to let you know that they are available.
First off, allow me to remind you that the Finder tracks each and every move you make with open folders. It will remember their position, size, icon placement, and view option. In this way, you can do whatever you want to a folder without affecting other folders. This also allows you to pick different view options for different types of folders. Here are the available features.
Views
You can view your files as a list, as icons, or as buttons. Each has its perks, and you can really use the three of them as long as they serve your needs.
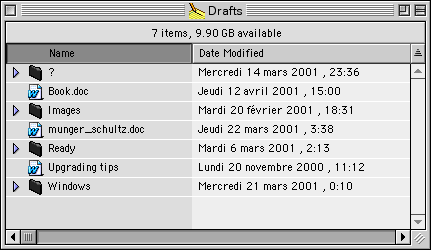
The list view is handy. It can handle a large number of files in the same folder and classify them. It usually sorts by name, which is the default, but with all the available columns, it can also sort files by the modification date or file type. The date is useful if you wish your latest files to be on top of the list.
The darker column is the current sorting option. Note the weird little triangular icon on top of the side bar. This indicates whether you are sorting files upwards or downwards – it changes the sort order at will. When sorting by name, it can toggle between “from A to Z” and “from Z to A.” The same applies to dates, from newest to oldest, or oldest to newest.
The list view is the one I recommend the most. It keeps everything clean, and the small arrow beside each folder icon allows you to open a folder without popping up another window. It gives a nice hierarchical feel. You can easily resize the columns by pointing your mouse to the line between columns, clicking and holding, then resizing it manually.
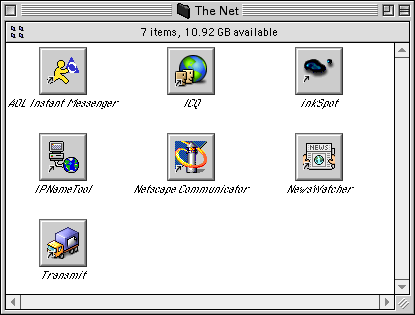
Viewing files as icons is nice, too, as long a you keep your icons in order. This is very appropriate for the desktop and uncluttered folders.
![]()
The third alternative is buttons, something that didn’t make it to Mac OS X. This is especially great for a folder with many aliases and application – you click a button just once to launch software or open a folder. If you wish, you can make a folder with aliases to create your own launcher using buttons.
There are two good ways to customize a folder’s views. First, make sure to open the folder. Then, reach for the View menu, and the three options are the three first in the menu items. You can always use contextual menus to achieve the same, by control-clicking anywhere in the open folder and pointing to the View sub-menu. Do this for each folder.
Popup Windows
Popup windows are very interesting. This option is available in the View menu and its contextual menu counterpart. When you turn a window into a popup window, the Finder will add a tab and make the window stick to the bottom of your screen.

When you see nothing but the tab, a single click will open up the folder, but the window will stick to the bottom of your screen. Another click will reduce the window to its tab again. This is very useful as an application launching folder, or as a way to store frequently used files.
View Options
When organizing your files, make sure to set the view options for each kind of view. When in a folder with list views, go to the View menu and pick View Options.
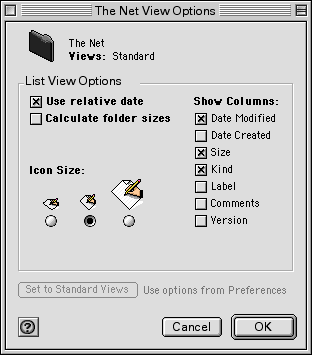
This will allow you to set standard options, so that when you create a new folder with views such as icons, list or buttons, you don’t have to rearrange the columns, icon size and sorting all over again.
General Tips
Now that you know the options available at your fingertips and know that you can mix them together – think of a popup window with “view as buttons” – here are some recommendations.
1. Names are important. When you name folders, make sure that you can remember what they contain. When you organize your files, you want something that’s easy to figure out when you dig in your disk for data and software.
2. Group your applications together in one folder or disk, each application being grouped with others of the same kind. In example, you can create a new folder, name it Multimedia, and put all your multimedia software it in. Do the same for Internet software and other types.
3. Separate data files from software. This makes your life easier.
4. Make everything hierarchical to create paths. When you will retrieve files, it will be easy to find out where your files are. Here are two examples to give you an idea. A is that mid-term paper I need to update; B is that Alanis Morissette song I want to copy to another disk.
5. Keep your desktop uncluttered. Put everything on the hard disk, leaving your disk icon and perhaps a couple of frequently used folders on the desktop.
That’s it, folks. If you read this carefully and take a few minutes to apply such organization methods to your Mac’s hard drive, I am pretty sure that you can turn a mess into a perfectly clean Mac – or at least make it a bit easier to deal with 🙂
Michel Munger wrote an OS X version of this article in 2005.
Keywords: #finder #finderviews #finderpreferences #classicmacos #organization
Short link:
