Apple
Mail, which ships with every version of Mac OS X since Apple
first released it, is the most commonly used application on the
platform. It is well known, but some features are often
overlooked.
- Why IMAP Beats POP3
- Smart Mailboxes
- Flagged Messages
- Bounce Messages
- Rebuild a Mailbox
- Append Messages
- Modify the Quote Level
- Previous Recipients
- Connection Doctor
Why IMAP Beats POP3
When people set up email accounts, their first impulse is to
select the POP (technically called POP3) configuration. The POP
account type is quite simple: your mail waits for you on the mail
server, and every time you check your mailbox, you download your
email to your computer and delete it from the server (unless you
asked the application to leave it there).
The big drawback to POP mail is that once your messages are
deleted from the server, you can't access them from anywhere other
than that computer. Even if you leave it on the server, any edits,
priority changes, flags, and other changes won't be reflected by
the copy on the server.
This is where you should consider using IMAP instead of POP.
IMAP leaves the mail on your server when you view it, and it
synchronizes every folder (or mailbox) on your computer with the
content on the server for you to access any message instantly. When
you send mail and make change to your messages, everything is saved
on the server.
This is much better than a POP configuration if you use more
than one computer, especially if you have access to your email from
a Web interface. IMAP allows both your email software and the Web
interface to "share" every bit of information, thus adding
flexibility.
Another huge advantage: Should you decide to use a different
email client - such as Eudora, Microsoft Entourage, Mozilla
Thunderbird, or GyazMail - you won't have to import your email!
Everything is sitting on the server, so the only task is to set up
access to the account in your new program.
You should also benefit from one more thing: Your service
provider makes regular backups and restores the data if a server
crashes and loses anything. You won't have to back your messages up
yourself - your ISP will do it for you.
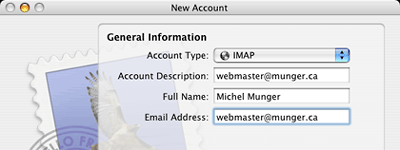 If your email
account is already active, it is not too late to switch. Pull down
the File menu and click on Add Account. Right besides Account Type,
click on the popup menu and select IMAP. Proceed to create your
account with your login information. Fine tune the account
preferences and filters to your liking. Recreate your folders in
the new account (by pulling down the Mailbox menu and selecting New
Mailbox), and they will be remembered on the server when you access
them using a Web interface.
If your email
account is already active, it is not too late to switch. Pull down
the File menu and click on Add Account. Right besides Account Type,
click on the popup menu and select IMAP. Proceed to create your
account with your login information. Fine tune the account
preferences and filters to your liking. Recreate your folders in
the new account (by pulling down the Mailbox menu and selecting New
Mailbox), and they will be remembered on the server when you access
them using a Web interface.
After that, all you have to do is drag and drop your messages
from your old POP folders to the IMAP mailboxes, and they will be
visible in the newly created account. Everything will also be
copied to the server.
Normally, Internet providers support both POP and IMAP on the
same servers, but some of them require that you use a separate
address for IMAP. If your default configuration does not work with
IMAP, contact your ISP to obtain the appropriate server
address.
After recreating your account with IMAP, just delete the old POP
settings. Pull down the Mail menu and select Preferences. Click on
the Accounts button. In the window, select the POP account and
reach for the button with a minus (-) sign on it. Click on OK to
confirm the deletion.
Smart Mailboxes
Now that you know how to use a better type of account, there are
plenty of other things you can do in Mail.
 One of my
favorite features is the Smart Mailboxes. These work the same way
than the Smart Playlists in iTunes and Smart Folders in the Finder.
By giving specific criteria to a mailbox, you tell Mail to regroup
certain types of messages together for easy viewing in one
window.
One of my
favorite features is the Smart Mailboxes. These work the same way
than the Smart Playlists in iTunes and Smart Folders in the Finder.
By giving specific criteria to a mailbox, you tell Mail to regroup
certain types of messages together for easy viewing in one
window.
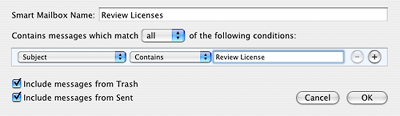
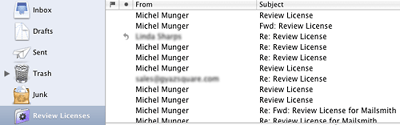
The example from my setup (see screen shot) uses the subject
line attribute for a smart mailbox. For the iBasics column, I
sometimes request software review licenses in order to try software
I would not use for my personal needs, and I like to keep track of
both the messages I sent and received about it. By creating a smart
mailbox, I can regroup the messages easily because I include Review
License in the subject line of every related message.
 To create a smart mailbox, pull down the Mailbox
menu and select New Smart Mailbox. Then give the mailbox a name and
select the criteria that should be used. The possibilities are
limitless. When you want to add criteria, click on the plus (+)
sign in the window. Use the minus (-) sign to remove anything.
To create a smart mailbox, pull down the Mailbox
menu and select New Smart Mailbox. Then give the mailbox a name and
select the criteria that should be used. The possibilities are
limitless. When you want to add criteria, click on the plus (+)
sign in the window. Use the minus (-) sign to remove anything.
After creating your smart mailbox, you will notice that the
folder icon is slightly different from the standard icon. It
differentiates your smart mailboxes from the ordinary
mailboxes.
Flagged Messages
A good way to mark the importance of a message in Mail is to
flag it. Most email software will support this, and the flag will
be easily noticeable. If you use an IMAP setup, your Web interface
should normally show the flagged status, as mine does (see screen
shot).


Bounce Messages
 Someone sent you
a message, and you don't want to correspond with that person
anymore. You can bounce the message and pretend that your account
no longer exists.
Someone sent you
a message, and you don't want to correspond with that person
anymore. You can bounce the message and pretend that your account
no longer exists.
Open the message and pull down the Message menu. Then select
Bounce. Click OK. This will send the original sender a message
called "Returned mail: User unknown" as if the delivery failed.
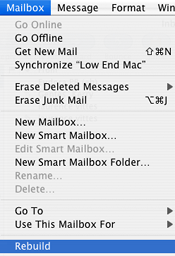 Rebuild a Mailbox
When viewing messages, do you have the impression that something
is wrong with it? Or do you have a lot of mail going in and out of
a mailbox? It may be a good thing to rebuild the mailbox every once
in a while to keep it small and clean.
To do this, make sure that the mailbox is selected in the left
column of Mail's main window. Then pull down the Mailbox menu.
Select Rebuild. Depending on the size of the mailbox and the number
of messages inside it, it can take some time to rebuild.
Append Messages
You have had a lengthy exchange with a colleague, and you want
to forward it all to another colleague and add a comment on top of
it. How can you do that without opening every single message and
doing a tedious copy-paste job? Mail will tackle it better than Ray
Lewis could take down any running back.
Make sure that the messages you want to quote are selected in
the mailbox. Pull down the File menu and select New Message. Fill
out the recipient field and give it a subject line. Then pull down
the Edit menu and select Append Selected Messages. Magically, all
the text will appear in your new message. Add your comment on top
of it and hit Send.
Modify the Quote Level
 When a message
is forwarded several times or when an email exchange gets long, the
quoting level can be high. In Mail, you get different quoting lines
in different colors (see example on right).
When a message
is forwarded several times or when an email exchange gets long, the
quoting level can be high. In Mail, you get different quoting lines
in different colors (see example on right).
Want to decrease the level a bit? Just pull down the Format menu
and highlight the Quote Level item. Then select Decrease Level. You
can also increase the level if you'd like.
Previous Recipients
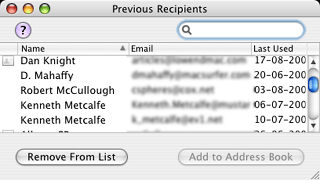 Someone has exchanged email with you,
and you didn't add that person to your Address Book. You don't have
his/her email address anymore, and you need to get in touch
again.
Someone has exchanged email with you,
and you didn't add that person to your Address Book. You don't have
his/her email address anymore, and you need to get in touch
again.
What can you do?
Pull down the Window menu and select Previous Recipients. Mail
will display a neat little window with all the names and addresses
of people you have sent messages to, along with a few buttons to
send new messages.
Connection Doctor
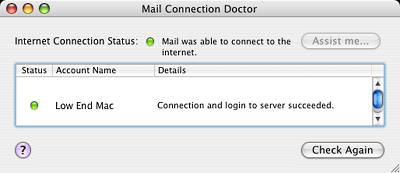 You think that your mail server is down, and
you're not familiar with network tools? You can easily verify your
server's status. Pull down the Window menu and select Connection
Doctor. Mail will check your Internet connection and try to contact
your mail server. You will soon know if your connection is still
working and if the mail server is down.
You think that your mail server is down, and
you're not familiar with network tools? You can easily verify your
server's status. Pull down the Window menu and select Connection
Doctor. Mail will check your Internet connection and try to contact
your mail server. You will soon know if your connection is still
working and if the mail server is down.
As you can see, Apple Mail can do much more than we usually
think. By the way, don't forget to control-click (or right-click
with a multiple-button mouse) on the main toolbar and select
Customize Toolbar. Apple Mail is one of the applications that give
you the most options to add and delete toolbar buttons.
Enjoy using Mail! 
Michel Munger is a journalist who lives in Montréal. He discovered the Mac in 1994, and his work on a PC reminds him every day why he embraced Apple's platform. Munger has also authored some MacDaniel columns.