Videophiles need not apply; this article is merely an introduction
for Mac users that need a helping hand with converting DVDs to files on
your Mac that can be played with QuickTime and other programs.
I think most people who want to start converting video on the Mac
think it's going to be pretty painless. Well, it mostly is. The real
issue isn't what the Mac can convert for you, it's how much patience
you have for the Mac.
Unless you have one of the new quad-core Xeons, don't expect video
to be very speedy at all. This is just a realistic expectation. I
highly recommend before you start a project to make some test files and
time conversions, imports, etc., so that you have at least some idea of
how long it will take you.
Since this will vary between each computer depending on RAM, hard
drive, etc., I'm only going to give an example with my computers. What
follows is information I discovered while ripping in my collection of
TV shows from their original DVDs.
Let's get started!
Video Resolution
What is video resolution, and what does it mean to you? Resolution
determines the physical size (not necessarily file size) of your final
video. There's lots of variation to tinker with, but we'll start with
what I consider the basics:
VHS Quality: 352 x 272 - If you convert a file from a DVD to
this quality, then reburn to say a VCD, I dare you to play it on a
television and tell me it looks bad. At this resolution you may find
that your video has JPEG artifacts, known to the casual user as
"blockiness" in all the wrong spots.
This resolution is a good choice if you want to process the video
faster while still retaining good quality and a smaller file size. It's
important to note, however, that on your computer screen this
resolution size will not look very good when resized (like with the
double-size option in QuickTime).
Good Quality: 640 x 480 - This is a good step up from
so-called "VHS Quality". Files produced at this resolution look good
both on most computer monitors and televisions. I really wish I owned a
giant plasma TV, but I don't, so I cannot comment on how these files
might look on a 42" screen. If you have a TV that large, you'll want to
go for full resolution at 720 x 698.
In my opinion, 640 x 480 is a good resolution to start with.
Free Software
Of all the video programs I've worked with, two really stand out as
winners: HandBrake and MPEG Streamclip. And the best part is
that they're both absolutely free.
Today we'll be looking at HandBrake.
HandBrake is a program I've been using for over a year now, and I've
found it to be extremely stable and reliable. The main purpose of this
program is to rip DVDs to your hard drive (once again, DVDs that you
own).

Step 1: Select Your DVD
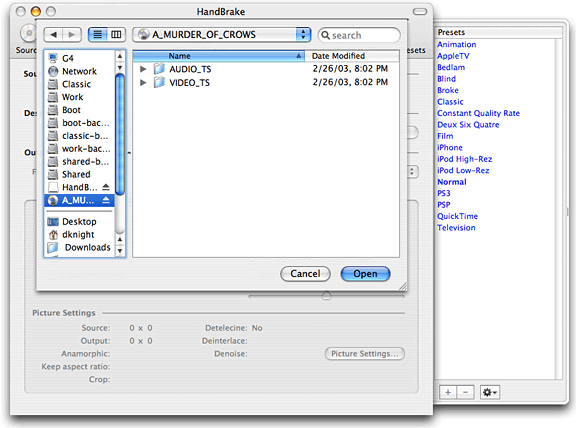
First, insert the DVD into your Mac and quite DVD Player when it
launches. Then open HandBrake and select the source, which will be the
DVD you just inserted. The program will scan the disc and find the
titles on the disc.
What's a title? Basically it's a collection of chapters in one set
of your DVD. As an example: On a DVD of TV shows, each individual show
would have it's own title, with about five chapters inside that
title.
The latest version of HandBrake has built-in presets for video.
While these are generally good, almost all of them are set at a really
high quality, much higher than you probably need.
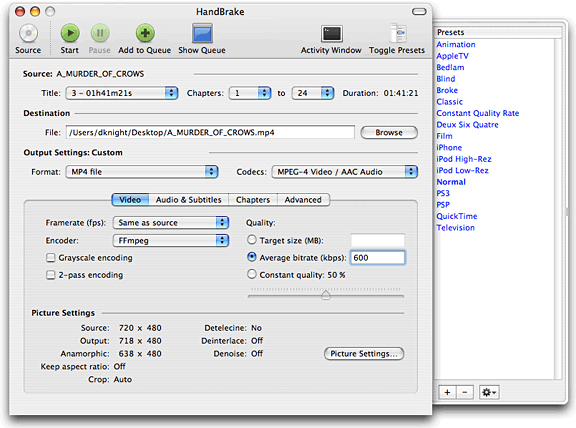
I would recommend that you choose the normal setting, then change a
few things. First, choose the destination for the file you're going to
create. Next, under output settings, make sure you're encoding to MP4
(MPEG-4).

Change Your Settings
Why MPEG-4? Because the resulting file will be small, be good
quality, and will be done in a timely manner. Make sure your video is
not set on H.264 with two-pass encoding - at least not right now. H.264
is what's called a codec for MPEG-4.
Confused? Don't worry, it'll make sense. Try it later on and see if
H.264 is for you.
Next, look to the right and look at the settings under Quality.
There are three different settings: Target size, Average bitrate
(kbps), and Constant quality. Let's go with average bitrate; this is
going to affect the end video tremendously.
The default is set at 1,000 kbps (kilobits per second). You can
leave it at that or set it lower, but the lowest I would go is 500
kbps. Anything lower and your video will be unwatchable - trust me. I
recommend 600 kbps.

Modify Your Audio Settings
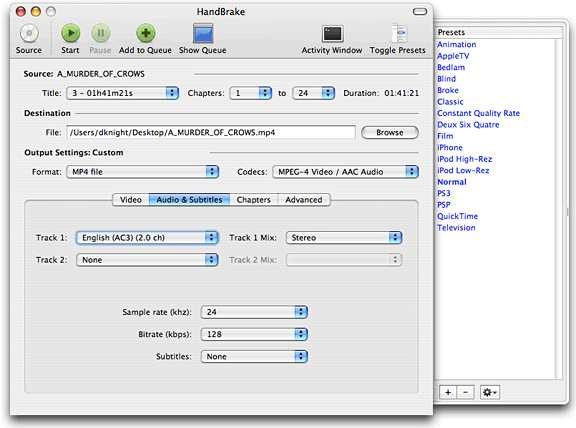
This is optional, but if you click on the Audio & Subtitles tab
you can change these settings. Look down at the dropdown menu that says
sample rate and decide what quality you want. The default is 44.1 kHz,
but for speed and lower file size, move it down to 24 kHz.
Encoding
Now that everything is set, it's time to let HandBrake go to work.
At the top of the window, click the green button labelled "Start", and
your video will start encoding. With the settings we just went through,
your video should be ripping decently fast on a G4 or better.
On my first generation iMac G5, a 22
minute show at 352 x 272 will encode in about 12 minutes. On my
1.33 GHz PowerBook G4, it goes almost in
real time, which is still not too bad. [Editor's note: I encoded a 101
minute DVD at full resolution (638 x 480) on my dual 1 GHz Power Mac G4 in 79 minutes creating a
file just under 500 MB in size. Ripping the same DVD on a 2.16 GHz Core 2 MacBook Pro, it took
68 minutes. dk]
The first time through, you might want to watch HandBrake work.
You'll notice as it's processing, it will display a current and average
frame-rate. The North American standard is 29 frames per second (fps).
Depending on your processor, it should stay at 23 fps or above. Even if
it's not at the maximum, your video will still be okay.
Once your video is finished, you should test it in QuickTime. Hit
command and "I" to bring up info about your movie. It should tell you
all of the relevant information for the movie, so you can check to make
sure the settings match.
I encourage you to play around with the settings some, until you
find what works best with your computer setup. 


