Wow, that was quite a project. Last week we designed and printed a
full-color brochure for Family Matchmakers, Inc., the adoption agency
my wife runs. It was quite a learning experience.
The following steps should also work in previous versions of
AppleWorks and ClarisWorks, but since AW6 is what came with her iBook,
it's the only version we used for this project.
Rough Draft
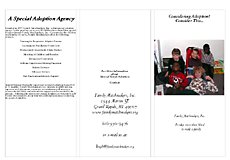
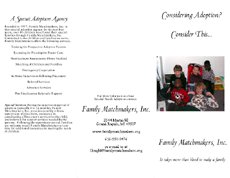
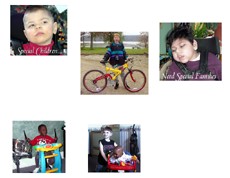
Linda roughed out the brochure in AppleWorks 6, starting with the
text, then placing it in a three-column page in landscape mode. The
next step was adding photos, using some she took with our Canon PowerShot A50 and
some sent in by her clients.
Being a low-end Mac kinda guy, I ran all the images through
Photoshop 4, cropped them, color corrected them, and then saved them as
roughly 3" wide 180 dpi images. I copied those from my TiBook to the SuperMac J700 server in the closet. From
there, she copied them to her indigo iBook and placed them
on the pages. Here's what it looked like at that point:
Tweaking the Design
The first thing to do was recreate the brochure using the drawing
tools in AppleWorks. To simplify things and keep the files smaller, I
created a separate file for the outside and inside of the brochure.
Each was created as an 8.5" by 11" document.
We'd earlier purchased some Geographics trifold brochure paper to
match the agency's letterhead and business cards, but found it
unworkable for this brochure. However, it did include the important
figures we needed to determine where the folds would go.
On the outside page, I drew a thin light gray vertical line at
3-5/8" and another at 7-5/16". On the inside page, the lines were at
3-11/16" and 7-3/8". Using these measurements, everything should print
properly.
The next step was to drop text boxes in each column, then cut and
paste the text from the draft brochure. From there it took a bit of
finagling with font sizes and placement, but things were coming
together nicely.
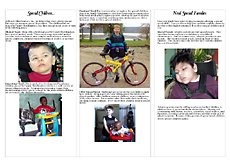
Once the text was in place, each image was copied from the draft
brochure and placed on the new page. Resizing images while keeping them
in proportion was easy - just hold down the shift key and resize to
fit. Here's what that looked like (click
here for a larger view, about 100K worth of images):
Just don't forget to remove the "fold lines" before you print.
Printing the Project
The next question was how to print it. Color is important. I could
print a master on my Epson Stylus Photo 870 using high quality photo
paper. We could then take that to Kinko's,
Office Depot, or someone else doing color copies - but at a price
of $1.50 to $3.00 per brochure.
There had to be a better way, so we got creative. We decided to try
mixed printing. We'd use our LaserJet 2100TN for the text, and then
print the color images with the Epson. That meant duplicating each page
twice (so we could leave the original intact), then removing all the
photos from one version and all the text (except for the reversed out
words over the photos - something I think really works nicely) from the
other.

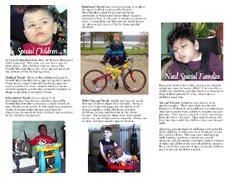
Here's what the interior page looked like, both the text and photo
versions:
We did some quick tests using regular laser paper to make sure this
was feasible, but knew we'd need better paper. We visited Office Depot,
where they recommended Kodak Premium Inkjet Paper, a double sided
finished paper designed for two-sided color printing. Home for a test,
a little tweaking on placement, picking the right paper setting (Photo
Quality Inkjet Paper) - and we're off and printing.
After the first 25 were done, we took them to Office Depot, where
they ran them through their folding machine at 4¢ apiece.
Sidebar: A Web Graphic Trick
I've put together a full-size version of the brochure interior
on a separate page using a similar
trick to the way we printed. Converting the whole interior, text and
photos, to a high quality JPEG (85% setting in GraphicConverter)
resulted in a 149,139 byte file. Saving just the photo layer at the
same setting resulted in a much smaller file: 79,828 bytes. I then
saved the text as a 16-level GIF image, which was just 27,342 bytes in
size.
To display the two images as one, I set the white background of the
text to transparent, created a one cell table, put the JPEG in as a
background image, and then placed the GIF inside the cell. In the end
we have two images totaling 107,170 bytes, a saving of nearly 30%
compared with the original JPEG. Not only that, but the text is much
sharper than it would be in a JPEG.
The Final Cost
This process really goes through the color ink, but it results in
very crisp text (the LaserJet 2100 is 1200 dpi). Linda, I, and everyone
she's shown the brochure to thinks it was worth the effort.
Best of all, we did it all ourselves using the tools at hand, so we
can easily edit the text or change a photo for the next batch of
brochures.
The hard part is calculating our final cost for the project. I
donated my time, and her agency bought all the supplies. Paper was $15
for 100 sheets and color ink is $18 per cartridge. I'm estimating 35
brochures per cartridge. At 10 pages per minute times two sides, the
time to run the paper through the LaserJet is minimal, as is the cost
of toner.
It takes 2:50 to print the inside of the brochure in color and about
50 seconds for the outside, for a net time per brochure of roughly 4
minutes. At 15 per hour, if we were paying someone $6/hour to babysit
the job, it would add 40¢ to the cost of each copy.
Here's the cost breakdown:
| Supplies |
Cost per page |
| Paper |
15¢
|
| Toner (est.) |
3¢
|
| Ink (est.) |
52¢
|
| Folding |
4¢
|
The total cost to print 100 color brochures: $74. The value of one
child placed with a new family: priceless.

