Last week we examined Vertus Software's Bling It! software, an inexpensive
image-enhancement program designed to help non-expert graphics users,
even amateurs, transform their digital photos into professional-looking
images of items or products for publishing on the Web or on online
auction sites, like
eBay and Craigslist.
Bling It! uses
technology borrowed from Vertus' Fluid Mask 3.0 standalone
masking/cutout application and plugin for Adobe Photoshop CS and
Photoshop Elements - a program intended mainly for use by professional
and advanced amateur photographers, graphic artists, designers, picture
editors, and anyone else who takes digital image editing seriously.
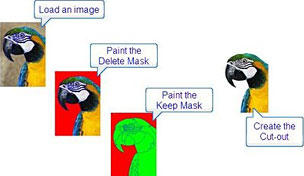
As with Bling! It, Fluid Mask's main purpose is "masking," to
separate and extract or "cutout" portions of digital images from their
backgrounds, which is accomplished by painting over unwanted areas of
images using the program's selection of tools and then clearing the
paint-designated areas with a mouse-click.
While cutouts
can be accomplished by skilled Photoshop (or other graphics program)
users with a degree of painstaking tedium and difficulty, Fluid Mask's
mission is to make the task faster and less boring, as well as less
demanding of user skill. However, there is still a learning curve to be
scaled, before one becomes proficient in getting the best from this
program, especially when it is applied to manipulating complex
images.
As noted, Fluid Mask can be used as a standalone application, as a
plugin to Photoshop (CS2, CS3), or Elements 6 launched from those
applications' Filters menu (see Appendix at the end of this article for
setup instructions for using Fluid Mask with Elements). I tried it both
ways; on its own and with Photoshop Elements 6. In either case, Fluid
Mask works pretty much the same way, and with the same interface,
although the standalone mode is considerably more selective about what
image formats it can open and save independently. The program prefers
RAW images, is reasonably happy with PNGs, and can work with JPEGs,
although in some instances less successfully due to the JPEG format's
"lossy" nature.
 Fluid Mask streamlines and simplifies the task of cutting out
images in two ways:
Fluid Mask streamlines and simplifies the task of cutting out
images in two ways:
- Fast masking tools - combined with image analysis, the Fluid Mask
tools allow you to quickly mask even complex cutouts.
- Intelligent blending - Fluid Mask uses the characteristics of the
edges between image objects to calculate the optimum blend between
them. Sharp edges remain sharp. Transparent and blurred edges are
feathered across their widths and background colors are removed
(something not easily achieved when making cutouts manually with image
editing applications).
To edit an image in
Fluid Mask, open it by using the program's Open dialog or just drag
your image file to the program's icon in the Dock, and then paint masks
over your image to indicate which parts to keep and which part to
remove. Fluid Mask uses three types of mask:
- Keep mask: indicates the part of the image to retain - the
green-colored tools
- Delete mask: indicates the part of the image to remove - the red
colored tools
- Blend mask: indicates the border of the cutout across which Fluid
Mask will create a blended transition - the blue-colored tools
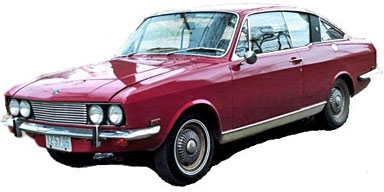
As test image I decided to use this photo of a car, to remove the
subject from its busy and somewhat unphotogenic background.
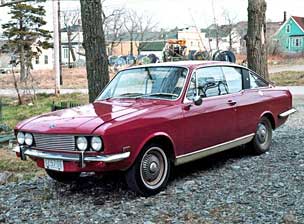
This is the image we started with.
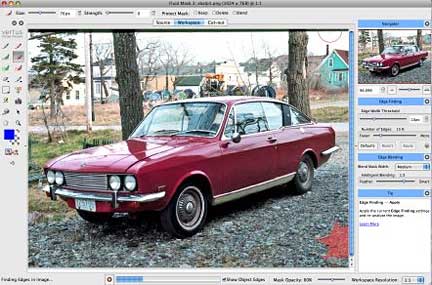
When you open an image, Fluid Mask automatically analyzes it to
identify the distinct areas of color and texture within the image, and
then "maps" it with edges.
Progress bar lets you know how Fluid Mask is coming along.
There is a progress bar at the bottom of the Fluid Mask window in
which you can track lengthy operations such as image analysis. If
required, you can also cancel an operation using the Cancel button.
 Note that Vertus cites minimum system requirements of an
833 MHz G4 or better with at least 512 MB of RAM. However, using the
program for this review on my 1.33 GHz PowerBook G4
with 1.5 GB of RAM, I found it none-too-swift doing the image analysis
and edge map drawing phases and updates. The program is definitely
usable on my G4, but I don't think I would want to use Fluid Mask on a
much slower machine, and I expect it will be a lot happier and more
lively on an Intel Mac. I haven't yet had the opportunity to try it on
my 2.0 GHz MacBook.
Note that Vertus cites minimum system requirements of an
833 MHz G4 or better with at least 512 MB of RAM. However, using the
program for this review on my 1.33 GHz PowerBook G4
with 1.5 GB of RAM, I found it none-too-swift doing the image analysis
and edge map drawing phases and updates. The program is definitely
usable on my G4, but I don't think I would want to use Fluid Mask on a
much slower machine, and I expect it will be a lot happier and more
lively on an Intel Mac. I haven't yet had the opportunity to try it on
my 2.0 GHz MacBook.
When Fluid Mask's image analysis is finished, the edges of the
"objects" found will be overlaid as blue outlines on the image, as
shown in the example above. You can now use these objects as guidelines
to flood-fill the areas you want to keep and those you want to delete.
You can also check or uncheck Show Object Edges at the bottom of the
Fluid Mask window to hide or reveal the edges of the objects, and
adjust the Edge Finding options to address a variety of potential
issues. As a last resort, you can also you can use the use the patch
tools to apply different Edge Finding options to just a part of an
image, or the Force Edge tool to draw a line manually, but smart
blending cannot be used with forced edges.
Once the edge configurations have been dealt with you can begin to
create an image mask. Select a brush from the Tool Palette and start
painting (i.e. filling "objects"). Use the green Keep tools to paint
the parts of the image you want to keep. Use the red Delete tools to
paint the parts of the image you want to remove, while the blue tools
can be used to create a special mask for blending the border of the
cutout. You can adjust brush strength and brush size as required to
mask your image quickly and efficiently. Fluid Mask has unlimited undos
so you can recover easily if your mask flows into the wrong areas.
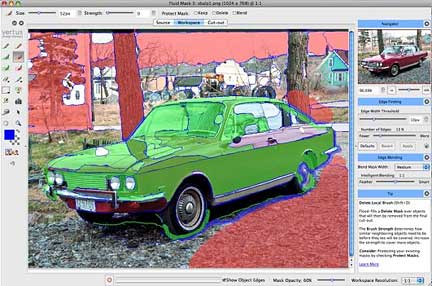
Selecting which areas to keep, delete, and blend.
There are three brushes for each type of mask:
- Exact brushes mask only pixels touched directly by your
brushstroke (like a traditional paint brush).
- Local brushes work like a combination of a traditional paint
brush and a paint bucket tool. Every image object that includes any
pixels under your brush stroke will be flood-filled. If you turn the
brush strength above the minimum, neighboring objects that are similar
in color and texture will also be filled. When using the local brush,
paint a stroke through the segments you want masked. Any segments
touched will be flood-filled.
- Global brushes work much like the local brushes, except they
will fill similar objects anywhere in your image (when the strength is
above the minimum).
When using either local or global brushes, you can control the
extent of the flood-fill of neighboring objects using the Strength
setting at the top of the window. At minimum strength, only those
objects touched by the brush will be filled. At maximum strength, large
areas of the image can be masked in a single stroke. You can use the
Undo function (Ctrl-Z) when experimenting with the brush strength.
Using the Exact brushes is a bit tedious, but the payoff is
precision results. However, it all gets a a bit magical when you start
using the Local and Global brushes, and the process speeds up
immensely.

The final image after removing unwanted details.
When you have finished masking the image, click the Create Cutout
button on the Tool Palette (Ctrl-U), and the cutout will be displayed
in the Cutout view. You can then zoom in and pan around the image to
inspect the edges. You can adjust the background color to make sure the
blended edges will look good against your cutout's intended background
and return to the Workspace view to touch up the masking. IMHO, it
would be a lot more convenient to be able to use some image editing
tools in the Cutout View, especially the eraser tool for touching up,
but you can use the Preview Cutout tool to check selected cutout areas
of your image while still in the Workspace view.
Cutout problems generally result from an edge problem or a blending
problem. Edge problems can often be fixed by adjusting the Edge Finding
options, while blending problems can be fixed by adjusting the Edge
Blending options or touching up the blend masks. The blend mask blends
the border between the Keep and Delete masks. Fluid Mask uses the
characteristics of the edge between two image objects to produce an
optimal border. If the edge is sharp, the resulting border will be
sharp. If the edge is soft, the border will be blended across the width
of the original transition. You can paint a thinner blend mask to
produce a thinner blend on the border of the cutout.
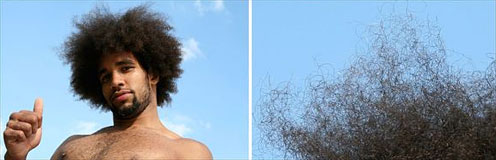
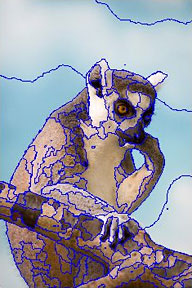
For complex things like wispy hair, you need to use more blending.
When working with complex and challenging cutouts, you may need to
use some of Fluid Mask's more sophisticated mask editing power. For
example, images with areas of wispy hair or animal fur through which
the background can be seen need to be masked with liberal amounts of
blending.
Other tricky image contents that Fluid mask can help you work around
are ones containing lattice-like structures or tree limbs, or ones in
which areas of background and foreground intermix. While going into
detail about tools and techniques one can use in Fluid Mask to deal
with these tricky sorts of images when making cutouts is beyond the
scope of this review, the value of this program is accentuated in its
ability to tackle them.

Happily, the Fluid Mask manual, which can be downloaded from the
Vertus Website, is very thorough and helpful in walking you through
both the basics and not-so-basics of using the program.
 When you are
satisfied with the cutout displayed in the Cutout view, if you're are
using Fluid Mask as a plugin, select Save and Apply from the File menu,
and your cutout will replace the contents of the layer active when you
started Fluid Mask. If you're using Fluid Mask standalone. select Save
(Ctrl-S) or Save As from the File menu. Fluid Mask can save in either
PNG or TIFF image file formats, or if you're using it in plugin mode
with Photoshop in many other formats.
When you are
satisfied with the cutout displayed in the Cutout view, if you're are
using Fluid Mask as a plugin, select Save and Apply from the File menu,
and your cutout will replace the contents of the layer active when you
started Fluid Mask. If you're using Fluid Mask standalone. select Save
(Ctrl-S) or Save As from the File menu. Fluid Mask can save in either
PNG or TIFF image file formats, or if you're using it in plugin mode
with Photoshop in many other formats.
To summarize, Fluid Mask 3 is a powerful tool that can save you a
ton of time if you work with image cutouts a lot, so as with the
substantial cost of say, Photoshop CS, Fluid Mask's price of $149
(recently reduced almost 40% from its original cost of $239) will be
repaid many times over through increased work efficiency. It can be a
very useful tool for nonprofessionals as well, but if you only work
with cutouts occasionally and casually, you might want to check out
Vertus' Bling It! application, which also does cutouts, for a more
modest price of $29.95. Both programs are available as 30-day demos, so
you can try them both out and compare how well they respectively meet
your needs before committing any money.
Low End Mac rating: 3.5 out of 4
A fully functional free trial of Fluid Mask
3 is available for immediate download.
System Requirements
Adobe Photoshop or Photoshop Elements (when using Fluid Mask as a
plugin)
Minimum OS requirements:
- Mac OS X 10.2.8 or higher
- 833 MHz G4 or higher
Windows
- Windows 2000, XP or above
- Processor speed 750 MHz or higher
- 512 MB RAM
- CD-ROM drive
- SVGA monitor with 24-bit color display
- Internet connection
Appendix: Setup Instructions for Fluid Mask with Photoshop
Elements
Fluid Mask 3 will work in Adobe Photoshop Elements 6, but the
product files require manually loading.
To install Fluid Mask into Elements these instructions:
- Double click the Fluid Mask file to start the installation
process.
- During installation, you'll come to a page where you have to
"Choose Photoshop Versions". On that page, select "Other".
- Click "Next".
- You will be asked for the Photoshop Plug-Ins folder in which to
install Fluid Mask. This is typically:
[your home directory] > Adobe/Photoshop Elements/Plug-Ins
or
[your home directory] > Adobe/Photoshop
Elements/Plug-Ins/Filters
Choose the appropriate folder and then continue with installation as
normal.

